Christmas tree - topiary. Master Class
New Year's topiary. Master class with step by step photos.
Author: Tyagina Tatyana Eruslanovna, teacher of kindergarten No. 7 of the Kiselyov city district, Kemerovo region, Russia.
The master class is designed for older children school age, teachers, parents and people involved in creativity.
Purpose: this master class is intended for making a tree of happiness - a topiary, which can serve not only as an interior decoration, but also become an excellent New Year's gift.
Target: making a New Year's topiary from improvised means.
Tasks: to acquaint with the technology of making topiary, to develop creative imagination, fantasy; instill aesthetic taste, develop hand motor skills, perseverance; to cultivate accuracy in the performance of work.
Initially, a topiary was a garden with ornamental trimmed plants and sculptures created from artistically trimmed trees. Topiary art has a long history. Yes, back in Ancient Egypt and Persia appreciated the ability to give bushes and trees geometric shapes. And the most famous example of a topiary garden is the Hanging Gardens of Babylon in Babylon - one of the seven wonders of the world. And now topiary (or European tree) is the name for small original trees, for the manufacture of which natural and artificial materials are used. The topiary is decorative in nature, and it depends only on the author's imagination what it will be made of. And the size of the topiary can be from 10-15 centimeters to half a meter.
Materials and tools for making New Year's topiary: small pot, branch or stick 40 cm, newspaper, thread with a needle, gypsum, artificial white fur, Christmas tree beads, artificial pine branch (brush) sold by the meter, wire cutters, scissors, glue gun, glue "Moment", decorative green and red ribbon, red bow, decorative silver branch, cones, white gouache or proofreader, a variety of New Year's mini toys.
Progress:
1. We make the basis for the topiary: we form a ball with a diameter of 10 cm from the newspaper and wrap it with threads for strength.

2. We make a hole in the ball, insert a branch and fix it with hot glue. We wrap the branch with green braid.

3. We fill the pot with diluted gypsum and immerse the base of the topiary into it. It doesn't take long for the plaster to set.


4. We decorate the trunk of the topiary with Christmas tree beads using glue.

5. Let's start making the crown of the topiary. We cut the artificial pine brush with the help of wire cutters into segments of 17 cm. It took 40 such segments for my topiary. It all depends on what diameter your ball will be.


6. Bend the pine pieces in half.

7. It turns out such fluffy lumps.

8. Using hot glue, we attach fluffy pine lumps tightly to each other on a ball. You need to start from the bottom of the ball.

9. It turns out such a crown.

10. Now we will decorate the crown of the topiary. To do this, you will need: cones, a corrector or white gouache, various New Year's mini-souvenirs, a decorative silver branch.

11. We cover the tips of the cones with a corrector (you can use white gouache).

12. Glue the colored cones between the pine branches.

13. We glue New Year's mini toys along the crown.

14. Glue decorative silver branches between pine trees. We cover the tips of pine needles with corrector or white gouache.

15. Let's start decorating the pot. To do this, you will need: white faux fur, red braid, large silver beads, a couple of New Year's mini toys (gifts), needles from a pine brush.

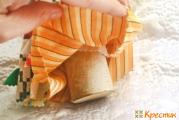
16. From white fur cut out the "fur coat" for the pot. The pattern depends on the shape of your pot.

17. We sew the grooves and with the help of hot glue we fix the “fur coat” on the pot. We tie the “fur coat” with red braid and decorate with a bow.


18. We put pine needles in a pot, then beads and gifts.


19. Lovely new year gift ready for friends and family.
Topiary is becoming more and more popular in interior design. These are small artificial trees made from various decorative materials. Paper, fabric, sweets, ribbons, artificial flowers can be used in the decor of topiary - everything that the author's imagination suggests.
New Year's topiary is a great idea for those who love needlework and new ideas. Topiary can be both an addition to the traditional Christmas tree in the decor of the room, and a fashionable alternative for those who want something new. Small bright trees will enliven the interior and enhance the feeling of a holiday. The article will be devoted to master classes on creating such New Year's mini-trees with your own hands.
A tree made by hand in a similar technique consists of four elements: a base, a trunk, a crown and a stand.
- A ball is taken as the basis of the topiary. It can be foam, polyurethane foam, cardboard figure, wire or made of papier-mâché. You can simply crumple the paper into a tight ball and wrap it with tape.
- To create a trunk, you need a strong wire that can withstand the weight of the base. The wire is decorated with a rope, ribbon, and can be covered with plastic, plaster or clay. A beautiful varnished tree branch can also be used as a trunk. If the topiary is small, then the trunk can be made from chinese chopsticks or wooden skewers.
- The crown is the most interesting detail of an ornamental tree. Ribbons, beads, paper flowers, coffee beans and seashells. But since we are creating a New Year's topiary, then the appropriate materials will be needed: Christmas decorations, balls, tinsel, cones, spruce branches, artificial snow, sweets.
- The stand for the composition is also different. It can be a flower pot, a bucket, flat stone or wooden beam. If the weight of the tree is large, then the stand should be massive and heavy.

Crown of New Year's topiary
The first master class will be devoted to creating a crown from Christmas toys with your own hands. For this you need:
- Christmas balls of a similar size and color,
- tinsel,
- fir cones, which can be covered with gilding or artificial snow,
- small branches with berries (you can take artificial ones),
- satin gold ribbons
- toothpicks for fastening.
Let's take a foam ball as a basis. To make the crown of a Christmas tree, you need each Christmas decorations and other decorative elements with a toothpick and glue to attach to the base without losing the shape of the ball. The gaps between the large balls are filled with small details, and so that the composition does not fall apart, you can glue the details together. Then it remains only to decorate the crown of the impromptu Christmas tree with ribbons and tinsel, you can spray some artificial snow. 
New Year's topiary using natural materials
created in the same way, but spruce cones serve as decoration. It is desirable that they are also the same size, and the space between them can be filled with small coniferous twigs, strings of beads or tinsel. Will look good in combination with big bumps very small plain Christmas balls. Cones for greater aesthetic effect can be covered with gold or silver. 
Topiary tree can also become good decoration New Year's interior. To create such a tree with your own hands, you will need spruce branches, cones, beads and artificial snow. It is better to take as a basis not a ball, but a cone, on which the branches will be attached, so that the tree looks like a real Christmas tree.
The crown in the shape of a Christmas tree can be decorated with fabric, sisal or felt will do. The fabric is attached to the base, then decorated with toys, threads, tinsel and other beauty. DIY Christmas tree is ready!

New Year's topiary tree can also be made from artificial coniferous branches, which are divided into small branches. The base is also taken - a ball or a cone, to which fluffy details are attached. Then it remains only to decorate the Christmas tree with toys, beads and small sweets.

Embroidered Christmas trees look unusual. To make them, you can sew together two pieces of fabric in the form of Christmas trees, stuff them with cotton wool to add volume and embroider with threads. You can embroider needles, and attach toys separately.
A master class on creating New Year's topiary from sweets is very simple. The base in the form of a ball or cone should be wrapped with green tinsel and, using toothpicks, attach various candies that will look like bright toys decorating a green Christmas tree.
You can use a combination Christmas balls and sweets, cones and sweets, fir branches and sweets. Any composition will look elegant and festive, and most importantly - appetizing.
Barrel for New Year's topiary
New Year Christmas tree master class continue ideas about what you can do with your own hands a trunk for a festive mini-tree.
- If the tree is small, you can take a few wooden skewers or Chinese sticks, fasten them together and decorate with a thick rope or satin ribbon suitable color.
- You can build a wire barrel, if necessary, connecting several parts if the wire is thin. Such a trunk is decorated in a similar way. The wire is convenient because it can be used to create not only straight, but also curved trunks: such trees look more elegant.
- Suitable as a trunk and an ordinary wooden stick found in the forest. You can pre-clean it and varnish it, give it desired color paint or decorate with ribbons. The length and thickness of the stick can be chosen depending on the overall size of the topiary.

Topiary base
There are many options:
- Styrofoam of any shape. This base is suitable for small light compositions.
- Cardboard stand filled with various fixing and decorating materials: needles, tinsel, cones, etc.
- Flower pot that can be decorated different ways. Suitable for more massive topiary.
- A glass, a mug, a vase, a jug, any vessel that is suitable in size for the composition.
- Small wicker basket.
- Stone or wooden block. But it is quite difficult to attach the trunk to such a base.

To fix the trunk in a pot or glass, you can use alabaster or cement mortar. This will also give the whole composition stability.
Topiary decor
A lot has already been said about decorating topiaries in our master class. As you can see, do-it-yourself decoration can be no less spectacular than that of professional designers.
There are many ideas for decorating New Year's topiaries.
- Decoration with Christmas balls. You can select balls by size, or you can use contrast, alternating large and small balls. Elements may be in the same color scheme, but 2 or more colors may be used. The combination of shiny and matte balls looks good.
- Tinsel . It can imitate spruce needles or serve as decoration along with other toys. The great advantage of tinsel in design is the variety of its colors and shapes.
- natural materials : spruce twigs and cones, acorns, small berries, leaves. Decorating models with coffee beans is not only beautiful, but also fragrant, and in combination with tinsel or pine needles, a wonderful Christmas tree. Tangerines and small lemons are used in the decoration of topiary, combined with pine needles, they create an excellent New Year's theme.
- edible elements : sweets with beautiful wrappers, cookies in the form of various figures and more. Such trees are not only beautiful, but also appetizing.
- Textile . It can be felt, satin, lace, delicate organza, flowing silk - it all depends on what image the designer creates.
- Ribbons and dainty bows - a win-win option in decorating topiary for the new year.
- Knitted elements . They can be knitted or crocheted. These are, for example, snowflakes, snowman figurines, Christmas decorations. It is rather difficult to tie such small figures, but this decor looks very beautiful and cozy.

A few ideas for creating New Year's topiary
Master class on creating a fragrant coffee Christmas tree
Coffee beans are glued onto a cone base, which is best painted brown. The grains are glued in random order, on either side. The main thing is that the whole space is pasted over. Next, the crown is varnished, then the coffee beans will shine. For decor, you can take lace and make small flowers out of it, the center of which is decorated with a bright red bead.
Several of these flowers are glued to the crown of the topiary. Between the coffee beans, you can stick a few beads and bows in red and white.

To fix the composition, you need to decorate the cup with lace and fill it with alabaster solution, fixing the trunk.
Creative master class on creating do-it-yourself candy topiary
The base-cone is decorated with a ribbon. A bell is attached to the top of the cone with a wire, the wire is also wrapped with tape. Candies are glued to the lower edge of the cone attached to the trunk. It is desirable that the rope and sweets harmonize in color. The space between the sweets is filled with tinsel and small silver-plated cones; you can also use small Christmas tree balls.

Ordinary pine cones can be a great home decoration with a little imagination and diligence. Looks very original topiary from pine cones made by hand.
The bud bleaching process is the longest and will take at least 4-5 days, including drying.
It will take much less time to make the same tree from cones. Decorate New Year's topiary can be a variety of decorative elements: pine twigs, small Christmas balls, ribbons, artificial snow, beads, etc. Your imagination is the best assistant and adviser!
In this case, in addition to cones, we will use sisal balls and small Christmas tree balls for the crown.
For the manufacture of New Year's topiary from cones You will need:
- Pine cones,
- sisal white,
- small Christmas balls - the color of your choice,
- planter pot or any other suitable container,
- strong wire (I use steel hangers),
- some round cable (0.5 m),
- building gypsum (alabaster),
- satin ribbon of a suitable color with a width of 0.5-1 cm (can be replaced with 100% cotton yarn so as not to fray),
- hot glue gun,
- scissors,
- round nose pliers and pliers (for working with strong wire).
Of course, you yourself can use your imagination and add any other materials, and you will get your own unique topiary tree.
It seems that everything is simple, but in fact, often, judging by experience, there are many questions, discrepancies and inconsistencies. To avoid them, and your tree turned out perfect, listen to my advice and carefully study the master class offered to you.
First, let's prepare the trunk.
As a trunk, decorative twigs (corelius), which can be bought at florist stores, or an ordinary branch of any tree can serve as a trunk.
In this case, consider the option of manufacturing a twisted stem for a topiary from a round cable and strong wire.
We take a strong wire (I have a metal hanger) and a round cable.
I pulled out the cores from the cable, which I replaced with a strong wire. The hanger can be straightened and cut off the required length with pliers.


We voluntarily bend. From below, I also bend the wire for a strong fixation in plaster. I made another additional decorative curl.


A decorative look can be given with a satin ribbon or yarn: we twist it in a spiral, periodically fixing it with hot glue. It's better to do it right away.

As a fixative, I always use building gypsum (alabaster).
The hole in the planter pot can be sealed with ordinary adhesive tape.


Building gypsum (alabaster) is diluted with cool water to the consistency of thick sour cream and put in a pot.

We set the entire composition in the center and hold until the gypsum hardens.


At the base of the crown is always a ball, which can be made of foam, foil, papier-mâché, newspaper, etc. Most importantly, the lighter it is, the better.
I have a crumpled ball from old newspapers, we wrap it with any thread.


We make a small hole in which we then fix the barrel with hot glue.


Cooking sisal balls. It is very simple to make them, we roll a small piece of sisal between two palms, just as we roll a plasticine ball in our hands.


We attach prepared sisal balls, cones and small Christmas tree balls to the crown base with hot glue.


We decorate as desired, and now we have an unusual, very cute holiday topiary - a decorative tree that will decorate the winter holidays!


Create with pleasure!
I was glad to help!
Despite the fact that the New Year is still far away, even now you can think through interesting and original ideas for gifts and decorations. The usual Christmas tree, garlands and pompoms, of course, is a good thing, but sometimes the soul wants something new and original. Recently, topiaries (fancy trees made from a variety of materials) have become very popular.
Such an element of decor can be put on a festive table, on a fireplace, a window, or used as a gift. So you can do DIY New Year's Topiary 2017 than immeasurably surprise and delight guests.
On the Internet, you will find many different variations to create this amazing item. In this article, we have included the most interesting and affordable ideas that anyone can do.
Topiary from Christmas balls
To make such a New Year's decor, you will need:
- Christmas balls of small sizes, matching in color with each other;
- The basis for the topiary (it can be made from papier-mâché or take a foam ball);
- Palua trunk;
- Flower pot;
- Floral oasis (sold in flower shops);
- Details for decor (tinsel, sparkles, bows, etc.);
- Glue gun.
Step 1. If you purchased a pot that does not fit the New Year theme, then you can decorate it with a bright satin fabric, for example, red.
Step 2 After that, a floral oasis should be placed inside the container. Suddenly, this is not at hand, then you can replace it with foam.

Step 3 The trunk of the future topiary must be fixed in the center of the pot. For such a stick, an ordinary strong branch or a cardboard tube is perfect. Decorate her beautiful ribbons and it will look wonderful. At the base you can put a shiny tinsel.
Step 4 Now you need to attach the same floral oasis or papier-mâché ball to the trunk. Let's say you use an oasis, then before inserting the balls into the base, you need to attach toothpicks to them.
Step 5 If large gaps are visible between large balls, close them with small balls, cones, bows or other decorative details.
Step 6 To keep the toys better, it is advisable to glue them together with glue at the end of the work.
Topiary from tangerine

You can make this craft from any other edible materials. Let's focus on tangerines this time, because they are an obligatory attribute on the New Year's holiday.
To make a tangerine topiary, you will need:
- Tangerines;
- Twine or any other decorative rope;
- Flower pot;
- A branch or snag on which the ball will hold;
- Scissors;
- Styrofoam or floral oasis;
- Christmas tree branches or mistletoe for decoration;
- Hairpins for strengthening tangerines;
- artificial snow;
- PVA glue.
Step 1. First of all, you need to wrap the tangerines with twine or that decorative rope that you have in store.
Step 2 Coat the ends of the pine branch with PVA glue and lightly dip in artificial snow.


Step 3 From a floral oasis, make a cone so that it sits easily but tightly in a pot.
Step 4 This part of creating a tree is the most difficult and responsible, so be careful. Insert the branch into the oasis so that it does not dangle. At the top, fix the second piece of the oasis, giving it the shape of a ball. Thread hairpins through tangerines and stick them into the oasis. Decorate the gap between the fruits with leaves.
Step 5 At this stage, the manufacture of the topiary ends!
Candy Topiary

Topiary of candies will be an excellent festive one. It will be great if you find red and white lollipops, but others will do. The main thing is that they are bright.
To make candy topiary you will need:
- Styrofoam ball;
- Beautifully curved stick for the trunk (you can take a regular cardboard tube);
- Satin ribbon for decoration;
- Styrofoam cube;
- Flower pot;
- multi-colored pebbles;
- Adhesive tape to match the candy;
- 300 grams of lollipops.
Step 1. Dip a Styrofoam cube into the pot and insert a stick into it to hold the candy ball.
Step 2 Cover the base with cardboard, as shown in the photo.
Step 3 Take a styrofoam ball and cover it with duct tape, on which later attach the lollipops. Of course, you can do without the tape and stick the candies with hot glue, but then you will have to decorate the gaps with additional details.
Festive topiary

This workshop shows how you can make a candy topiary in just a slightly different style.
To make a topiary you will need:
- Styrofoam;
- Candies;
- Wire;
- Cable;
- Decorative details: buttons, balls, ribbons, flowers.
Step 1. Wrap cable decorative tape and make a tourniquet.
Step 2 Take the wire and attach a small bell to it, then you can also wrap it with decorative tape, fix the end firmly.
Step 3 It is necessary to make a cone from foam plastic (it will be the base of our Christmas tree). Glue the sisal thread at the bottom and start wrapping the product. Note that their sisal topiary always looks attractive.
Step 4 Try to wrap the cone tightly, occasionally smearing the base with glue.
Step 5 At the top you should attach a wire with a bell. Just insert it inside the cone. Bend the end a little.
Step 6 Insert the cable into the lower part and only after that start decorating the product with sweets.
Step 7 Take a small glass, fill it with a floral oasis and insert a New Year's product into it.
Step 8 As a decor, use your existing beads, rhinestones, tinsel, bows.
Topiary “Cockerel”

As you know, 2017 will be the year Fire Rooster. For those who want to truly surprise guests, we suggest paying attention to this one. It tells how you can make a New Year's cockerel with your own hands. Topiary is easy to make and will not take you much time.
To make the topiary "Cockerel" you will need:
- Textile different colors and invoices;
- Satin ribbons;
- Scissors;
- Pattern cockerel;
- Pot;
- Two thick wooden skewers;
- artificial grass;
- Product filler.
Step 1. Print out the pattern below. You can use different patterns, the main thing is that the cockerel looks beautiful and festive. Attach the pattern to the fabric and mark the borders of the product. The photo shows that the top of our cockerel will be made from one fabric, and the “panties” from another. Having finished cutting out the parts of the product, you must stitch them from the wrong side.
Step 2 Each of the sticks on which the rooster is located should be wrapped with the remnants of the fabric and stuck into the toy. Sew the holes carefully.
Step 3 Attach the wings. Draw the eyes, a slight blush. You can make a tail out of bright satin ribbons.
Step 4 Sew on the beak, and at the top you can attach a crown or scallop.
Step 5 You can pour a little earth into the pot, and add gravel on top. Decorate it all with artificial grass. Hang a soft egg on one of the wings. New Year's typiary is ready! With this product, you can fantasize and add new details - it will still turn out to be cute and festive.