DIY Baba Yaga master class, fairy-tale character. DIY Baba Yaga from paper DIY Baba Yaga in a mortar
Baba Yaga is a well-known character from fairy tales, whose image is very often reproduced in creative works children and adults. Making Baba Yaga quickly and easily with your own hands is quite simple, you just need to choose the materials suitable for making and ask for help step by step lessons presented in this article.
A handmade craft in the form of this controversial character will be an original gift for lovers of fairy tales, and can also become an excellent home talisman.
We make a fabulous Baba Yaga with our own hands from natural materials
This manufacturing option can be offered to a child in primary school. The materials used here are simple and familiar, and the work itself does not involve the use of complex techniques and schemes.
You will need:
1) Plastic cup;
2) Plasticine, stack;
4) Twigs, pine needles, cones;
5) Ready eyes;
6) Part for the nose (you can use pasta);
7) Thick thread or yarn.
Stages of work:
1) First of all, we create a stupa for Baba Yaga. To do this, cover the glass with a thick layer of plasticine. If you don’t have a ready-made container, you can cut it out of a plastic bottle.
3) Now we start making the body from the cones. We take a large part and secure it in a cup at the bottom using a piece of plasticine. Do not glue on top big shot, which will be the head of Baba Yaga.

4) We form hair from yarn or thick thread, attaching it to the head with glue. Then, using plasticine, we complement the craft with eyes and a nose made from pasta.
5) Let's start making hands. To do this, carefully break two small sticks in the middle, strengthening the cracked area with plasticine. Glue it to the body. We make brushes from plasticine, cutting out fingers using a stack.
6) To make a broom, just tie pine needles to a small branch. And insert the blank into the hands of Baba Yaga.
That's all, simple craft Baba Yagas in a mortar are ready!

MK on making amulet dolls for beginners
This master class will tell you how to make a doll-amulet in the form of Baba Yaga from fabric.
You will need:
1) Light fabric;
2) Thick fabric;
3) Sticks, twigs and dry grass;
4) Scraps of multi-colored fabric, including fur or fleece and burlap;
5) Any filler.
Manufacturing stages:
1) Cut out a flap for the face from light fabric. We put a piece of stick there and wrap it with thread, forming a nose.
2) Then we put the filler on the piece with the nose and also use a thread to make a head, which we then wind to the base branch.
3) We make a support from thick fabric, twisted and attached, starting from the end of the stick opposite the head.

4) Cut a small rectangular piece of light fabric and fold it lengthwise 4 times, then fold it in half. These are blanks for the doll’s palms, which we attach to the sleeves.
5) Turn the sleeves inside out and wrap them around the neck. Next, attach the undershirt in the same way.
6) Now we form the outer skirt from scraps of different fabrics. We make an apron from burlap. We make a padded jacket from a piece of fur or felt.
7) We form hair from threads, attaching most of them to the back of the neck. We attach a scarf to the head.
8) We make a broom by tying dry grass to a small stick. And we give it to the doll.  Crafts using the stocking technique will require some time and patience from those who want to make it.
You will need:
2) Foam rubber;
3) Sintepon;
4) Wire;
5) Scissors, wire cutters;
6) Hair;
7) Pieces of various fabrics;
8) Threads, thick needle;
9) Buttons.
Step-by-step instruction:1) Take a small piece of foam rubber, wrap it with padding polyester, increasing the required volume. This is the head of the future doll. Cut off the sock from the tights and pull it onto the resulting soft piece.
2) Make a hooked nose from wire, forming two wings. We wrap the workpiece with padding polyester and push it towards the head under the nylon, determining its location. We finish shaping the nose with the help of weights.
3) We place pieces of padding polyester under the nylon head in the places where Baba Yaga’s cheeks, lips and chin will be located. We shape the mouth by piercing several holes under the lower lip using a thick needle. We tighten where necessary.
4) Take a button, cover it with nylon and prime it with white paint. Let's draw an eye. Then we attach the eyelids, cutting off a fairly large piece of nylon for the top one. We sew the blanks into place.
6) Now we make the body, similarly forming a wire frame (see photo below). We also wrap it with foam rubber, create the required volume using synthetic padding and stretch the nylon on top.
This is the kind of original Baba Yaga made from tights that you can end up with!
Video materials on the topic of the article
Below is a selection of videos with training lessons on making Baba Yaga from various materials.
Who doesn’t know Baba Yaga, the heroine of many Slavic fairy tales? The hunchbacked old woman is capable of intimidating children with just her appearance. The description of Baba Yaga’s appearance is truly memorable:
- a hooked nose can smell an uninvited guest from a distance,
- the bone leg allows the heroine to stand in the world of the dead,
- long shaggy and White hair indicate that the hostess has lived in the forest for at least 300 years.
In autumn, children create wonderful crafts from natural materials. These could be hedgehogs, owls, spiders and other animals. Nuts and chestnuts are used in their pure form, and sometimes the basic materials are supplemented with seeds and berries. How to make Baba Yaga from pine cones? Today we will show you one of the options for making a popular fairy-tale character.
So, let's get ready for work:
- - Pine cones,
- - gnarled branches and twigs,
- - ash seeds,
- - plasticine for joining craft parts,
- - autumn leaves to create a forest setting.

The big bump is Baba Yaga’s body, and the small one is the head. By the way, the shape of the cone is quite similar to a dress. Probably, forest dwellers wear only such clothes.

Let's sculpt eyes from multi-colored pieces of plasticine for crafts. Break off a twig about 0.5 cm from the branch to get a hooked nose. The job is quite doable.

After attaching the parts to the pine cone, let's think about how to design Yaga's shaggy hair. There are two options here:
- sculpt thin strips of white plasticine,
- Attach a bunch of ash seeds to the top of the cone.

Baba Yaga's head is ready.

You can attach the part to the body by first decorating a large bump autumn leaves(cut into thin strips).

This is what an old woman looks like dressed in colorful rags.

We will make the hands of the sinister heroine from branches. Traditionally, we attach them to the body with plasticine.

By the way, it is difficult to imagine Baba Yaga without her magical attributes. What is it about? About a mortar, broom or shovel, on which an old woman puts naughty children and sends them to the oven.

Baba Yaga is one of the most striking fairy-tale characters. All the children love her very much and are not afraid at all, despite her harsh appearance. In all the fairy tales in which this terrible old woman is present, she has never really harmed anyone. The smallest children can deceive her and run away. And she, having a flying magic broom, cannot catch up with anyone.
The favorite heroine of fairy tales is often drawn and depicted in their crafts by children of both senior preschool and junior school age. In our article we will tell you how to make Baba Yaga from pine cones, what you need to prepare for this, what additional details will be needed to complete the image, and how to fasten the elements together.
Craft materials
In order to create the image of a fairytale old lady, you need to find a large fir cone. It is long and suitable as a torso. You can choose sticks of the same size for your hands. These can be whole branches, then the arms will not bend. But you can make them bent at the elbows. Then you will need four short sticks and plasticine to fasten them together.
The head of the “Baba Yaga made from cones” craft can be made from any natural material rounded shape. It could be a chestnut, a walnut, a small pine cone. Spruce trees, even small ones, have an elongated and pointed shape, while pine cones have a rounded shape. WITH back side All the scales are adjacent to each other, resulting in a dense round part on which all other parts of the face can be perfectly placed.
Small parts
Baba Yaga should also have a face and hair made from cones, you can even prepare a scarf for her. After all, Russian women used to wear headscarves, and our old lady is a resident of the Russian forest, so she should also be the owner of such a headdress. If the head is made of chestnut or walnut, then it will be enough to make eyes from plasticine or appliqué. To do this you need to take two small ball white plasticine and attach to the top of the chestnut; two more black or brown balls, only smaller in size, cling to them on top.
If you decide to make Baba Yaga’s eyes from pine cones using the appliqué method, then you need to cut out two white circles and draw dots on them with a black marker. Then glue it at eye level onto the chestnut or nut with PVA glue.
If the head is made of small pine cone, then you can cover the entire “face” with yellow or beige plasticine, and place the eyes and nose on top of the leveled surface. Then the role of eyes can be played by acacia seeds or buckwheat.
The nose can be created from a piece of plasticine, as well as other materials. A small acorn, a piece of a branch, or a hook-shaped pasta will do.
Hair and headdress
Hair for Baba Yaga from pine cones is made from natural hemp ropes, threads from a skein of yarn suitable color, straw. The easiest way is to make a tassel from threads or ropes. To do this, you need to wrap several layers of yarn on a cardboard template. The more threads there are, the more magnificent the old lady’s hair will be. Then, on one side, all the threads are gathered with a simple cotton thread into a knot, a couple of turns are made around the top of the tassel to keep all the parts together. On the opposite side, sharp scissors are used to trim the edges evenly so that the threads are all the same length. Then the hair is attached to the top of the head using PVA glue.

A scarf for Baba Yaga made from pine cones is made from a piece cotton fabric. Draw a template on cardboard triangular shape. It should be an isosceles triangle, where the base is made long, so that later the scarf can be easily tied around the head. Using the template, outlines are drawn onto the fabric and cut out with scissors. All that remains is to tie it on your head. If the threads on the fabric split after cutting, you can burn the edges with a candle or lighter.
Assembling the Parts Together
To make a figurine of Baba Yaga from pine cones, you need to fasten all the parts prepared in advance together. To do this, you need to take a large piece of plasticine and roll it into a round ball. Stick it on top fir cone, and the head is placed on top, which we have already made separately. If your arms are bent at the elbows, then you need to connect two small sticks or twigs at an angle with plasticine. Then balls of plasticine are attached to the neck area on one side and the other. Hand sticks are inserted into them. You can also decorate the lower part with plasticine. There will be a palm into which you can insert a broom.
How to make a broom for a fairytale forest old lady? It is not difficult. You need to take one long branch, slightly larger in size than the character figurine. To create the broom itself, you need to collect thin branches of the same length from the bushes. A bunch of thin ones are folded around a large branch and tied tightly with a simple cotton thread. You need to wind several tight turns so that small branches do not fall apart. The finished broom is placed in a mortar or in the hand of Yaga.
Stupa materials
It is impossible to imagine a forest dweller without her main flying attribute. Of course, next we will talk about the stupa. What is she? This is a large round container that resembles a bucket. It is made of wood. Yaga, when she needs to go in pursuit of someone, gets into it and flies away. Baba Yaga from pine cones in a mortar will not work if you miss this detail in her fairy tale image. The stupa is made from a paper or plastic cup, which serves as a basis for further application of natural material.

It can be covered either with bark from a tree, planting it in a circle on glue, or with twigs. You can also wrap the cup in burlap and tie it in a circle with twine. It will also turn out original. Now let's take a closer look at making Baba Yaga from pine cones in a mortar. The photo below shows how to do this.
How to make a stupa from twigs?
Paper disposable cup You need to paste it around the circumference with brown plasticine, covering the entire surface. This is necessary so that the branches do not fall out of the mortar. Then thin branches of the same size are attached one by one, pressing into the plasticine mass with light hand pressure.

All that remains is to tie the branches from below and above with twine. You can take a simple rope, or you can take a contrasting bright yarn, for example, red. When the flying object is made, Baba Yaga is carefully placed in the mortar. That's it, the craft is ready.
Surely Baba Yaga is one of the most recognizable fairy-tale heroes. Despite its harmful nature, it is worthy of reproduction in children's creativity. As you know, Baba Yaga is a forest dweller. There is a lot of natural material in the forest: cones, twigs, berries. Using such affordable materials, you can easily make a craft with your own hands, and our Baba Yaga will be kind and not dangerous.
Tools and materials:
Twigs;
- unopened cones;
- plasticine;
- barbecue stick;
- straw or twigs from a broom;
- Knitting;
- scissors;
- pruning shears;
- cardboard;
- glue;
- tree leaves;
- autumn berries;
- a cap of hairspray.

DIY craft from pine cones: Baba Yaga
Let's start by making a stupa. As a base, I used a cap from hairspray; you can also take such caps from a used air freshener. Or you can take a small one a plastic cup for flowers or cut half off a toilet paper roll. Using pruning shears, we cut off several branches, the length of which is equal to the height of the cap. We glue the branches to the cap, which is convenient to do using a glue gun or “Moment” type glue.

Take two unopened pine cones different sizes and glue them together (by the way, in order for the cones to be preserved in this form, you should either coat them with glue and let them dry, or store them in the refrigerator until they are needed to create crafts).

Let's start making Baba Yaga's face, for which we make a mouth from red plasticine (roll up a flagellum and fold it into a “moon”), from yellow plasticine we sculpt a nose with a hook and make eyes from white circles on which black balls are stuck.

To disguise the joint between the cones, we will make beads for our Baba Yaga. The easiest option is to roll balls of orange plasticine and attach them. Beads can be made from paper or rowan.

We put used plasticine at the bottom of the stupa and insert the body of Baba Yaga into it (you can fill the granny there with plaster, but this option is more difficult).

We make arms from twigs (first we connect two twigs perpendicularly using glue gun - we get a bent arm, and then we glue this arm to Baba Yaga’s body).

We make a bunch of knitting threads and glue them to the top of the top cone-head. 
We take a kebab stick and tie several branches from a broom to it to get a panicle. 
Cut out a circle or square from cardboard and cover it with leaves. 
We insert the resulting panicle into the mortar (the panicle is also fixed in the mortar using plasticine), glue the mortar with Baba Yaga into the middle of the circle (square) with foliage. We make a few bright accents and glue rowan or viburnum berries near the stupa.
Greetings to all blog readers! Today is a handicraft lesson from our sorceress Svetlana Averina, who will tell and show in detail how to make a Baba Yaga craft from natural material, adding to this: “This is the third time I have helped my children participate in a competition of crafts made from natural material. We made swans from pine cones, and we had hedgehogs from chestnut shells. This time we decided to make a Russian fairy-tale heroine folk tales Babu Yaga. I’m sharing with you a step-by-step master class on how to make this fabulous forest dweller.” Similar family activities develop children's creative thinking, imagination, fine motor skills hands, perseverance and attentiveness. We also recommend watching step-by-step master class how to do
Natural materials and tools:
- Cones (spruce and pine) with a tail
- Twigs from larch or any other tree
- Rowan berries
- A plastic cup
- Leg-split
- Sackcloth
- Threads
- Glue, plasticine, scissors
- Pasta "horns"
How to make Baba Yaga with your own hands:
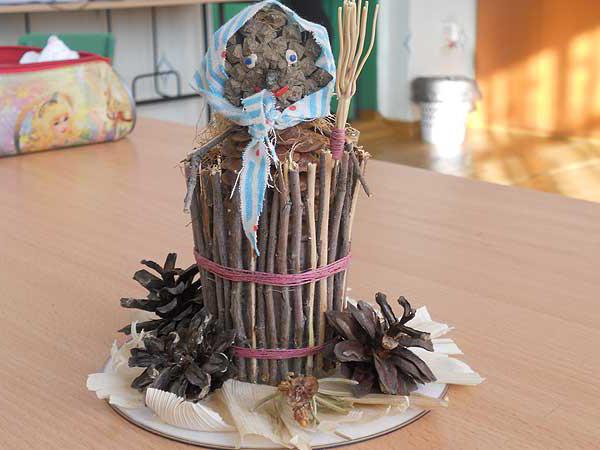
 We begin to make a stupa for Baba Yaga. To do this, coat a plastic cup with PVA glue and wrap it with twine from bottom to top. Let it dry.
While the aircraft is drying, let's make an old woman's head and torso from pine cones and plasticine.  You need to carefully place the pasta on the tail of the pine cone. This will be a hooked nose.
We sculpt eyes and a mouth from plasticine. 
You need to collect beads from rowan berries. To do this, use a needle and thread to plant berries and decorate Baba Yaga’s neck with them. My son easily coped with this part of the work. 
We insert the branches into the plasticine. They will be hands. 
By this time, the mortar has already dried from the glue. We put a piece of burlap in it and secure it with twine. 
Baba Yaga must be held steady in the mortar using burlap. But is something missing for the image?! Yes, hair! 
To make it we use twine. Cut small pieces and bend them in half. We bandage the fold.  Well, now it’s a different matter! We put our Baba Yaga in a mortar. For a complete fairy tale set, a broom is not enough. It is made from thin twigs.
Here she is, cute and not at all scary, everyone’s favorite fairytale Baba Yaga!
Inspiration and flight of fancy!
For viewing we offer a master class on making funny hedgehog DIY pine cones from the Niki Junior channel


