How to braid a 3-strand braid. The simplest braids: four strands, French braid, dragon, tourniquet, chamomile, crown, headband
In addition to the fact that this hairstyle looks neat, beautiful and aesthetically pleasing, it is also practical, which is especially important when it comes to children who rarely sit in one place. Any other styling will quickly fall apart and lose its original appearance.
Despite the variety of types of weaving, there are some standards and principles that remain unchanged - these are the so-called blocks. Each of them has twists of strands and their weaves that are characteristic only of a particular hairstyle. Once you have mastered several techniques, you can combine them.
Some braids for girls are most popular due to the ease of weaving, others are less popular due to the complexity and time required to create them. However, you can easily find 100 hairstyles with step-by-step photo instructions.
Rules for weaving with ribbons
Ribbons give the hairstyle originality and attractiveness.
When using tapes, it is important to remember the following points:
- Typically used narrow satin ribbons. Wide ones are rarely used.
- To make the image harmonious, special attention should be paid to the color of the ribbons.
- Before weaving, the ribbons are attached with invisible threads to the hair at the base.
Classic three-strand
The classic version is woven from three strands, which are alternately superimposed on one another.
Braids for girls - 100 hairstyles traditionally start with the usual well-known three-strand braid, which even children can weave
Two three-strand braids
This is a favorite hairstyle of little girls. The basis of weaving classic scheme, only the hair is divided into two parts along a straight vertical parting and braided on both sides.

Two braids crossed at the back of the head

Two braids with doodles

Braid horns

Two bundles of three-strand braids

Ponytail
 Ponytail braid: braiding pattern using elastic bands
 Three pigtails from the tail
This hairstyle resembles the previous one, with the only difference being that here three braids are woven from a ponytail gathered at the top or back of the head.
"Harvest"
For this hairstyle, all the hair is gathered into a ponytail, from which at least 10 braids are braided. Then they are secured with bobby pins, tucked under an elastic band, and the result is a slightly untidy, but this makes it even more romantic and original cocoon.
Fish tail
Braids for girls (100 hairstyles with step-by-step photo instructions are presented in this article) are made using a variety of techniques.

For a fishtail hairstyle, the hair must be smooth and manageable, so it is lubricated with conditioner or water. The work begins at the temples, where two strands are taken from. They cross at the back of the head, the left under the right.
Left is taken extra strand and crosses with the right one so that the new strand is at the bottom. Next, the strand is taken from right side and then the entire “fish tail” is braided using this technology.
French or spikelet
Weaving starts from the crown. A large curl is divided into three parts, and the work begins with braiding the usual classic version. Then they gradually begin to weave in the hair from the sides.

Three French braids - dragon
 The “dragon” hairstyle can be made from either three, two or four reverse French braids.
 French Falls
Take 4 strands of the same volume at the temple, with the exception of 2, which should be slightly thinner than the rest.
Weave according to this pattern:
- 1st under 2nd and on top of 3rd;
- 4th under the 3rd and on top of the 2nd.
Then a little hair from the total volume is added to the outer strand.

- 2nd above 3rd and below 4th;
- then the 1st strand is removed to the side, and instead of it a curl is taken from the total mass;
- the new one is carried out under the 3rd and above the 2nd.
They weave according to this pattern, but additional hair is taken not only from below, but also from above.
Waterfall from braids
The technique is the same as in the previous version, but those strands that fell freely down in the previous hairstyle are now braided into small braids.
Multi-row French waterfall

Two French braids joined into one  Two French braids intertwined in a crisscross pattern
Two braids crossing at the neck area look very original. In order to braid such a hairstyle, you need to divide your hair into 2 parts along a vertical parting, and then divide each part into 2 more parts, but along a horizontal parting, that is, separate the top from the bottom. For convenience, all parts can be secured with rubber bands.
Weaving starts from the top left strand. It is based on the French technique with a one-sided grip. Having reached the middle, it is fixed with an elastic band. The upper right part is braided in the same way and is also secured with an elastic band in the middle.

Two French braids with hair added on one side
Another interesting weaving option french braids- this is with gradual weaving of hair into a braid on only one side.
Circular French braid
 Snail Scythe
 Basket
By appearance resembles a wicker basket. Before starting work, the hair is distributed evenly from the crown. The basis is French technology.

The braid is braided from the crown in a circle and only with outside. It should braid the entire head, and the remaining hair is braided either in a regular braid or carefully secured with hairpins.
Milkmaid's braid (around the head)
One of the most simple hairstyles, the creation of which will require a minimum of time. The hair should be parted down the center. The parts should be approximately the same in volume.

Each is braided separately, and then they are connected crosswise at the top of the head, one on top of the other, secured with a hairpin and the hairstyle is ready.
Four-strand
Strand counting starts from left to right. The 3rd is placed on the 2nd and brought under the 1st. The 2nd is placed on top of the 4th and brought under it. The 4th is carried out between the 1st and 2nd, and is brought under the 3rd. 2nd. pass under the 1st and throw on top of the 3rd. And further according to the same scheme.


Four-strand braid with the main 3rd strand
The 3rd strand is taken as the central one, i.e. all weaving is carried out around one strand, and it itself is not involved, therefore in finished work the accent is clearly visible.

Four-strand braid with ribbon

Five-strand
It is best to learn how to braid this option from the tail, and in the future you can do it without it.
The tail is divided into 5 strands (counted from left to right) and braided according to the pattern:
- 5th above the 3rd and below the 4th;
- 1st above 3rd, below 2nd;
- 5th above 4th, below 3rd;
- 1st over 3rd, under 2nd.


Spit - Hollywood wave

Double Hollywood Wave

With elastic bands
Braids with elastic bands are one of the favorite hairstyles for every girl. 100 hairstyles with step-by-step photos clearly convey the process of creating a hairstyle.
The most popular are two options: with a throw and with a thread. The basis is a high ponytail. It is divided into 4 parts, 2 side parts are connected at the top and tied with an elastic band. Divide the strand that remains below into 2 parts, throw them on top, connect them and also fix them with an elastic band. And so on until the end.
In the case of threading strands, the principle is approximately the same, but the technology is slightly different. The hair is not divided into two parts, but not into 4, that is, the top is separated from the bottom. They are alternately threaded through one another and secured with elastic bands.
Spiral (twist) or harness
Each strand (and there can be from 2 to 6) is twisted into a spiral and then intertwined with each other. An important point is that you need to twist the bundles tightly, otherwise everything will fall apart.

French style twist
 Braid twist
  Braid with elastic bands with the addition of two twist braids on the sides
A braid or twist can also be woven into one using elastic bands.
Malvinka from two braids
 Malvinka with one braid
  Hairstyle made of braids and crossed strands a la French braiding
 French braid beard
 Swiss
Swiss
The principle of weaving is the same as in the classic version, the only difference being that each strand is twisted into a strand.

Classic, spikelet or fishtail in tail
This type of hairstyle involves braiding using one of the techniques, but the hair is not loose, but tied in a ponytail.
Braid in braid
This hairstyle looks good on thick long hair. On the crown you need to make a parting that looks like a triangle, the tip of which looks inward. The hair of the selected triangular area is braided using reverse technology. And the remaining hair, gathered into a ponytail for convenience, is threaded through those that are braided and secured at the top.

After the base is braided, unfasten the threaded curls and braid them into a braid that runs right down the middle.
Snake
The work begins with dividing the hair along the side parting. From a small strand separated from the front, a French purl braid is made. Picking up is carried out only from one, external, side.

Next, the weaving turns in the other direction, and the pick-up is done on the other side, having reached the opposite edge, it turns around again and the side of the pick-up also changes. Thus, the braid is woven to the bottom and looks like a snake.
French inside out (Dutch, Danish)
Hair is lubricated with conditioner to make it soft. Weaving starts from the crown. You need to take three strands and start braiding a regular braid and add loose hair to the strands as you go.

But if in the classic French version the strands overlap each other, then in this variation, on the contrary, the strands are wound under each other.
Diagonal Danish braid

Fishtail over French braid
 Fishtail over French braid: braiding pattern
 French inverted
The work begins not from the top of the head, but from below the neck and braids upward. The remaining hair on top is either shaped into a beautiful bun or hidden inside.

French inverted, along the parting and diverging to the sides on the forehead
Weaving begins slightly above the back of the head. First, two partings are made in such a way that a triangle is formed, the sharp end of which is located above the back of the head, that is, at the beginning of the weaving. The selected strand should be of such volume that it can be divided into two parts.
Weaving is carried out towards the face. At the base of the forehead, the strand is divided into two parts and thin braids are braided from each. One is wound through the left side to the back of the head, the second through the right, and there they are connected.
Bun with a regular braid
Hair should be below shoulder length. They need to be combed well and tied in a high ponytail. Then they are wound onto a hairpiece designed for creating bun hairstyles (can be purchased at any specialty store).

Bun with two inverted braids
Braids for girls (100 hairstyles with step-by-step photos demonstrate that anyone who has a clear example of their implementation can master a hairstyle of any complexity) should be able to be braided by mothers who have daughters growing up.

The bun is done in the same way as in the previous hairstyle, but first, reverse French braids are braided on the sides, starting from the temples. Their ends are tied into a ponytail at the back of the head. Next, a bun is made, but in this case, the ends are not braided, but hidden inside the bun and secured with invisible hairpins. This hairstyle looks more festive and elegant.
Five-strand braid with ribbons
One of the most popular options with ribbon is five-strand. Here two ribbons are used, which are woven so that in the finished braid they are placed in the middle of the weave.

Eastern
This is a lot of small braids all over the head. This hairstyle is quite practical and convenient, because if the weave is more or less tight and well secured with elastic bands, then you can wash your hair without even unraveling them.

Bun
One braid is braided at the back of the head using a small amount of hair. The second is made from the remaining strands and is curled around the first in a ring, forming a bun.
Weaving with elastic bands
Braids for girls (100 hairstyles with step-by-step photos - a necessary guide for a beginner) are often woven using elastic bands, hairpins, and ribbons.
The required number of rubber bands is 11 pieces. The parting is not done in the middle, but slightly to the side. On the side where there is more hair, 4 horizontal partings are made, and these strands are tied into ponytails. The second and third tails are divided into 2 parts. Then the first ponytail and half of the second are joined together and tied with an elastic band, forming a new ponytail.

The same is done with the second half of the second and half of the third, and the second half of the third and fourth. Thus, you get 3 tails. Next, the first and half of the second, as well as half of the second and the third are also joined together, and you get 2 ponytails, from which ordinary Russian braids are braided.
Headband
The name speaks for itself - the finished hairstyle is a kind of headband around the head. The parting is done horizontally in the front of the head so that only the frontal area is involved in the hairstyle.

Weaving starts from the temple using the French technique. Loose hair is usually braided into a classic braid.
Roman mesh
The hair is divided into two parts using a horizontal parting. We separate a curl from the resulting parting, but not straight, but slightly slanted. French braid so that it goes obliquely. Then another curl is separated, but with an inclination in the opposite direction.
Heart
This hairstyle can have two options: when all the hair is involved and when not all the hair is involved.
Option 1
2 partings are made - horizontal and vertical so that you get 4 squares. Weaving starts from the lower middle edge of the upper right square (where the partings intersect), using the French braid technology with a fence of curls on both sides. Weave diagonally, that is, from the corner upwards, then round off the weaving, move to the lower right square and weave diagonally downwards.

The same is done with the other side and connected at the base of the neck. You can secure it with an elastic band and make a tail, or you can continue weaving and twist the tails of both braids into strands and intertwine them together.
Option 2
Make a vertical parting - from the forehead to the crown. Start weaving on the right side from the middle of the parting. Weaving – french braid with one-sided (external) grip.

As we weave, a heart shape is formed. The gripping is stopped shortly before the end of weaving. On the other side, do the same and connect them at the back of the head, leaving the end free. The lower hair is left loose.
Herringbone
The hairstyle has this name because the parting is made in the shape of a Christmas tree (zigzag). The braids start from the middle of the head, that is, from the narrow ends of the Christmas tree and diverge to the sides. At the end they can be tied into a ponytail.

Loop or flower in French technique
Braids for girls (100 hairstyles with step-by-step photos give you a choice) often help out those who want to create a fashionable but comfortable hairstyle.
This weaving, if you look at individual elements, resembles a loop, and if you look at the composition as a whole, it resembles a flower. The parting is done crosswise, resulting in the formation of 4 sectors, in each of which a braid will be braided in the form of a loop.
A curl from one sector begins to be woven from the crown using the French braid technique, smoothly rounding it until a loop is formed. And so on in all four sectors. The loose ends are braided in a classic style and gathered into a ponytail. The braids in the ponytail are intertwined and look like a twist braid.
Flower from a three-strand braid rolled into a snail

Headband in French technique with a flower
A waterfall from a three-strand braid from one temple to another with strands passed into each link after weaving the braid.
Two waterfall braids on the sides and a fishtail in the center
Two braids are woven from the temples using the technique french waterfall, which are then combined into one braid - a fishtail.
Malvinka, complemented by braids decorated using the technique of “a strand in each link”

Malvinka of two strands, decorated with knotted weaving
In this hairstyle, strands braided using the malvinka technique are gathered into a kind of knot.
Malvinka made of two braids braided using the French technique

Ponytail with two braids braided from part of the hair
To ensure that the hairstyle looks neat and the braids do not fall apart, the ends of the hair are secured with an elastic band, also capturing unbraided hair.
Heart of two thin braids (based on malvinka)
This hairstyle has many similarities with the first version of the “heart” weave.
Two twist braids combined into one with a bun
Two twist or plait braids are woven from the temporal lobes, which are connected into one at the back of the head, after which this braid is twisted into a bun and secured with hairpins.
Waterfall braid with French braids
A horizontal waterfall braid is woven from three strands. The strands coming out of it are divided into two parts and two one-sided French braids are woven from them, weaving one strand each time. The ends of the braids are secured with one elastic band.
Trefoil braids

Ponytail braid with added strands
The technique is reminiscent of French. First, the tail is made, it is divided into two strands, one additional strand is added to each on both sides, twisted once and secured with an elastic band. Then they repeat the same thing.

Malvinka-based braid knots
First, the braids are woven according to the braid principle, which are then gathered into knots and secured with hairpins.
Double twist ponytail braid with two three-strand braids on each side
This hairstyle combines two types of weaving - a twist or plait and a regular three-strand one.
A braid from the temple with strands added at the end using the French technique on one side
It's essentially a side French braid style braid. You can braid either a regular French braid or a reverse braid (inside out).
Greek braid

Greek braid with loose hair
This version of the Greek braid is suitable for festive events.
Two French braids with the addition of strands from the temples based on Malvinka
Using the Malvinka technique, two French braids are woven, which are then joined into a ponytail.
Tail braided with a braided mesh in a circle

Two crossed one-sided braids from two ponytails on the top of the head
This hairstyle is neat and practical, because it collects all the hair, which is convenient for the child.
Hair bow with braid

Snake on loose hair

Heart with a tail
First, a regular tail is made. Then the bottom strand from the ponytail is threaded under the elastic and pulled up.

Divide it into two strands and braid one braid from each. The ends of the braids are secured with an elastic band under the ponytail.
Bunch of several braids with a donut

Two three-strand braids with small braids woven in
First, you need to part your hair in half, then braid several three-strand braids on each half. Then use these small braids to braid two three-strand braids on the sides. Small braids are woven using the French technique.
Two one-sided French braids, braided from the temple
Two braids start from the temple, the hair is woven using the French technique from the forehead. The braids are placed one below the other.
Two parallel braids-waterfall from the crown and with a tail
On both sides, two waterfall braids begin to be woven, which are then gathered into a ponytail.
Lush Danish braid
The technique of weaving this braid is similar to the technique of weaving a regular Danish braid. Lushness can be achieved by slightly pulling and fluffing strands from a braided braid.
Tail braided using fishtail technique

Figure-eight braid

Combination of fishtail and French technique

Malvinka fishtail with a tail on the back of the head

Crossed strands and small braids

Knotted braid

Boho braid
Several small braids, braided from the parietal area and connected into a ponytail at the back of the head.
Double waterfall braid - headband
This hairstyle will help separate your hair from your face while leaving it loose.
A basket bun with a hair flower in the center
Another popular variation of basket weaving, which can be both an everyday hairstyle and a festive one.
French braid with added airy strands

Chinese braid

Three-strand braid using the technique of “a strand in each link” and a tail at the back of the head
This hairstyle combines a three-strand braid and a ponytail.
Tail braided using French technique

To ensure that a girl always looks neat, fashionable and stylish at school, her mother should learn several techniques for braiding hair. You can easily make 100 hairstyles based on braids, if you follow the step-by-step photos and this is not the limit.
An older girl can do some hairstyles on her own. The braid is one of those few hairstyles that are universal and suitable for everyday life, holidays and sports.
Video about braiding girls
Video about braids for girls - 100 hairstyles - 3 simplest and most beautiful:
Video about the 10 most beautiful and easy-to-perform hairstyles on last call:
Every girl dreams of being the owner of luxurious hair, but everyone knows that various styling with the help chemicals and hairstyles such as ponytails, buns and many others ruin the hair. But the safest hairstyle for hair is undoubtedly a braid.
At first it may seem that such an original hairstyle is very difficult to do, but this is absolutely not the case! If you know how to weave a French and classic braid, then you can do this one without any problems. So, let's begin.

We will need:
- Several hair ties;
- Comb;
- Hair fixation spray.
First stage:
Divide your hair into three equally sized strands. We begin to braid a regular braid and stop after each of the three strands has been used.
Second phase:
Next, we need to leave a smaller strand free from each strand, while continuing to weave. These actions are very reminiscent of French braiding, only exactly the opposite. It will be better if someone helps you hold the separated hair so that it does not get tangled in the main braid.
Third stage:
From the hair left free, we make a more complex braid, right on the main braid (detailed braiding can be seen in the video at the end of the article).
Fourth stage:
Secure the resulting 3D braid into one using an elastic band or hair clip. And finally, fix the resulting hairstyle with hairspray. Well, the seemingly complex braid is ready, and it only took a little time!
Chic braid from 3d braid

- First, stretch out the entire fabric with an iron or hairdryer to make the task easier for yourself - smooth, straight hair is much easier to handle, and it is also easier to track the direction of each curl.
- Secondly, if they are very long, it is recommended to periodically moisten the working mass during the process, since the ends will get tangled.
- Comb the entire length of hair well and divide it into 5 equal parts. Which half you start weaving with does not matter. For convenience, we suggest proceeding exactly as indicated in the diagram.
- Take 3 parts in your left hand, stretch the outermost one under the one on the right and throw it over the next one - the one that is central for all 5 strands.
- Hold them in the given position, then move on to the remaining ones in your right hand: stretch the outermost one under the adjacent one and throw it over the central one (for all parts).
- Repeat the above steps: pull the leftmost strand under the adjacent one and place it crosswise over the middle one. Then bring the one on the far right out from under the adjacent one and above the middle one.
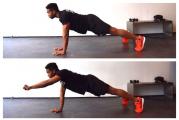
Volumetric 3D braid

- Comb your hair and comb it back.
- For convenience, you can collect them in a ponytail.
- Divide your hair into 3 parts, start braiding a regular braid: place the left strand on the middle one, then also intertwine the right strand with the middle one.
- After the first braid, separate a small strand of hair from each side part and throw it to the side, then braid it.
- With subsequent weaves, separate the braids from the sides along the strand, and then intertwine them.
- Using the same technique, braid the braid to the end and tie it with an elastic band.
- Let's move on to the released strands.
- Take 3 strands and begin to braid an inverted braid, in which the side strands should intertwine under the middle one.
- Continue braiding, using the released strands as ties for a new braid.
- Using this technique, braid the braid to the end.
- Bring both ends together and tie with an elastic band.
- Fix with varnish, use decorative accessories if necessary.
- The hairstyle is ready!
Multi-strand 3d braid

- All hair should be gathered into a high ponytail at the back of the head and divided into seven equal parts.
- Secure the middles of these parts with seven silicone rubber bands. It is best if the elastic bands are multi-colored.
- Next, the tail of the strands needs to be divided into two parts: one has four tails, the other has three.
- Then the outermost strand of the four must be placed on top of the adjacent one, then threaded under the two strands that remained and attached to the part where there were three tails.
- The same actions must be done on the other side. It becomes clear that only the outer strands take part in weaving.
- The hairstyle is secured with an elastic band. To make the braid looser, you can remove the elastic band that holds the ponytail at the back of the head, which will make it more airy.
- At the end, this installation can be secured with varnish.
At the beginning of the scheme, such a hairstyle seems complex and intricate. You need to do all these weavings several times to understand the technique. For those who are familiar with the macrame technique, learning how to make a 3D braid will be much easier, since it practically completely repeats the principle of such weaving. But it will not be difficult for people who are not familiar with “macro” to get used to it.
Stylish braid 3d

- Comb the entire mass of hair back, separate a thick horizontal layer from the top, and divide it into 3 equal parts.
- Cross the left strand over the middle one, then cross the right strand over what is now the middle one (formerly the left one): a classic start to a regular 3-strand French braid.
- After this, lift the side parts up and secure them with a clamp - they will not be needed temporarily.
- Now grab from the free mass of hair (top layer) a wide strand equal to the one that remained untouched - the middle strand in the braid.
- Repeat the previous steps again: cross the new right strand over the middle one, then cross the new left strand over the middle one.
- Here it is important to maintain the primary direction: if you started weaving with the left, then each next level also start with the left.
- Lock middle strand in place with a duck clamp, lift the side ones up and leave them there - they won’t be needed temporarily.
- And let go of those that were previously at the top: now they will become working side ones.
- This trick will allow you not to get confused in the number of parts and make the weaving as neat as possible.
French braid 3D

- Using your fingers, take a bunch of hair and divide it into 5 parts.
- We will count strands 1 to 5 from right to left.
- Let's move on to the actual weaving.
- Insert your index finger and little finger between strands 1 and 2.
- Use your little finger to pick up 1 strand.
- Insert your ring finger into 2 strands and grab
- Now you need to insert your middle and index fingers between 3 and 4.
- Using your middle finger, grab 2 strands, and place your index finger under 4 and grab
- Now you need to extend your right hand to the ends of your hair.
- This way you can straighten your hair.
- Do the same with the other hand.
- Now you need to add another strand to the strand between the middle and index fingers.
- Now repeat steps 3-5.
- All hair should be in one left hand.
- Now repeat point 7, only add a strand on the other side.
- Now weave in this manner until you run out of hair.
Very beautiful braid 3d

- Comb dry hair thoroughly clean hair. A small nuance - if you
If you want to get a tight braid, lightly wet your hair using a spray bottle filled with water. - As you already know, a 5-strand braid starts from the side of the forehead and ends at the ear line. Separate a small part of the hair from the right or left side of the head.
Divide the selected part of the hair into three identical pieces. - After this, you need to place the first strand on the second, then on the third.
- Now we need to select a quarter of the hair on the left side of the resulting braid.
- After this, we put 4 tufts under the second, and then on top of the third,
as if forming a checkerboard pattern. - Then, near the temporal zone on the right side, we separate another, fifth strand. We pass it under the first and over the fourth. Our weaving continues using strands 2,3 and 5.
- It is necessary to place a second strand under the third and over the fifth.
- The third one is pulled up, and then we separate another part of the hair and
add it to the second one. We lower the third strand down. Our weaving will now consist of strands 2,4 and 1. - We lift the fourth clump up. Select a new part of the hair on the right side and place it next to the first strand. Then, you need to bring the first one over the second and thread it under the third. We lower the 4th strand down. Using this technology, we continue to weave as long as the length of the hair allows.
Volumetric twist braid 3d

- First you need to comb your hair thoroughly and throw it to one side.
- Next, tie the tail with a silicone rubber band. This type of elastic band can be purchased in special stores. Take elastic bands that match the color of your hair, or colorless ones, and be sure to check that they won’t break immediately.
- Leave an opening for the twist just above the elastic band.
- Lift the end of the tail and pull it through the opening left, as if unfurling the tail. And so you have made one element of the braid twist. Pull it tighter.
- We repeat this manipulation a couple more times, as long as there is enough hair.
- To give the braid originality and volume, you need to extend the top element in each part of the twist.
- As a result, you will get a very beautiful and practical braid (photo below).
- You can easily add your own elements to this hairstyle to create a unique look. After all, a girl always needs to be different, and it is thanks to different styles that individuality can be achieved.
Spikelet 3d

- Comb your hair back and separate one strand on each side in the temple area, on average their thickness should be 2.5 cm.
- We take the strands back to the back of the head and cross them.
- Holding the resulting weave, select a new strand on one side and cross it over the top strand in the weave.
- Next, take a strand from the other side and do exactly the same.
- Continue these steps until you reach your lower hairline.
- Now we divide the hair into two parts and take strands from under the tail on one side or the other and continue to weave the braid as before, crossing them with each other.
- Moreover, when we take a strand from the left side, after weaving it must be combined with the right part of the hair.
- Secure the resulting braid with an elastic band or a hairpin.
Chic French braid 3d

- Separate part of the hair from the front and secure it with a small silicone rubber band.
- Starting braiding in this way will make your work much easier.
- This step is optional, you can skip it and from the very beginning divide this zone into three identical strands, which you need to cross and make one twist as if you were weaving a regular braid (move the left strand to the middle and move the right strand to the middle).
- Now we separate two identical strands on both sides (strands 1 and 3).
- We move the right strand (number 3) over the top to the middle.
- We also move the left strand (number 1) to the middle.
- Now we begin to grab new strands and weave them into the braid.
- Separate a thin strand from the total mass of hair on the right and attach it to the rightmost strand No. 2.
- We transfer this double strand to the middle over the top.
- We repeat a similar action on the other side - we separate a small strand from the total mass of hair on the left and attach it to the left strand, transfer it to the middle.
- We repeat again on the right side and weave further, each time adding new strands to the border of the hair at the neck.
- After you have braided all the hair on the sides, we braid a regular braid, moving the outer strands one by one to the middle.
- The result is a beautiful feminine hairstyle
- The elastic band with which we secured the strand at the beginning must be hidden under the hair, or removed by carefully cutting it with scissors.
- We stretch the braid a little wider with our hands.
- If the hair is smooth and about to fall apart, fix the hairstyle with hairspray and it will remain in its original form for the whole day.
- You can straighten small strands near the face, this will give softness and lightness to the hairstyle.
- It’s beautiful when the braid is not braided tightly (this is how girls can braid it so that their hair doesn’t get in the way), but has a slightly careless appearance and individual strands falling down near the face.
Volumetric braid 3d

- Take a small section of hair near your face and divide it into three equal strands.
- Place the right strand under the center one, and then the left one under the right one (it has now become the center one).
- Place the left strand under the center one and add part of the hair on the left to it.
- Place the right strand under the center one and add part of the hair on the right to it.
- Continue braiding as described.
- Having collected all the hair in this way, continue to weave a simple reverse braid (it is woven like a regular braid, only the side strands are placed under the middle one).
- Secure the end with an elastic band.
- Stretch the strands in the braid to add volume.
Openwork braid 3d

- At the top of the head, select a tuft of hair.
- On the right side, cross the hair at a similar level with the central strand.
- Do the same on the left side.
- When you cross the central strand with the side strands, slightly loosen your fingers with which you hold the strands; you will pull out the strand woven in on the right.
- Pull it until a gap appears between the strands on the right and in the center, approximately the size of your finger.
- Leave a gap, stretch the hair a little more, only from the edge of the right strand.
- One openwork loop is ready.
- Pull out the left strand in the same way.
- Then again add strands on both sides, as with classic weaving.
- Stop and repeat the steps, pulling out the strands one by one.
- Weave and pull out the openwork loops to the end.
- Spread them out with your fingers so they are identical and look neat.
- Once you have finished braiding, secure your hair with an elastic band.
3d braid reverse

- Before you braid a French braid, you need to prepare your hair.
- They should be clean, combed and slightly damp.
- You can additionally apply conditioner.
- First, you should choose the starting point of the braid.
- As already mentioned, it can be placed in different directions, starting from the top of the head, from the back of the head, from the temple, etc.
- It all depends on the desired end result.
- We select a wide curl and divide it into 3 strands.
- We extend the one on the far left under the middle one.
- Now it becomes central.
- We do the same with the outermost curl on the right.
- Next, go again to the left curl, drag it under the bottom of the middle one, collect the entire structure in one hand, use your free hand to separate a thin strand from the unused hair and connect it to the central one.
- We do the same with the right curl.
- Alternately weaving free strands on both sides, we form a braid along the entire length.
Inverted 3d braid

- Comb your hair well.
- Separate a small section of hair above your forehead.
- You can experiment with thickness, this will significantly change the appearance of the braid.
- Divide the separated strand into three equal parts.
- Lightly spray the hair with water from a spray bottle, this makes it easier to separate one strand from another.
- We place the left strand under the middle one, the right one on top of the middle one, then the left one on top of the right one.
- After each cross, pull the strands very tightly, they will look neat, and the hairstyle will last longer. Read more:
- We free our left hand from the hair and hold everything in our right.
- Place your palm down and turn the two outer strands up.
- So the left strand turns out to be the middle one.
- We dive under the outermost strand on the left side, take a little from the head of hair and place it on the middle one.
- Take a strand approximately the same size as the main one.
- With your left hand, fix the base of the braid, release the two outer strands and turn it upside down.
- Again, place the outermost strand on the right side on the middle one with a small curl from the main hair.
- Using the same principle, braid the remaining hair.
- You can make a voluminous braid by securing the end of the curved braid with bobby pins at the very bottom.
- This hairstyle is decorated with shiny pins or barrettes.
- After finishing braiding, spray your hair with hairspray.
Video: technique of weaving 3D volumetric braids
In this article you will learn the basic techniques of braiding with step-by-step photos.
After reading it, you will be able to independently create both everyday simple and the most sophisticated and extraordinary designer hairstyles.


Braiding step by step photos: varieties
The braid is not only one of the most feminine, but also practical hairstyles. With braided hair, you can easily walk throughout the day without fear of it becoming disheveled. Moreover, such a hairstyle is quite universal and looks natural and harmonious both in a business setting and at a youth party.


There are several main types of braiding:
- classical Russian;
- European: Swiss, Greek, English, Dutch and famous French weaving;
- eastern: plaits (side braids), ropes, threads, braids, zizi, curls, rastas, etc.; the last three types can also be used for short hair;
- designer: “French waterfall”, knotted braids, Lino Russo, “basket”, “dragon”, “fishtail”, “figure eight”, etc.
The best way to master any of the techniques is to watch video tutorials on this topic or study photographs of step-by-step braiding. Moreover, for any of these weaves you can use not only your own hair, but also false strands or hairpieces. Their color can either match or contrast with your own hair color: the main thing is not to use more than three colors at the same time.


Advice! Recently, the so-called careless styling has become very popular, which can be used with any type of weaving. But even in this case, the strands should be pulled together evenly and not get out of general style. Otherwise, the hairstyle will look simply sloppy.
Classic braids
The traditional Russian braid has long been a frequent guest on many famous catwalks: the Valentino fashion house, theatrical shows of Victor&Rolf, Emerson, etc. Today it is presented in various variations: from braiding on the back, sides or top of the head to creating the most intricate hairstyles of the two and more braids However, it’s not difficult to master even such complex types of braiding yourself with the help of step-by-step photos.


The traditional Russian braid consists of three equal strands that are intertwined alternately. It can be not only smooth, but also voluminous, slightly disheveled, multi-colored, asymmetrical, or used in combination with other types of hairstyles. The hair can be parted straight or sideways, asymmetrically, or have no parting at all. The weaving density and the number of strands used can also vary.
One of the varieties of the Russian braid is the “spikelet” braiding: a technique that allows you to achieve volume and pomp in your hair. In this case, only two strands are used with the sequential addition of new ones. The order in which they are added may vary. However, for the hairstyle to look neat, the density of each new strand added should be the same.


Advice! Perfectly smooth braids look too strict, so you should let some strands stick out a little.
Straight from Europe
Designers distinguish several options for weaving that came to us from Europe:
- Swiss braid: it is woven according to the Russian principle, but before that, each of the strands is twisted into a tight strand, due to which the hairstyle looks more voluminous; This type of weaving goes perfectly with any style and looks great with jeans or open summer dress, and with a business or cocktail suit; step-by-step weaving of such braids for medium hair or hair of maximum length can be seen below;
- French weaving: unlike the “spikelet”, the strands are not woven one on top of the other, but are laid inside; the braid begins with a small bun, divided into 3 main strands, with the gradual addition of additional strands after 2-3 cm so that at the end of the braiding all the hair is collected; strands can be taken from one or both sides; weaving can be direct (towards you) or reverse (away from you); start from the crown or pass throughout the head in the form of a wreath;


- English: its only difference from the Russian version is that the braiding begins with a ponytail, attached to the back of the head or closer to the crown; similar braiding on long hair shown in step-by-step photos;
- Dutch: braid “inside out”; the woven strands do not hide inside the hair, but rise above it;
- Greek: combination smooth hair and a braid that resembles a headband that runs all over the head; in this case, three small strands are taken closer to the parting, the rest of the hair is pinned up for a while; small strands are gradually added in a circle, with the help of which such a headband-braid is firmly held on the head; There can be two braids, in which case they start on both sides of the parting, and then are cut into one at the back of the head.


Advice! Stylists advise doing a little backcombing at the roots before braiding. It will make your hair more voluminous and your hairstyle more feminine. This technique is especially relevant when creating evening hairstyles.
Oriental tales
A distinctive feature of such hairstyles is the intricate shapes and the presence of large, eye-catching decorations:
- strands (Sinhala braids or screw braids): the hair is divided into two equal strands, each of which is twisted in one direction; then both strands cross and twist in the opposite direction; harnesses can be used in combination with loose strands, a ponytail, side braids, etc.;

- rope braids: a side parting is made on the hair, and braiding (twisting two small strands) begins on the side where there is more hair; when passing such a braid, new small strands are added around the head; at the level of the back of the head it intertwines with the main mass of hair in the direction opposite to the main weave;
- Afro braids (braids): many small braids weaving from the back of the head to the temples; you can let them loose, create one or several thick braids from them, make a tail out of them, twist them into a shell, etc.;


- zizi: a type of braid, ultra-thin braids made of artificial hair, created using machine weaving; woven into each individual strand of their own hair;
- Curly: the method is similar to zizi, but the curls are twisted into a tight spiral; can be used for extensions.
With the help of step-by-step photos for beginners, you can master braiding quite quickly. The main thing is patience and extreme care.


Advice! Unraveling small braids is quite problematic. To make this procedure easier, before creating a hairstyle, the hair should be thoroughly washed with a cleansing shampoo, not an ordinary one, and then any high-quality balm should be applied to it.
Modern design techniques used in weaving
IN last years Braid hairstyles received the most unexpected execution. However, any design techniques are, in fact, improved ethnic versions of the Russian, European and Oriental versions:
- “French waterfall”: resembles the usual one or two braids, starting at the temples and ending at the back of the head; however, each lower strand is released into “free floating” and falls freely onto the back. The hairstyle can have all sorts of variations: be asymmetrical, go over any part of the head, sag, etc. It can even be used on short hair;


- knot braid: two strands are connected to each other using a series of knots; in this case, both part of the hair can be woven (one or two small knots are used as a kind of decoration), or its entire volume;
- Lino Russo: a combination of knots and the “spikelet” technique. After each knot, new hairs are added to the already selected strands; for such a hairstyle, the hair must be cut evenly and be the same along the entire length;
- “snake”: a regular French braid is not located along one line, but meanders over the entire surface of the head; may have 2-3 or more spreads;
- “basket”: part of the hair on the top of the head is gathered into a high ponytail, then a regular French braid is woven from the temple with alternate addition of strands from the ponytail and free hair;

- cornrow braiding: classic afro braids are arranged all over the head in the form of a geometric pattern reminiscent of rows of corn (from the English corn - corn and row - row); To obtain such a pattern, each miniature braid is braided in the manner of a classic French braid.
Advice!To make it easier to weave when creating a braided hairstyle, you can use any styling products: foam, varnish or gel.


Braiding for short hair
Thanks to improved braiding methods and the availability of modern means of fixation, you can decorate yourself with braids even if you have short hair:
- “headband”: two braids are braided at the temples, and then secured with hairpins at the back of the head;
- braid parting: a weave of side strands located on one or both sides of the face;
- bangs with a double braid: the upper part of the face is framed by two small braids;
- a braid around the head: can be located in any part of it, pass over the entire head, or located on the left, right of the face, or braided only at the back of the head;
- "French bangs": long bangs can be pulled to the side in the form of a French braid; since in case short haircut the hairs will invariably stick out to the sides, you should fluff and tousle the rest of the hair mass so that it looks as organic as possible;
- a combination of the “punk” style and the French braid: some of the curls are combed in the form of a mohawk; the side strands are braided.
Braids for girls are perhaps the most popular hairstyle that caring mothers they create every day by sending their little miracle to kindergarten (school). If you are also interested in braiding for girls, you want to learn how to create new, simple or complex hairstyles, be sure to read this article, in it you will find a lot of new things on this topic and learn how to braid a girl’s hair simply and beautifully.
If we talk about children's hairstyles, then the expression: “Beauty requires sacrifice” is completely inappropriate here, because the main priorities in children's hairstyles are:
- practicality— the hairstyle should not interfere with the child (do not fall apart during active games);
- rapidity fulfillment - when parents get their child ready for kindergarten (school), they, as a rule, strive to get their hair done faster;
- safety- to secure everyday hairstyle for girls, it is better not to use objects with sharp ends: bobby pins, hairpins or synthetic styling products, including gels, varnishes, hair foams and others;
- variability- new interesting options styling will attract increased attention to your daughter, she will want to please boys, which contributes to the formation of the feminine essence.
Of course, there is no point in immediately starting to perform complex hairstyles; first, start with simple styling. Practice mastering new ways of braiding long, medium or short hair, try to combine different options, and also invent new ones if you suddenly have enough creative imagination for this.

Braiding methods
We present to your attention some options that are most popular today.
3 strand braiding
You will need to divide your hair into 3 sections. Then move the left strand to the right so that it intersects with the middle one, and the middle strand remains on the left side. Follow the same steps for the right strand of hair, move it to the middle. And so on, braid the braid until there is a small ponytail left at the end. Finally, use an elastic band to secure the braid.
French spikelet
This braiding also looks very impressive on children's hair. Thanks to a special purl technique, you can achieve the creation voluminous braid on top of smoothly combed hair. When using such weaving, it becomes possible to create very beautiful children's hairstyles, for example, you can braid the braid diagonally, make interesting zigzags, or lay out the weaving around the head.
Braids for girls: 20 hairstyles with photos
Most of the braided hairstyles that are presented in this article involve the use of ribbons, lovely butterflies, smooth or, conversely, sharp lines. Some of the hairstyles at first glance seem quite complex and difficult to achieve, while others are quite suitable for beginners.
Hairstyle 1. Crossing low braids for girls with the addition of ribbons.

This is a very attractive hairstyle that can be used by girls with long hair. The hairstyle involves the back crossing of two inside-out French braids, which create a very unusual design. Adding to this hairstyle also a beautiful ribbon, you will make the image more harmonious and completely complete. It should be noted that crossing French braids for girls really look very flattering.
Hairstyle 2. Braids with bows.

This is a slightly higher level of creating hairstyles, because here baskets are also used in hairstyles. You will need to section your hair into three sections just like a traditional braid, but add four or more ribbons to create a complex and unique braid. The hair is then parted in the middle and secured, after which the braids are neatly twisted into cute little buns. The charming bows decorating the top of each “bun” will be a spectacular finish to this hairstyle. You will have to work hard to create such a hairstyle, but the result will really be worth it.
Hairstyle 3. Double heart braids.
 Photos of girls' hairstyles with braids
 This double heart, made in the form of weaving, is actually much more difficult to create than it might seem to you at first glance. Inside, this braiding for girls should be divided so as not to interfere with other braiding. After creating and securing both braids, you need to carefully weave a ribbon into the hairstyle to obtain a more spectacular and complex result. To complete this childish look, weave two bright purple ribbons with flowers into each of the ponytails. With such an interesting hairstyle, your daughter will instantly feel like a real little princess.
Hairstyle 4. Asymmetrical floral braid style.

Break all the rules of modern hairstyles by creating these interesting and unique braids for your girl. In this hairstyle, the braids surround the head in an original way and are securely secured with cute little ponytails. Bright and bold accessories that will add even more attractiveness to the overall appearance of the hairstyle can diversify the image and add new notes to it.
Hairstyle 5. Four braids with intertwining ribbons.

This symmetrical style looks very attractive and inspires creativity. Try it various colors ribbons, matching them to the color of your girl’s main outfit. This unusual hairstyle can be performed on girls with short, long or medium hair. All you need is to simply create four braids, add two long pieces of ribbon and use elastic bands. You need to make sure that this braiding hairstyle for girls is really tight if you want to get lasting results.
Hairstyle 6. Braid with twisted braids.

Twists and braids look very attractive in this chic children's hairstyle. You need to create two or three braids high on the top of your head so that they go down diagonally, and then style one of them into a ponytail. The look will be completed with two giant neon bows and your little princess will be able to enjoy an unusual and very stylish hairstyle.
Hairstyle 7: Double twists with cute buns.

Would you like to try creating those amazing twists with some pretty buns? Of course, to create such braids for girls you need to have long enough hair. You need to start with one twist at the top, and also make one at the bottom, and then attach two cute “buns” to the two braids on both sides. The final detail of this look will be soft colored ribbons, which will also hold the braids at the same level.
Hairstyle 8. Braids separated by laces.

This hairstyle features careful sectioning and skillful braiding. In this case, it is necessary to divide one French braid into two parts. Adding to the image beautiful ribbons and colors will make this option most suitable for spring or summer weather. Don't underestimate the importance of hair bands and accessories. With their help, you can easily turn the most ordinary braid into an interesting and sophisticated weave.
Hairstyle 9. Crisscross braids decorated with lace buns.

Just look at this amazing hairstyle! Six mini ponytails intertwine diagonally at the back and end in two cute fluffy buns at the top of the head. A necessary addition to the look will be bright pink ribbons, worthy of a little queen of pop music.
Hairstyle 10. Braids of the future.
 Photo of hairstyles in kindergarten
 One cannot but agree that these French braids look quite futuristic. Loose strands hang down and then curl back to create an amazing spider web effect. This hairstyle would be a very good idea to add to a Halloween costume, but it also needs to be done by someone who is really knowledgeable about how to properly do French braids for girls.
Hairstyle 11. Classic long hair intertwined with ribbons.
 Photo quick and easy hairstyle for long hair
 This is a very inspiring hairstyle that can be created by almost any skill level. Classic ponytails are placed high on either side of the head and then woven down with the addition of stylish blue and purple ribbons. Is it difficult to find a similar hairstyle that looks so sophisticated and gorgeous?
Hairstyle 12. Intricate braids with ribbons.

The main motto of this hairstyle is: “If you can imagine it, then you can do it. A zigzag parting, thick braids and thick ribbons all make for a pretty chic hairstyle. The ribbons are harmoniously woven into the braids, giving the hair the appearance of being lifted up. This hairstyle looks really cool, of course, you will have to spend a lot of effort and time on it, but you will certainly be satisfied with the beautiful and interesting result.
Hairstyle 13. Snake braids.

If your little one has super long hair and you want to show it off, this hairstyle will be perfect for you. In this case, two braids flow gracefully down along the back line and are secured high at the temples with funny elastic bands. The hairstyle looks very beautiful and stylish, but to create it you need to have sufficient length and thickness of hair.
Hairstyle 14. Braids with chain links.

Here's another great hairstyle for thick hair. Show others all your imagination by dividing ordinary braids from below into two parts. After this, once again divide each of the strands into three parts and twist them into sinuous bends. To do this, twist the right strand of hair over your finger and add a little more of the left strand to create a rope braid. Finally, connect the two rope braids into one link using braid. You can also create three braid sections if you wish and end up with two large braids. This hairstyle looks very fun and unusual.
Hairstyle 15. Double braids with double buns.

Just take a look at this fabulous hairstyle that combines braids and buns into one! The thicker the hair, the better and more appetizing the “buns” will look. The colorful elastic bands that decorate the “buns” will add special attractiveness to this look. It's hard to imagine that there could be an even cuter hairstyle than this.
Hairstyle 16. Crown.

Who doesn't love girls with braided hair? A beautiful braid on top will create an interesting crown effect that fits perfectly into the style of French braids. The crown will help hold the front part of the hair, will look very gentle and unobtrusive, while beautifully framing the little princess's face.
Hairstyle 17. Waterfall.
 Hairstyle photo: Braids for girls
 In this version of the hairstyle, neatly styled ponytails look very unusual and stylish. Clear straight lines and bright colorful elastic bands will make the look especially attractive. It should be noted that to create such a hairstyle you need to stock up on remarkable skills and have extensive experience in creating French braids for girls.
Hairstyle 18. Large double bows.
 Hairstyle photo: Girl with a braid
 These gorgeous intricately twisted bows on black hair are absolutely fabulous in appearance! This hairstyle has two double tail rise up the back and curl diagonally into voluminous “buns”. With the help of such a super original hairstyle, you will definitely be able to make your little one stand out from the gray crowd.
Hairstyle 19. Soft fishtails.

In this version of the hairstyle, deep side parts allow you to achieve a more delicate result, resulting in a very delicate and romantic hairstyle for your little miracle. In appearance, these braids do not look very neat, but you don’t have to worry about styling and spend a lot of effort and time maintaining your child’s hair in perfect shape.
Hairstyle 20. Braiding a girl's hair, step by step photo
 Photo: Braids for girls for long hair step by step
 This stylish hairstyle looks very cute and unusual. At its core, it is very simple and from behind it looks very stylish and extraordinary. This braid combines bright style and special looseness. It will definitely appeal to girls who, from childhood, prefer to stand out from the gray mass and have good taste.
Video: fashionable braids in 2019
In the video for beginners, you will see step-by-step instructions on how to weave braids for girls.
At the end of this article, it should be noted that modern braiding for girls is far from just two separated ponytails with intertwining strands. Braids can include a variety of twists, buns, ribbons, flowers and more! Don't miss this great opportunity to test yourself a little by trying something new and giving up the boring ones classic options hairstyles
Choosing an evening hairstyle is no less important than choosing a beautiful evening dress. On the day of the celebration, every woman wants to be perfect and original. If you don’t like evening hairstyles with curls, fashionable hairstyles with a high backcomb or a bun, a hairstyle with several braids styled in the shape of a flower would be an excellent option.
Braids can act both as a central styling element and as a small decoration. Nowadays there are a huge number of types of weaves, so you always have plenty to choose from. Every girl has a chance to find the perfect braided hairstyle in her chosen style.
Hair has long been considered a woman's main treasure and adornment. Hair styled in a braid is also a symbol of honor and dignity. Therefore, it is not surprising that braids have been human history so popular.
Evening hairstyle with 3 braids in four strands
Many people love styling with braids not only due to their originality and beauty, but also for the ease of creating a classic style, because braids allow you to get good hairstyle without styling products or tools.
In order to choose the most suitable look braiding, before an important event you should try several ideas for hairstyles with braids and choose the best one.
Let's look at the hairstyle with French braids in 4 strands step by step.

Photo lesson created from the video of MK Nikolai Rusu, Parikmaher.TV
1. Separate the hair diagonally, the parting starts above the left ear and ends below the right ear.


2. Separate 4 strands on the left.


4. To make the braid look voluminous and openwork, already on the third link we begin to carefully stretch its sides. In order for the braid to come out neat, you may have to first practice the technique of braiding a 4-strand braid.

We braid to the end and secure with an elastic band.

5. Select another section diagonally parallel to the previous one.

6. In the same way, we braid a braid of 4 strands, trying to stretch the braiding so that it hides the parting.

7. In the remaining area, move the braid to the left so that it goes right next to the parting.


8. Using bobby pins, we create a base frame for attaching the flower.


9. First of all, twist the rightmost braid into a ring. We fasten with invisible ones.

10. Then we draw the middle one around the first ring, and the last one around the left one. Don’t forget to style your bangs, do it to your liking, you can first curl it into curls and lay it out in a wave. If the bangs are short, everything is even easier.