How to make a paper box with a lid. The easiest ways to make a paper gift box
Paper boxes are a great way to decorate gifts with your own hands, create original packaging for storing household items, and also a great opportunity to bring creative impulses to life.
A big plus is that you can start training on plain paper or unnecessary thick cardboard, after which you can move on to making beautiful boxes from special paper.
To gift box with your own hands it turned out neat and pretty; when doing it, it wouldn’t hurt to take the advice of professionals and follow the step-by-step instructions with photographs and diagrams that can be found in our material.
Method No. 1: Square origami box

Beautiful and easy to make - this is how the first homemade box should be. This is exactly how it will turn out if you do it according to these simple instructions. In this case, the origami style is used.
Popular articles:
- Colored or wrapping paper for gifts;
- Scissors;
- Ruler;
- Pencil;
- Decorations optional - satin, velvet or lace ribbon, 3D applique, flower bud.
How to make a box:
To make gift wrapping easy, it will come in handy step-by-step instruction with photo. In order to make a beautiful box, you need to take care of creating the lid and the main part in the same style. The top can be presentable, bright or playful. The bottom can be made from plain paper of a suitable color.
- You should start by creating a lid for the box. You will need square paper for this. The sizes can be anything - depending on the author’s idea. In this case, the square will be 21.5x21.5 cm. You need to draw a square of paper diagonally to make a cross, as in the photo below.
- The bottom corner must be bent so that it lies at the central point of intersection of the drawn lines. You can navigate by the photo. Then you need to bend the resulting fold again, but this time so that its edge exactly coincides with the drawn strip. The folds must be smoothed out well so that they are imprinted on the paper. You can use the body of a pencil. After this, we bend the square back, keeping on the paper the folds necessary for further work.

- We repeat these steps for the three remaining corners, resulting in a finished square with a grid of folds we need. After this, we cut two side parts on both sides, which now look like houses.

- We do the next step according to the photographs: we fold the lid of the future box.

- After this, you can begin to make the base of the box. To create it, you will need a square of paper 3 mm smaller than the previous one. In our case - 21.2x21.2 cm. The bottom is folded in the same way as the lid. The result is a beautiful box that can be decorated with ribbon, applique, or flower.
- The inner ends can be glued on the inside with double tape.

We learned how to make a box out of paper, but there are also more reliable materials for such an important product as gift wrapping.
For clarity, you can watch a video where the box is also made in origami style:
Method No. 2: Rectangular box made of thick paper

Plain paper is good, but a gift box made from this will not always be a good idea if its purpose is to keep a heavier gift intact. For the next craft, you will need thick paper - that is, cardboard.
To make the box you will need:
- Cardboard;
- Double-sided tape/glue;
- Scissors;
- Pencil;
- Ruler;
- Decorative decorations.
How to make a box:

- First you need to print and cut out the template. If this is not possible, you can redraw it on your thick paper, taking into account the required dimensions. The main thing is to maintain proportions.
Sample:

- Having cut out the future box from cardboard, you need to bend all the ends in the places marked with a dotted line. Since the paper is thick, you can help draw the fold lines with an object with a sharp end (pencil, nail file, screwdriver).
- Now that the silhouette of the gift box has already appeared, you need to stick double-sided tape or apply glue to the places where the edges of the paper should meet - that is, on the sides, as in the photo. Then all that remains is to fold the cardboard into a finished box and, if desired, decorate the product with stamps, appliqués, ribbons, and inscriptions.
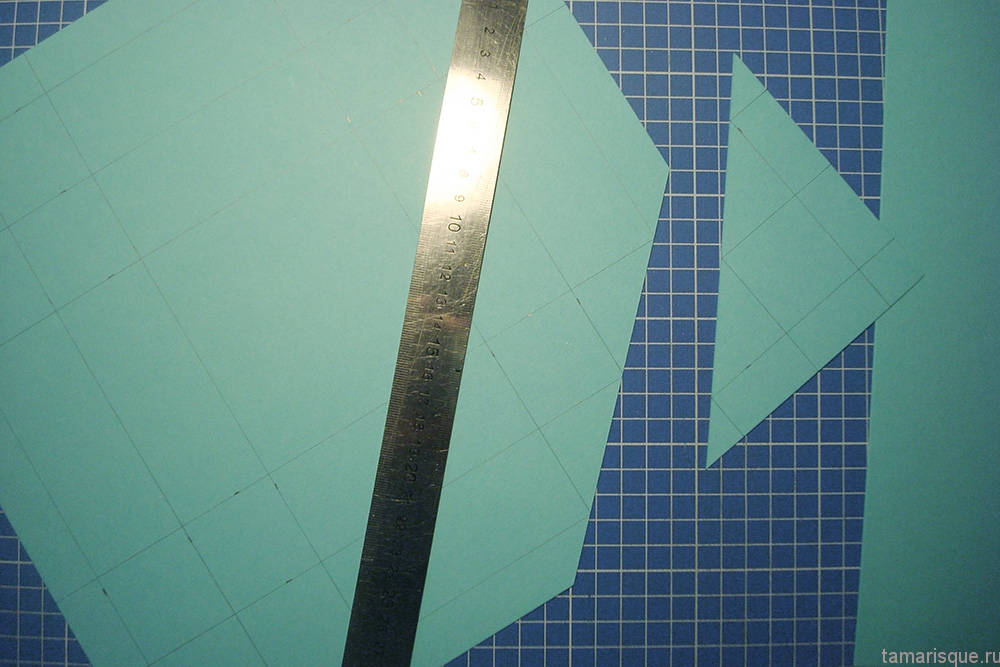
Method No. 3: Triangular cake box

From paper and cardboard you can make not only simple square and rectangular boxes, but also gift and packaging products of very original shapes. Step-by-step photographs will help you understand the manufacturing process faster.
As in the previous case, making this box will greatly facilitate the work of a ready-made template. The edges of the lid can be wavy, which is associated with cream, or straight. You can choose the colors of the paper at your discretion, the main thing is that everything looks harmonious together. The dimensions of the future box can be anything, the main thing is that the bottom template is 3 mm smaller than the lid template.
To make the box you will need:
- Cardboard or thick paper;
- Glue;
- Scissors;
- Pencil;
- Ruler;
- Decorative decorations - optional.
How to make a box:
Advice: For the first time, you should try to make this box from plain paper to understand the manufacturing principle, and only then proceed to the original on more expensive paper.
Templates:
 Box lid template with straight edges.
  Box lid template with wavy edges.
  Template for the base of the “cake” box.
 Important: Be sure to check the template sizes, these examples may not fit each other in size. The dimensions of the base template should be slightly smaller than the dimensions of the lid template.
- We draw a template for the lid and the base of the box on two separate sheets. Cut out blanks from paper.
If this is the final version of the product and you want to work with cardboard, then paper templates you need to attach it to the cardboard and outline the edges, mark the dotted lines of the folds, and then cut out the components of the box.

- Then you need to make even folds on the cardboard in the dotted areas. You can help yourself with a ruler and a pointed object.

- Now all that remains is to seal the future top and bottom of the box at the joints - on the folds.

- Finally, you can decorate the product with ribbon, applique, beads, and flowers.
Video tutorial: How to make a paper box
To inspire creators with new ideas for creating these wonderful additions to any gift, you can watch several master classes from professionals. In them you can learn how to quickly and easily do it yourself case box, round box-box And box-book.
Gift wrapping is a responsible matter, because even the most desirable thing, carelessly wrapped in newspaper or stuffed into a simple bag, will not make the impression that the giver expects.
Of course, buying gift wrapping is not a problem today. The stores will offer a wide variety of options: boxes, bags, etc. But all the same, standard packaging will not be able to convey the range of feelings that you want to put into a gift.
Therefore, many are interested in how to make a gift box using scrap materials.
Decorating ready-made boxes
The easiest way is to decorate a finished box of a suitable size. This can be done different ways. For decoration use colored paper, bows, decorative flowers, beads, sequins, pieces of lace, elegant braid, etc.


You will need to decide for yourself how best to decorate the box, depending on the reason for the gift and the personality of the recipient. It is clear that if a gift is being made for a girl, you can use more decorative elements. And if this is a gift for a man, it is better to show restraint. If desired, you can use a photo of the person for whom the gift is intended to decorate the box.

When decorating, it is advisable to emphasize for what reason the gift is being given. For example, if this new year holidays, then use snowflakes in decoration, Christmas tree cones, tinsel, etc.
Simple box
It is not always possible to find a ready-made box of the right size, so you can very easily fold a box from paper or cardboard.

Even a child can make the simplest version of the box; to make it you will need:
- cardboard (preferably colored);
- ruler;
- pencil;
- scissors;
- hole puncher;
- ribbon.
If you don’t have colored cardboard on hand, you can cover ordinary white cardboard with colored paper.

First of all, you need to draw a template on a sheet of cardboard:
- in the center of the sheet you need to draw a square, this will be the bottom of our box;
- now on each side of the square we draw four more squares of the same size as the first, we have a figure resembling a cross;
- Now we carefully round the upper corners of the four squares (except for the central one).


To get it straight, you should use a template or compass:
- the resulting template should be cut out and the side parts bent upward;
- in the upper part of each side part, holes should be punched with a hole punch;
- thread a ribbon through the holes and tie it with a bow.


You can decorate such a homemade box to your liking using rhinestones, beads, and ribbon bows. But using the technology described, it is worth making only a small box, since a large one will not hold its shape.
Square box
To make a rectangular, or rather square, box from colored paper with your own hands, you will have to tinker. Here is a description of the work sequence:

- take a square sheet of thin cardboard or colored paper;

- draw two lines diagonally with a pencil;

- bend one of the corners of the square so that the corner falls exactly at the point of intersection of the diagonal lines;

- a second time we bend the same edge of the cardboard square so that the edge of the fold falls on the diagonal line;

- We do the same with all the other corners of the square;

- as a result, we got a sheet divided into small squares by fold lines;

- draw a bottom contour in the center, consisting of four squares;

- Now make cuts from two opposite corners to the intended bottom.
Now we begin to fold the box, the assembly diagram is as follows:
- fold the square from the wide (uncut) sides with the corners towards the center;

- then raise the sides;

- fold the paper on the wide side, forming the two remaining sides of the box;

- Now we wrap the cut out parts of the square, finally forming a box.
If you need to make a lid for the resulting package, you need to make a slightly larger box in the same way. That is, at the first stage, make a square 3-5 mm larger than the first.

Once you master this technique, you can learn how to make boxes yourself. different shapes: in the form of a pyramid, cone, cylinder, etc.
Book-shaped box
Today, instead of a material gift, the hero of the occasion is often given money; a box made in the shape of a book is very suitable for a monetary gift. Let's look at how it can be done:


- first of all, you need to make a rectangular box of the required size from cardboard; it is important that the bills that you plan to give fit freely into it;


- Now you should start assembling the “binding”. To do this, cut out two rectangular sheets of cardboard in length and width 1 cm larger than the manufactured box. You also need to cut out another strip, its length should be equal to the length of the sheets, and the width should be 0.5 cm greater than the height of the box made;


- we take the material from which we will make the binding, it can be plain or colored paper, thick fabric (for example, denim) or artificial leather;


- We lay out the blanks on the material, placing a narrow strip between two cardboard sheets. The gaps between the parts are 2 mm, a three-centimeter allowance is left at the edges;


- glue the cardboard to the material and cut out the blank along the intended lines, cutting off the corners;


- now we need to wrap up the allowances and glue them to the cardboard, we have a semblance of a book binding;


- We glue the previously made box onto one of the inner surfaces of the binding;


- We glue ribbons in the center of the top and bottom “lids”, with the help of which our box will be closed.


Now all that remains is to decorate the top part of our book box. You can decorate it with flowers and bows, beads and sparkles. The exclusive box is ready.
Of course, with production gift packaging you'll have to tinker. Perhaps not everything will work out the first time, but with a little practice, you will be able to make unique packaging that will not be found anywhere else.
After analyzing several MK packages, I found an option that suits me quite well for now. This way you can make a box of any size and color for a box, plate, etc. There is nothing new in the box design itself. The main thing that I “invented” for myself was making my own “designer” paper. It's hard to find nice paper in a small town, so here's what I suggest you do.
1. Materials:
- Whatman paper or cardboard,
- napkin or corrugated paper
- sheet of tracing paper
- PVA glue
- scissors
- ruler
- pencil
2. Determine the size of the box so that you can then draw a diagram.
Size of the bottom of the lower part: add 1 cm to the size of the product itself.
The size of the side parts is equal to the height of the product or slightly higher.
Size of folds for the bottom: 1 cm smaller size side part.
Cover size: 0.5 or 1 cm larger than the bottom.
I make the size of the side parts of the lid 3 cm.
The size of the folds for the lid is 2.5 cm (for a simple box you can do without them)
For example: the size of the box is 5X5X4. Box dimensions: bottom 6x6 cm; sidewalls 5cm; bend 4 cm. Lid 7x7 cm, sides 3 cm, bend 2.5 cm.
Now we determine the dimensions of the square, which will be the basis of our diagram. Fold 4+5+6+5+4=24cm. This is the length of the square, which we will draw on whatman paper.
In fact, making all the calculations is not as difficult as it seems))) If you do it once and understand the principle, you will easily make them in your head without any papers or notes.
3. Draw a square on whatman paper, in our case with long sides = 24 cm. Cut it out.
4. Now we mark the square on each side according to the scheme: 4cm - 5cm - 6cm - 5cm - 4cm. We connect all the points and get the following diagram.
Here are the shaded parts that we then cut off.
5. Now, actually, let's start making paper. To do this, you can use a regular napkin of a suitable design and size. Or corrugated paper, then the box will be plain. The square we cut out of whatman paper. grease with PVA. Here it is important to coat the entire surface well, especially the edges, but there should not be too much glue so that the napkin does not get wet.
While the glue dries slightly, iron the napkin with a hot iron so that there are no wrinkles. Corrugated paper You don't have to iron it. Then we place the napkin on whatman paper, cover it with a sheet of tracing paper and carefully iron it with an iron. I didn’t get it right the first time, it requires some skill))) This is what happens.
6. Now we cut off the excess parts of our square. We get such a figure.
7. Make cuts along the red lines.
8. Carefully bend everything using a ruler
9. We wrap the flaps and folds inward and get a nice box. More precisely, its lower part.
10. For the lid of the box, we repeat all the operations, only the dimensions of the square will be different. In our example, 2.5 cm + 3 cm + 7 cm + 3 cm + 2.5 cm = 13 cm
As a result of all the described manipulations, such a box appears
Everything is done quite quickly, in about an hour I did 6 of these things
And this is what the finished product might look like in beautiful packaging.
Today I’ll tell you how you can make a beautiful gift box with your own hands.
There are quite a few master classes on this topic on the Internet, but I don’t think I’ve ever seen my version, but it’s very convenient and the box turns out to be thick even from thin paper.
To work you will need:
3 sheets of cardstock measuring 30x30 cm each,
1.5 meters of tape desired color and width,
Double-sided tape,
Glue Moment Crystal or Joiner,
Scissors,
Paper cutting knife,
Creasing stick, if available - scoring board,
Ruler,
Pencil.
Working hours:
When your hand is “stuffed”, it takes about 30 minutes FROM and TO the box. But if you don’t have certain skills, making a box can take several hours.
Paper selection:
To make such a box, I recommend choosing cardstock with a density of 200 to 270 g/m2 - this is the optimal density at which it will be comfortable to work with paper. Thicker paper may break and be too rigid and clumsy, while paper that is too thin will not be able to provide the required density to the box.
Description of work:
1. Determine the size
Before starting work, you need to decide on the size of the box - it is important to know its length, width and height. After this, the paper size is calculated.
For the bottom of the box, the paper size should be as follows:
2 cm + box height + box height + length + height + height + 2 cm = length of a sheet of paper
2 cm + box height + box height + width + height + height + 2 cm = width of a sheet of paper
For the top of the box, the paper size should be as follows:
2 cm + (box height - 1 cm) + (box height - 1 cm) + (length + 0.5 cm) + (box height - 1 cm) + (box height - 1 cm) + 2 cm = length of a sheet of paper
2 cm + (box height - 1 cm) + (box height - 1 cm) + (width + 0.5 cm) + (box height - 1 cm) + (box height - 1 cm) + 2 cm = width of a sheet of paper
If the box is square, then measuring one side is enough.
For my box, I chose a size of 10x10 cm with a height of 4 cm. A sheet of cardstock measuring 30x30 cm would suit me.
2. Making the bottom part
We take a beautiful turquoise cardstock and line it according to the diagram and our calculations:


It turns out this is the preparation


This is what the workpiece will look like after the cuts. I make the cuts “by eye”, cutting out very small pieces, only so that later I can “plant” the sides correctly.

And this is a blank already with bigs (shown back side, for clarity). Bigs can be made with a scoring stick. If you have a scoring board - just great, the folds will be perfect and the paper will not break.

The next step is to fold the sides. We bend according to the pattern, first inward 1 and 2, then bend outward 3.


You should end up with something like an accordion on each side:

The “extra” valve tails need to be bent as in the photo - inward.

The description is quite complex and may seem confusing, but it is better to try to make a blank using the diagrams and photos - you will immediately see where the cuts and folds should be.
As a result, you should get something like this:


Now we apply a little glue to the short sides, hide the valves inside and, as it were, “cover” the top with the glued part. We press the side panel tightly on both sides and wait a little for the glue to set.

The bottom part of the box should look like this.

There is just a little bit left - you need to cut and glue the bottom. We make the size of the bottom 3 mm smaller on each side than the size of the bottom of the box base. For example, if we calculated the base to be 10x10 cm, then we cut out the bottom measuring 9.7x9.7 cm.

Apply glue to the bottom of the box inside and carefully place the cut out bottom on top. Press with your fingers - the bottom of the box is ready!

3. Making the top part
We do the upper part similarly to the lower one, only the calculations will be slightly different.
For the top of my box the paper size should be like this:

Please note that the height of the top of the box has decreased by 1 cm, and the length and width have increased by 0.5 cm. Half a centimeter is the necessary margin for a comfortable fit of the lid, and the shortened height is for convenient opening of the box.
We make markings on a sheet of 30x30 cm:

After marking, we cut off all excess (marked in red in the photo):


We cut out the bottom, the size is 3 mm smaller than the bottom of the base, in our case it is 10.2x10.2 cm. But we don’t glue it right away, we can only try it on for now.

Now you need to prepare the tapes. Cut 1 ribbon 30 cm long, 2 ribbons approximately 50-60 cm long each. The ribbons must be carefully ironed to ensure they look perfect.

Place small pieces of double-sided tape on 4 sides of the inside of the lid to secure the tapes.


Carefully glue the edge of the tape first to the bottom of the lid, then to the side.

We wrap the tape around the outer part of the lid and also glue it on the other side inside:

In this case, it is important to monitor the direction of the tape so that there are no distortions, and you also need to ensure its uniform tension so that the tape does not dangle.
Now we glue two pieces of tape on the free sides of the lid. Glue only one end of each segment, leaving the other end free.

Carefully apply glue to the bottom and edges of the ribbons. I deliberately do not apply the glue too close to the sides, so that when gluing the bottom it does not crawl out.

Carefully glue the bottom.

The box lid is almost ready, all that remains is to tie a beautiful bow:

The excess length of the ribbon on the bow needs to be cut off, the edges can be processed with a lighter - an almost imperceptible scar will form and the ribbon will not crumble.

All! The box is ready and you can pack the gift!


