Make a cardboard box with a lid. DIY gift wrapping _ Layout diagrams and templates for cardboard boxes of various shapes
We don’t always have a box of a very specific size at hand for specific needs. For example, it would be nice to carefully put small treasures in it, divide gloves, socks, hairpins, handkerchiefs into compartments, or arrange a gift. Therefore, knowledge is worth a lot!
Take a square piece of paper. Carefully fold it in half diagonally. First on one side, then on the other. Expand the sheet.
Fold the sheet in half horizontally. Unfold it again. To achieve the best results in solving a simple task, how to make a box out of paper, you need to fold the workpiece carefully, each time carefully aligning the edges from corner to corner.

Repeat the folding action, but this time vertically.

At this stage of the lesson, from paper, you should get a sheet with crossed lines from the folds exactly in the center.

Fold all 4 corners one by one exactly to the center of the square, where the fold lines meet.

The upper half of the resulting workpiece must be folded in half.

Repeat the same action, but with the bottom half.
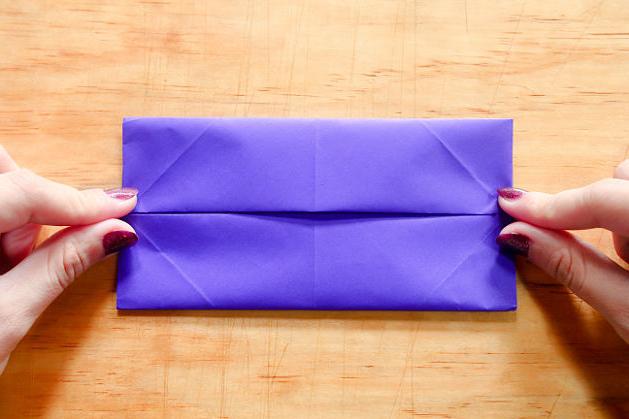
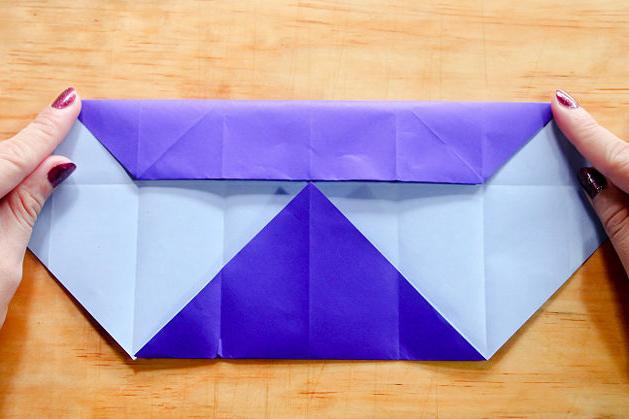
Bend the halves and release two opposite corners, as shown in the illustration:

Rotate the folded sheet 90 degrees.

Fold the half of the workpiece from the top edge towards the center.
Fold the bottom edge towards the center as in the previous step.

Until now, doing origami and describing the process on paper seemed quite far from the final result. But at this stage of the lesson, the hand-made box finally acquires “sides”. To do this, open the newly folded parts of the paper 90 degrees.

Lift the open end while pressing on the corners as shown in the illustration until you have another “side” of the box.

Lower the top corner until it hits the exact center of the base of the paper product.

Repeat steps 13 and 14 on the other side.

This step is optional, but you can glue the raised corners to the bottom of the box if you wish. Ready!

To make a lid for the box, you need to take a paper square 4 millimeters larger than the previous one and fold it in the same way. Then connect both parts, and you will have a full-fledged box with a lid. Now you know how to make a gift box. Made from cardboard, of course, it will be stronger. A presentable box should be colored. Bright or in subdued colors - depends on the event.
Perhaps making a box will encourage you to learn how to make a paper vase or other equally interesting things. Don't forget to involve children in making these things. General classes are not only learning useful and interesting things, but also unforgettable moments of communication.
Making a gift even more pleasant is quite simple: it needs to be wrapped beautifully without damaging it. As a rule, there is nothing more practical than cardboard boxes. But even such a boring attribute of a surprise can be played up in an interesting way. And to do this, you just need to make a round cardboard box with your own hands.
Round cardboard boxes or hat boxes are not only original packaging for gifts or confectionery, but also a very practical way to store:
- fabric scraps, threads, needles;
- beads, beads;
- memorabilia;
- decorations;
- hats and other items of clothing.
Such boxes look very cute regardless of size, and making them is no more difficult than rectangular models. The main thing is to choose the right cardboard.
How to choose cardboard?

To choose cardboard for round boxes, you need to take into account the basic principle: the material must be flexible. Therefore, thick double cardboard, in which household appliances are packaged, is definitely not suitable. It is best to take thick paper or a packaging version of cardboard for cakes - making a craft from such material will not be difficult and you can be sure that there will be no unsightly folds on it. Also suitable:
- cardboard for children's creativity;
- photo paper for printer;
- poster board;
- coated or uncoated whatman paper;
- designer cardboard.
Whatever option you choose, keep in mind that the density of the material should be from 180 to 250 g/m2.
How to make a round cardboard box with your own hands?
For a round box (for example, for stationery), you can take colored Whatman paper.

Materials:
- whatman;
- ruler, pencil;
- PVA glue;
- markers.
Instructions:
- Draw a rectangle of the required height and width on whatman paper.
- On one of the long sides we set aside an allowance of 3 cm.
- Divide the length of the allowance by a whole number and draw perpendiculars.
- In each resulting rectangle we draw an isosceles triangle.
- We cut out the blank, paint it with felt-tip pens, fold it in a circle and glue the sides.
- On whatman paper we draw 2 circles equal to the circumference of the blank cylinder.
- Cut out circles.
- Glue the triangles to one of the circles on the outside.
- Using the second circle, placed on double-sided tape, we seal the bottom with seams. The box for pens and pencils is ready.
Making a gift box with a lid: master class with diagram
If you want to make a round box with an unusual design, use diagrams from the Internet. Print the design you like on a sheet of designer cardboard, cut out the parts and glue them together. If you do not want to use a ready-made template, then you can do it differently.

Materials:
- photo paper for printer;
- stationery scissors;
- ruler, pencil;
- PVA glue;
- double sided tape.
Instructions:
- We print any drawing on 2 sheets (it is better to take an abstraction).
- Draw a rectangle on one sheet of paper and add an allowance of 2.5 cm to one of the long sides.
- Divide the allowance by a whole number and cut to the base line.
- Cut off small corners of each rectangle. Glue the sides together.
- On the second sheet we also draw a rectangle, the length of which is 0.7 cm greater than the first, and the height is equal to the desired height of the lid.
- We also make an allowance on one side and repeat steps 3-4.
- We measure the length of 2 circles and make 2 blank circles for each part.
- We attach the circle to the base, bring the triangles out and glue them.
- We close the seams with the second circle, gluing it to the first with double-sided tape.
- For the lid, repeat steps 8-9. The box with a lid is ready.
Read also:
Festive packaging for cake
The cake box should not only be beautiful, but also durable. This nuance should be followed when making a round “house” for a confectionery product.

Materials:
- poster cardboard;
- stationery scissors;
- compass;
- pencil;
- ruler;
- PVA glue or “Moment”;
- fabric in 2 companion colors.
Instructions:
- Draw a circle of the required diameter on cardboard and cut it out.
- Draw a rectangle whose height will be the height of the box.
- Make an allowance of 4 cm to one side of the rectangle. Cut out the part.
- We cut the allowance in several places and glue it to the circle.
- Draw a circle whose diameter will be 1.5 cm smaller than the first. Cut it out.
- We cover the resulting circle with fabric and glue it on the back side.
- Glue the bottom into the base blank.
- Repeat steps 1-4 for the box lid.
- From cardboard we cut out a rectangle about 8 cm high, equal to the diameter of the base plus 2 cm.
- Glue the side parts of the resulting strip together.
- Glue the strip into the base so that about 5 cm protrudes outward. The lid will be placed on this protrusion.
- Let's start decorating the box. We make circles of fabric a few centimeters larger than the circumferences of the bottom and lid.
- We notch the edges of the fabric circles and glue them to the bases.
- We cut out rectangles from the fabric, which we cover the outer and inner sides of the circle.
- To hide the seam of the fabric from the outside, you can make a small fold. The cake box is ready.
Decorating round boxes

In addition to patterns and fabric, round boxes can be decorated with almost any decorative elements:
- sequins, rhinestones, beads (especially if the cardboard is covered with fabric);
- applications;
- lace;
- ribbons;
- fabric flowers, bows, etc.
The box can also be made in the style of scrapbooking, giving it the appearance of noble antiquity, or it can be supplemented with an element of quilling or origami to make the decoration voluminous. It is better to fasten such parts with silicone glue.
Summary: DIY gift boxes. How to make a box out of paper. Box diagrams. Cardboard box. Origami box. How to wrap a gift beautifully. DIY gift wrapping.
Nowadays there is no shortage of gift wrapping options in stores. Helpful sellers will offer you gift boxes, decorative bags, gift paper for every taste. But you must admit that it is much more interesting to make the packaging yourself. And the recipient of the gift will be doubly pleased, because by taking the time to select and wrap the gift, you thereby showed attention to it. In this article we want to offer you different options for making boxes from paper and cardboard with your own hands. All crafts are accompanied by ready-made box patterns. You just need to choose the gift box you like, print out the diagram and glue the box with your own hands according to the instructions.
1. DIY box
We will start our article with the original pyramid-shaped boxes. Download the box diagram, print it on thick paper or cardboard, use a hole punch to make holes as shown in the instructions for making a box with your own hands. Collect the box and tie it with a beautiful ribbon. The gift wrapping is ready! Note: boxes made from corrugated cardboard will look beautiful.
2. How to make a paper box
Don't know how to make a box with your own hands? Then use our ready-made paper box designs.
Gift box with a heart. Such packaging will be especially relevant for a gift on February 14 or March 8.
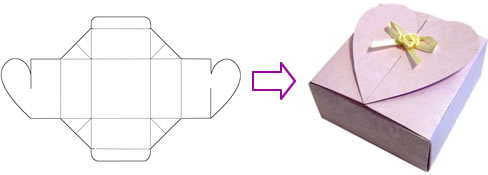
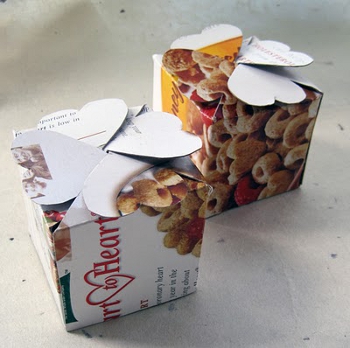
Here is another version of a cardboard box with hearts >>>>
3. Gift boxes. Gift boxes
Pink and blue gift boxes with white polka dots. You can put cookies or candy in this gift box. It will be great if you bake the cookies yourself.

Pink box diagram >>>>
Blue box diagram >>>>
Instructions >>>>
4. How to make a box out of paper. Box diagrams
Decorative paper for scrapbooking is ideal for making paper boxes with your own hands. Make holiday packaging out of it according to the pattern. Use the instructions
5. Cardboard box for a DIY gift
We invite you to make a bonbonniere with your own hands. A bonbonniere is a beautifully decorated box for chocolates. Bonbonnieres are usually given to guests at a wedding as a sign of gratitude for attending the celebration. Also, such cardboard boxes filled with candies and nuts can be given to children who come to your child’s birthday. In the photo below you see a classic version of this handmade gift wrapping.
6. Do-it-yourself packaging. How to make a box
The largest selection of DIY boxes is presented on the Creative Park website from Canon.


8. DIY box. How to make a box
You will find original boxes for small gifts or sweets in the section
The article will tell you how you can make it yourself and use a cardboard box. Here you will find templates and master classes on making boxes of different shapes.
A box is the easiest way to pack or hide something. The box can serve as an excellent means of storing things: jewelry, cards, small items and cosmetics. Of course, modern stores will provide you with a lot of options for boxes: large, small, curly, square, with lids, decorated and simple cardboard.
It is much more pleasant to create something with your own hands and decorate it the way you would like it and the way the product itself will correspond to the style of the holiday, room, or occasion. You can make a craft from absolutely any cardboard. The material can be purchased at a craft store (you will find a large selection of cardboard colors and textures), or you can use the kind in which household appliances are often packaged (refrigerators, for example, or washing machines).
For work you will need:
- Cardboard (as much as needed for your preferred size product).
- Hot glue (you can, of course, use any other glue, but hot glue is preferable due to its quick drying and strong bonding of the material).
- Template (with the help of it you can understand exactly how you should cut, bend and glue the material).
- Scissors and pencil - for marking and cutting. This is necessary to ensure that your product looks neat and aesthetically pleasing.
Flip lid box templateIMPORTANT: There are two main types of cardboard boxes with lids. One assumes the presence of a lid that covers the top of the box, the other - a lid that folds back, but is part of the box.

 Box template with cover lid
 How to make a box with a lid step by step:
- Prepare all the supplies, print the template for the box on a printer or draw it in the exact proportions on cardboard.
- Cut out two elements from cardboard
- Start folding the dotted lines and gluing them carefully.
- Press the edges firmly to hold the material together.
- Let the product dry a little
- After drying, you can decorate the box to your liking.
Video: “Box: master class”
How to make a round cardboard box: diagram, template
A round cardboard box is a very beautiful and practical product that will always find its use. Having decorated it to your liking, you can store jewelry and jewelry, sewing and embroidery kits, cosmetics, clippings and much more inside.
Making a round cardboard box is a little more difficult than, for example, a square one. However, it is quite possible to “figure it out” with your own hands, without spending a lot of money on materials. Use thick cardboard and follow the template provided exactly; you can only change the size, but not the shape of the parts.
How to make a round cardboard box, templates:

 Round Cardboard Box Template No. 1
 What parts does a round cardboard box consist of: template No. 2
 In what order should the parts of a round box be glued together: template No. 3
 Round cardboard box with handle: finished product
 Video: “Gift box or casket made of cardboard: detailed master class”
How to make a heart box from cardboard?
A heart-shaped box is much more difficult to make than a round or square box. However, if you follow the tips and templates, you can easily create this beautiful piece.
A heart-shaped box is not only a storage box, it is an ideal packaging for giving a gift to a loved one. Such a box can be filled with many surprises: sweets, souvenirs, trinkets, gifts, keychains, flower petals, even butterflies can fit in it.
IMPORTANT: The heart box is in many ways similar to a round box, but here everything depends on the bottom: if it is proportional, then the whole product can look neat and even. The box has two bottoms: internal and external, the walls of the box are attached according to the principle of a round box.
Different templates for making a heart-shaped cardboard box:
 Heart-shaped box template from one piece: template No. 1
 Heart-shaped box template from one piece: template No. 2
 Step-by-step work in photos:

 Prepare identical hearts: two bottoms and a lid
 Cover the bottom with the side of the box
 Fix and wait until completely dry, make a lid
 Video: “Heart-shaped box: master class”
How to make boxes from paper and cardboard?
Giving gifts in bags, cellophane wrappers and paper wrappers is no longer attractive and is considered a sign of “bad taste.” Your gift will look much more impressive in a paper or cardboard package that you glue and decorate yourself.
IMPORTANT: The size and shape of your box depends only on what exactly you will be giving. Heavier gifts require thick cardboard, but for small and light ones you can even glue a paper box together.
Boxes made of cardboard and paper, different templates:
 Simple Rectangular Box: Template
  Hinged Lid Box: Template
 Triangular box: template
  Simple square box: template
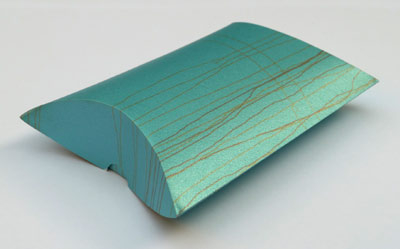
  Box-pouch: template
 How to make a box from colored cardboard?
In a modern creativity store you will find a huge selection of cardboard:
- Kraft cardboard (solid sand-colored material)
- Colored cardboard
- Velvet cardboard
- Holographic cardboard
- Glitter cardboard
- Cardboard with prints, drawings and inscriptions
- Textured cardboard and much more
IMPORTANT: All this variety of choice allows you to create cardboard boxes of incredible beauty and use them for any purpose.

 Cardboard for creativity
 Video: “How to make a cardboard box?”
How to make a cardboard box without a lid?
If you need to make a cardboard box without a lid, you should also use a template. This product is perfect for storing personal items: pencils, cosmetic brushes, hair accessories and much more.

 Box template without lid
 Video: “Do-it-yourself box without a lid using origami technique”
How to make a cardboard box for candy?
Boxes of chocolates don’t have to be bought in a store; you never know exactly what will be inside. It’s always nicer to make a box with your own hands, fill it with candy to your liking and give it to a loved one. This will not only be a “delicious” gift, but also very original and special.

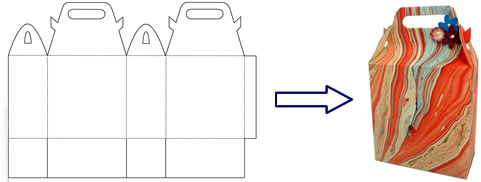
 Box with handles: template
  Box with a butterfly: template
  Triangle box: pattern
 How to make a jewelry box from cardboard?
It is very convenient to store jewelry, jewelry and watches in a cardboard box. You can buy it or make it yourself, decorating it to your liking. If desired, you can make one or several sections inside the box.
A few tips and templates for making a flat cardboard box will help you make your own packaging of any size.

 Template for flat box
 Video: “DIY Flat Storage Box”
How to make a square box from cardboard?
A small square box can be used as a bomboniere or packaging for small surprises for your loved ones.
 Simple square box template
 How to make a triangular box from cardboard?
A triangular box can exist as a separate unusual package, or it can be part of a cake-shaped package.

 Triangular box template
 Do we decorate cardboard boxes with our own hands?
Decorating a homemade box depends only on how original and great your imagination is. The box should also be decorated based on the occasion (a holiday, for example, or the decor in the room).
How and with what you can decorate any cardboard box:
- Lace and fabric
- Satin ribbons
- Scoop and burlap
- Stickers and stickers
- Buttons and other accessories
- Sequins and stones
- Colored paper
- Kraft paper
- Drawings and inscriptions
Video: “5 ideas for decorating a box”
Boxes covered with fabric look very nice. These ready-made boxes look very festive, it’s very nice to give gifts in them (and receive them too :))
I found an interesting master class dedicated to similar boxes; you can make them yourself.
:
The technology for this work does not depend on the shape or size of the box. Finish the outside first, tucking excess material inward, and then, if desired, finish the inside.
You can also line the box lid with a thin layer of synthetic liner or cotton wool before covering it with fabric.
Manufacturing process:
Round box. In a bowl, mix a little PVA glue with water to the consistency of thick cream. Apply the fabric to the outside of the box, wrapping it so that there is a 2.5 cm seam allowance at the edges, and cut the required amount of fabric. Coat the outside of the box with glue and attach the fabric. Carefully glue one edge to the other where they meet, tucking it inward, as shown in the picture (to do this, cut the material with a small margin in length). 
Make 2.5cm (2.5cm) seams along the top and bottom of the box at equal intervals. Tuck the cut material onto the bottom of the box and inside (on top) and glue it. 
Cut a circle of fabric slightly smaller than the bottom of the box. Turn the box over, coat its bottom with glue, check that the fabric is positioned strictly in the center, going beyond the edges of the seam allowances folded and glued to the bottom. There is no need to overcast or tuck the fabric, as the glue will protect it from fraying. 
To cover the lid of the box, cut a circle of fabric with a diameter 2.5 cm larger than the lid itself. Glue it in the center on the top side. Make cuts on the seam allowances and glue them, folding them over the edges of the lid. 
Cut a strip of fabric about an inch wider than the side of the lid and glue it in place. Cut the excess fabric in a circle, fold it inside and glue it too. 
Rectangular box. Mix the glue in the same way as for the round box. Cut a piece of fabric so that when wrapped, one edge extends slightly beyond the other. Leave a 2.5 cm allowance at the top and bottom. Coat one side of the box with the prepared glue and glue the fabric, starting from the corner farthest from you. Sequentially cover all edges, applying only one of them at a time. Do not apply glue to the metal card window. Wipe off glue if it gets on the metal.
Continue gluing the fabric around the box, pressing down on the material to secure it. When you have finished gluing the last edge, turn the longer edge of the fabric under to finish it. 
Use a sharp pocket knife to cut out the fabric in the card window. Do this while the glue is still wet. Trim the fabric around the metal frame on three sides, leaving a small allowance on the side of the pocket where you will insert the business card.
If necessary, apply glue to the edges of the fabric along the frame to prevent it from fraying. Use a small brush for this. 
Place the remaining allowance inside the frame and glue it. Cut the card to the appropriate size to place in your pocket, label it as you wish, and frame it. 
Turn the box upside down. Glue the remaining seam allowance, tucking it to the bottom, first on the short sides of the rectangle, and then on the long ones, folding the corners diagonally. Cut a rectangle of fabric slightly smaller than the base of the box. Glue, covering the raw edges. Turn the box over, fold the seam allowances over the top edge around the perimeter and glue. 
For the lid, cut a piece of fabric so that it covers it along with the side edges, as well as allowing for an allowance to wrap over the edges. Apply glue to the surface of the lid and attach the fabric. Fold the fabric inward first from the short sides of the lid, and then from the long sides, cutting it at the corners so that the material lies evenly. 


