Volumetric macrame scheme. Macrame for beginners
The theme of macrame received a new round of development when the modern generation got excited about weaving baubles, funny keychains and “hippie” bags with long wide belts. Girls who do not yet know how to weave themselves tend to quickly catch up with the masters of this art form. A macrame weaving pattern for beginners will come to the rescue, which will speed up the process of introduction into the ranks of needlewomen. Even a few basic knots using the macrame technique will allow you to make your first interesting products.
Basic nodes
First of all, you need to learn how to attach threads to the base. The base can be a flat foam cushion, a wooden stick, a plastic ring, or the rope itself.
The fastening can be different, but the simplest is fastening with a lock inward and a lock outward.
The first type is done like this: a thread folded in half is placed behind the warp, and the middle of the thread in the form of a loop is bent to the front side.


The two free ends of the working thread are threaded into the resulting loop. The knot is tightened.


Fastening with a lock on the outside is done in the same way as on the inside. Only the position of the working thread changes.
A straight knot (roller knot) is knitted from two threads, first according to the principle of a lace on a shoe, then the threads are intertwined a second time and tightened in a non-standard way: two left and two right segments stretch in different directions. This unit has a crossbar on the left or right side(depending on which thread is leading).

A square knot is one of the main decorative elements in macrame. It is made on four threads, by double weaving them and tightening them into knots. First, a left-handed knot is woven, then a right-handed one: this creates a square knot (or a double flat one).


Several square knots woven one after another form a chain.

If you weave only knots in one direction, you will get a twisted chain. This technique is usually used when weaving hanging flower pots.

Rep knot - too important detail in almost any macrame work. Due to it, the woven fabric is strengthened. He also participates in decorating the design with convex “grooves”.
The rep knot can be either horizontal or vertical. The horizontal one is formed on four threads, as shown in the photo.


The vertical rep knot repeats the horizontal one, but on a vertical base.

There are also diagonal rep knots. They look very impressive in the product.

Practice the little things
Even knowing only a few basic components, you can already introduce a practical component into the theory.
For example, weave several multi-colored bracelets with square knots with inserts of beads or stones between the weaves.

Or you can try to puzzle yourself with the pattern of the bracelet and weave it according to the pattern. At the same time, it will be clear whether a beginner can read simple circuits or this will have to be given special attention.

You need to take two colored threads. Fold them in half and form a loop on the fold. This will be the clasp. The button is selected according to the diameter of the loop.

For convenience, the threads are fixed on a flat surface. Weaving begins from the loop with a simple knot for a length equal to the wrist.


After this, all the threads are collected with a rep knot into one bundle, and the excess ends are trimmed.

Simple and sweet. Or you can complicate the task and try to make a cute keychain in the shape of an oak leaf according to the diagram.

To do this you need to take two threads. Divide one of them in half and throw it over the middle of the second thread with a simple fastening.

The warp threads are lowered to the center and two rep knots are woven. Next, the warp threads are woven with one rep knot.

Take two new threads and pin them in the middle to the pillow along the edges of the first. Two rep knots are formed on both sides.


One end is taken out of service. In the center of the product, the right warp thread is woven onto the left bridle. The extreme threads on both sides are woven into brids, intersecting in the middle.

Additional two threads are reattached according to the same principle as the previous ones. Two more rows of rep knots are formed.
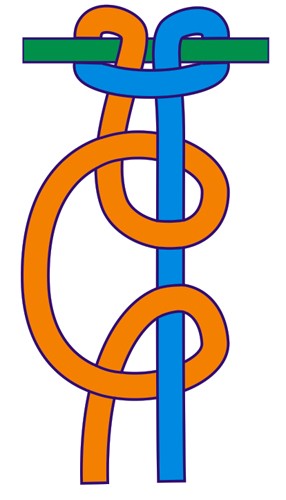
The art of macrame has never lost its popularity. And all because a simple rope, gray twine or just a cord in skillful hands turns into real masterpieces of handicraft. This “Cross” article has been prepared for beginners in mastering macrame. It will allow you to gain all the basic knowledge and master the initial skills of weaving using the macrame technique.
History of macrame
This art was born with the first knot that ancient man tied. The first nets for catching birds and fish (first knotless, then knotted) were made from grass or animal hair.
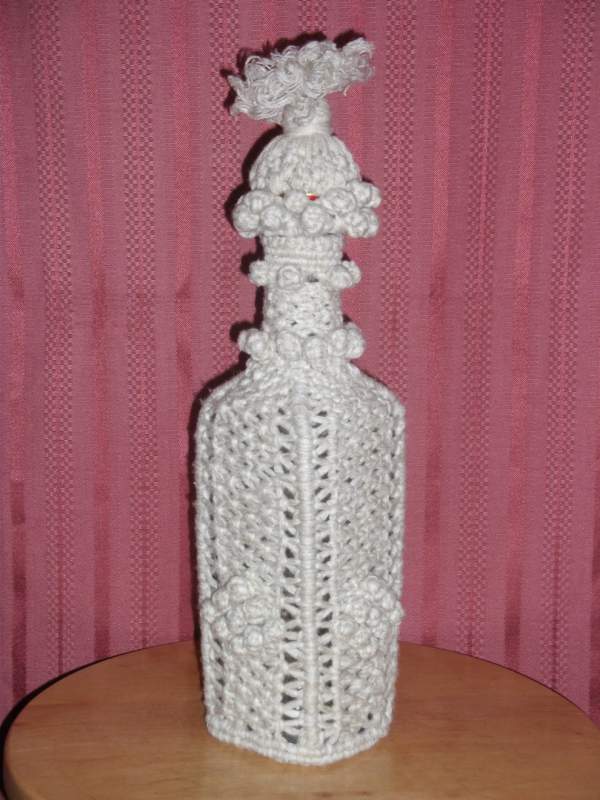
But the sailors of the sailing fleet improved this technique best of all. Due to their professional activities, they had to be able to tie various sea knots, of which there are more than four thousand. In their free time from their main work, they had fun braiding flasks, bottles, utensils, knife handles, etc.
Already from sailors in the 14th century, residents of other countries learned technology sea weave and used it in their products. That is why sea knots are so widely represented in the macrame technique.

If in our time simple material is taken for work, then for weaving of that time gold thread, silk threads and laces, animal hair, and leather were used. The craftsmen used amber, beads, pearls, and wood in their work (they used them as decorative elements).
Examples of products using the macrame technique
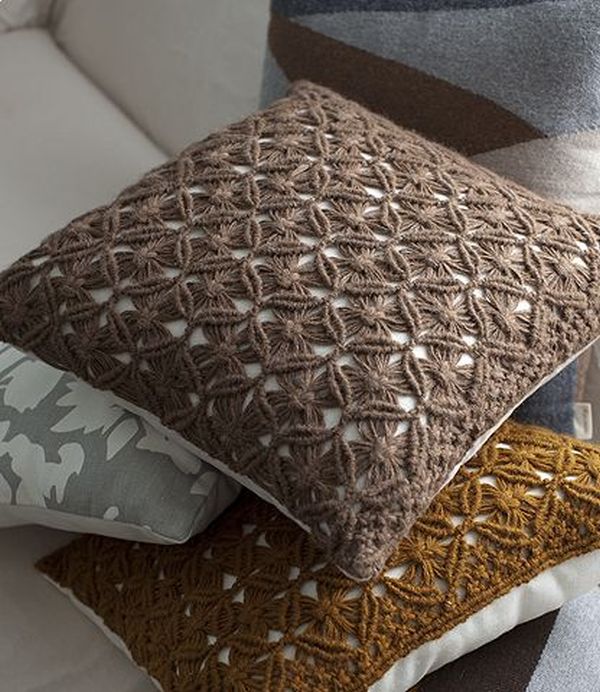
Very often, products made using the macrame technique decorate not only residential buildings, but also public institutions.

For many years, a stylized panel in the shape of an owl has been at the peak of popularity as a symbol of wisdom and good luck.

Wall panels are one of the most popular products using the macrame technique.


Weaving using the macrame technique can be combined with other types of needlework:
The simplest shelf will look much more expressive if you add thread weaving to it:

Jewelry and boxes for storing them can also be made using the macrame technique!


A hammock chair and a wicker curtain will make the interior of your home especially cozy!


What threads are suitable for weaving
For weaving using the macrame technique, threads of different thicknesses and degrees of twist are used.
From thin threads such as floss and coarse threads of various compositions (nylon, silk and cotton). they come out wonderful.

With a rope of medium thickness you can braid an ordinary one or an original one that will decorate your table.
Thick threads are used to create interior curtains, etc.

Flowerpots woven from thick linen or hemp rope look great.

Most often, this technique is used to work with:
- cords of different thicknesses,
- thick cotton threads,
- nylon cords,
- clothesline,
- leg-split,
- flat braid,
- sisal,
- jute,
- fishing line,
- plant fibers, etc.
Basic requirements for the selection of material:
- must be strong enough, but at the same time pliable;
- correspond to the chosen model and theme;
- be of good quality and nice colors;
- the threads should be moderately twisted and stiff, without this a beautiful knot will not work (if the threads are too hard, then they need to be softened by boiling them in water for a few minutes);
- the surface of the rope should not be too slippery, which is typical for synthetic threads;
- the threads should not be fluffy, as the knots in the product will be inexpressive.
You also need some tools and equipment.
Materials and tools
1) Device for fastening the thread. This can be a fairly hard and comfortable pillow.
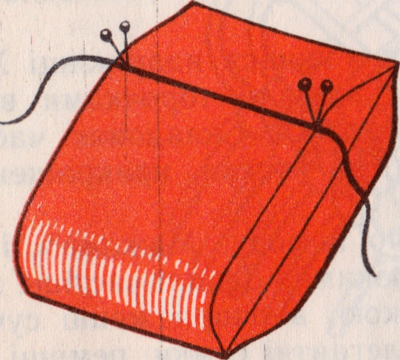
You can replace it with a piece of foam plastic. Or you can simply use the back of a chair or armchair covered with fabric. Sometimes even a piece of plywood measuring 25 by 40 cm or 30 by 45 cm will do. Place foam rubber 5–7 cm thick on it and cover it with strong fabric.
2) Pins for fixing parts of the product and giving the appropriate shape. They should be long enough, strong, with large heads.

3) Large crochet hooks.
4) Centimeter tape.
5) Scissors.
6) Knitting needles or an awl for untying ugly or incorrectly tied knots.
7) Clamps (like a vice) for fixing the base of the product.
8) Weights for leveling.
9) PVA glue for installation of products.
10) Decorative elements: buttons, buckles, beads, wooden balls - for decorating crafts using the macrame technique.

Beginning of work. Fastening threads
You have decided to knit a product using the macrame technique. We decided on the choice of model, selected the product design and material. Next you need to cut the threads. But they do not all perform the same role.
The basis is axial threads, along which they weave. Fewer of them are needed and they should be much shorter. Is there working threads, which weave knots. Naturally, when weaving, working threads are consumed faster and therefore much more of them are needed.
After cutting the thread, you need to attach it to the bar. More often it is an uneven fastening, where the axial threads are shorter than the working ones.
Remember that it is easier to start learning with thick and not very slippery threads, because weaving with them is much easier. Each node is clearly visible. And when you master the basic knots and weaving techniques according to patterns, you can move on to thin threads.
First way. Fold the thread in half, make a loop and lower it away from you. We pull the loose ends into a loop and tighten it. We have a lock on top, and the ends of the threads behind the loop. It should look like in the photo:
Second way. We make a loop again, bring it from behind to the bar, bend it towards ourselves and pull the ends of the thread into the loop. Lock on the bottom. Pay attention to the photo:
Third way not much more difficult, but more interesting. First, we secure the threads by bending them towards themselves. Then we pass the right end of the thread through the bar from top to bottom and tighten the loop. Repeat the same with the left end. If you do everything right, it will turn out like in the photo:

In the lessons of Selena's Workshop you will clearly see the process of attaching threads and weaving basic knots:
Basic macrame knots
To master the art of macrame, you need to master the technique of knitting basic knots.
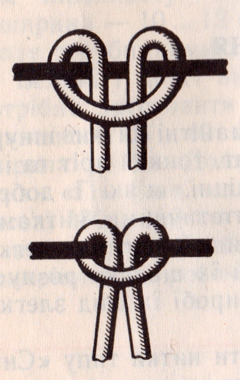
The main nodes are simple herculean knot And . Although there are a great many different knots in macrame, they are most often based on these basic knots.
Simple Herculean knot
Secure the two cords. Then place the right cord under the left one, and braid the left one into a loop. Pay attention to the diagram:

Right-handed and left-handed flat knots
Why are they called that? What is the difference? And they differ only in the thread with which weaving of the knot began. If you start from the right side, you will get a right-handed flat knot; if the first working thread is on the left, you will get a left-handed flat knot.
For a sample, take a couple of short length threads. Secure them vertically to the pillow. Threads No. 2 and No. 3 in the middle (axial) are the base, and we will knit with working threads No. 1 and No. 4.
We take thread No. 4 with our right hand, place it on the axial threads, and then under thread No. 1. With your left hand we pull thread No. 1 under the warp and pass it from below into the loop between the warp and thread No. 4. The figure clearly shows the sequence of work.
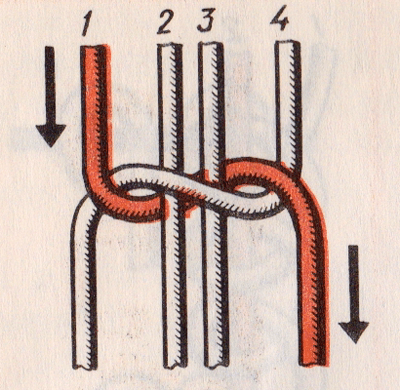
Then we tighten the knot. Now you see why the knot is right-handed. Because we start knitting with our right hand and the working thread on the right lies on top of the warp, and the left on the bottom. The horizontal thread is used for fastening.
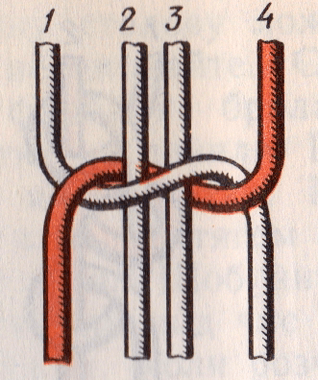
The left-handed flat knot is woven exactly the same as the right-handed one, only in a mirror image.
We start working with the left extreme thread No. 1. With your left hand we place it on the axial threads in the middle and under thread No. 4. Then with your right hand we grab thread No. 4 on the right, pass it under the warp and pull it from below into the resulting loop.
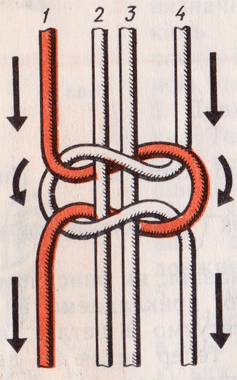
Square flat knot
To weave it, you need to master the technique of knitting flat knots: left-handed and right-handed. By combining these knots with each other, you will get a square flat knot. It is necessary to finish with a lock so that the product holds tightly.
Dasha Space shows how to weave a square knot:
Having mastered weaving a square flat knot, you can create various patterns and simple products.
Chain of square knots
We attach 2 threads to the base using an uneven fastening. Then we begin to alternate the left-sided flat knot and the right-sided flat knot to the length we need. We will get a beautiful chain that can be used as a bracelet, a handle for a bag or a decorative basket.

Rep knot
Another basic knot in macrame is the rep knot. It is very similar to a voluminous lace and is called a brida.
Rep knots can be vertical, diagonal and horizontal. It all depends on the location of the axial thread.
When combining different rep knots, you can weave decorative elements into the product.
How to knit horizontal rep knot? Pull the first thread (axial) horizontally near the working threads. Then make two turns from bottom to top and tighten the loop between turns. We repeat in the same way with another working thread. And so on until the end of the row.

If we need vertical rep knot, then we do the opposite. The working thread here is the main thread, located vertically. Practice tying a series of rep knots, horizontal and vertical brids.
Lesson from Svetlana Shchepkina on knitting rep knots:
Tatting knot
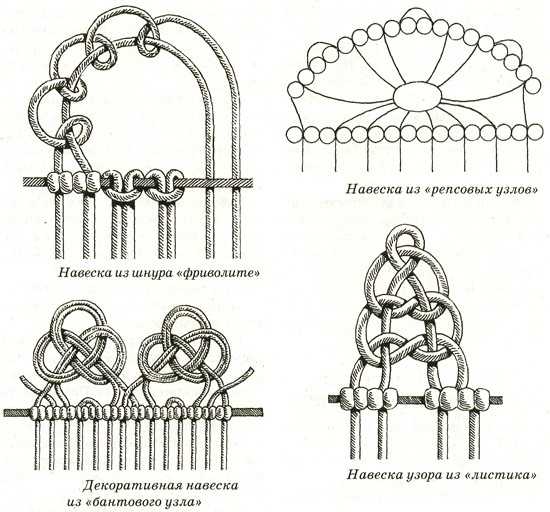
The edge of any of your products will look great, decorated with a wonderful pattern with such a frivolous name. It is woven quite simply, but looks very impressive. A tatting knot can be woven from either two or four threads. In the first case, one thread is braided by the second, and in the second, two outer threads braid a group of main threads.
Secure the working thread with a lock to the face. Bring the left thread under the warp, then over the warp and into the loop. Then bring the left thread back over the warp, then under the warp and into the loop.
How to weave a beautiful ribbon from tatting knots, knitted in pairs, see the mini master class by Yulia Zheglova:

Chinese knots
Chinese knots very often carry a hidden sacred meaning. They are quite complex, but look elegant. One of them is called "Lotus". It is often used for weaving various pendants and laces.

How to knit a Chinese Lotus knot. It is necessary to place two threads on the pillow, one on top of the other, and secure them with a pin. Then alternately lay the ends of the threads in a circle: the first - on the second, the second - on the third, the third - on the fourth, and thread the fourth into the loop of the first thread. Gently pull each end in a different direction until a nice knot is formed.
How to tie a Chinese Lotus knot, watch the video from Svetlana Shchepkina:
Macrame weaving patterns
The “Spider” weaving pattern is very often used to create products using the macrame technique.
First, several square knots are made, then one of them is tied on three to six threads in the second row. The basis of the product is the fourth and fifth cords. When doing the third row, make one square knot using the same warp (4th and 5th cord), and then add the 7th and 2nd strands to the work. The fourth row of the pattern uses threads 4 and 5, as well as 8 and 1. Pay attention to the pattern:

See other macrame weaving patterns below:


Master class for beginners “Pops using macrame technique”
Very often, various rooms are decorated with living plants. To create a special style and atmosphere, flowers can be placed in a glass vase. And if you place this transparent vessel in a flowerpot made with your own hands using the macrame technique, you can decorate the interior in an original way.

You can create a pot for a flowerpot in the same way.

No special skills are required here. The main knots of macrame are described in detail above.
To complete the work you will need the following materials:
- round glass vase;
- nylon threads;
- a little tape;
- sharp scissors;
- mounting base.

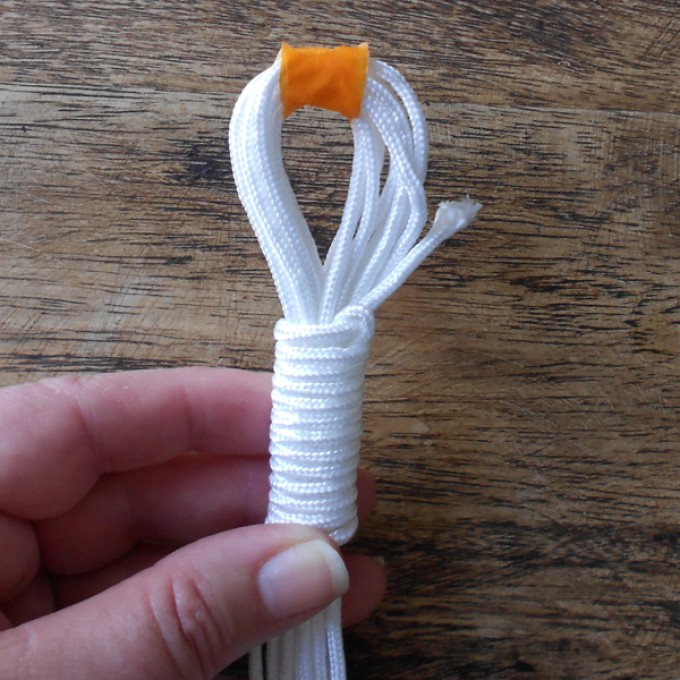
The order of work. Take 8 threads, fold them in half and secure with tape.
The calculation of thread consumption for work is approximately as follows: multiply the height of the product by 4 and add a little more for insurance. If the threads are doubled (as in this case), then you need to multiply by 8, not 4.

Then take the ninth thread and wrap it tightly around the previous threads to create a fairly strong loop.
Take a good look step by step photos. They show the operating procedure in great detail.

Carefully cut off the excess with scissors.

Then we divide our bundle into 4 parts, each of which will also have 4 threads. And we begin to knit a left-handed flat knot. We place the working thread on the left above the axial threads and under the working thread on the right. Next, we pull the right thread under the axial threads into the hole and tighten the knot. And so on to the height we need.

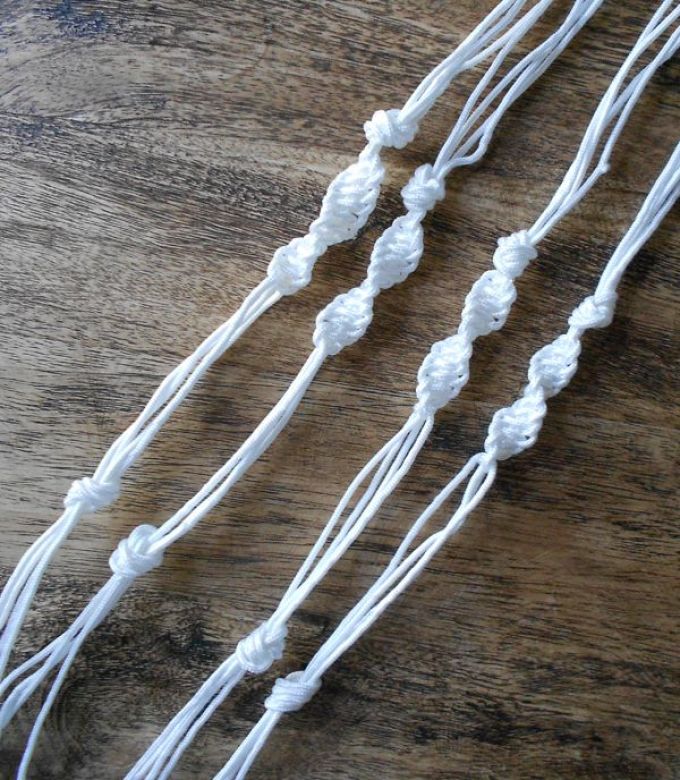
This is how we knit a twisted chain.

After several macrame knots, you can step back and tie the threads again with a simple knot.

In the same way, we need to weave three more such cords.
Then we begin to make the base for the vase. We divide each part in half with 2 threads.

And we tie these knots:

Flat knot...

...and twisted
At the bottom we decorate the product with square knots and braid it tightly so that the vase does not fall out.

We tie a knot at the end of each thread. To make it hold tighter, it can be melted.

This is such beauty!

All that remains is to insert the vase and admire the beautiful result.
CategoriesEvgenia Smirnova
To send light into the depths of the human heart - this is the purpose of the artist
Content
Now we will tell you what macrame is, how to create wicker items and why you need it. The word macrame is of Arabic origin, which means fringe, lace, braid; to put it simply, it is knotted weaving.
Story
Over the centuries, people have created many types of handicrafts. One of them is macrame. Over time, they were improved, and one day they turned into decorative, and then into artistic weaving. Knotted and knotless (braids), flat, figured - these types of weaving existed in Rus'.
Material
Can be used for macrame a large number of material. The most common are: strips of leather, cords from various fabrics, plant fibers, sisal, fishing line, jute, twine, thin wire, cotton, silk, linen and wool threads.
Beautiful products can now be created from synthetic materials. Not so long ago, needlewomen used natural tones in their work. Linen was considered very popular. Natural colors not so much, so a little later they started using thread dyeing.
Most lace is created in light colors, but well-chosen multi-colored combinations are also pleasing to the eye. Before choosing the necessary colors and material, you need to decide on the theme. To prevent the material from deforming, it must be washed and boiled for 10-15 minutes. Only in this case will your product have its original shape and appearance.
Material requirements
The material should be durable, moderately twisted and pliable. If you want a clear relief pattern, then the material for weaving macrame needs to be twisted tightly.
The threads can be lengthened, since it is not always possible to cut the required length. You can do it differently. You need to swap the long and short threads, but it is best to attach the ends to each other using knots. All excess can be easily cut off. It is very easy to connect nylon material, as it melts.
Choosing macrame color
If macrame weaving is done with multi-colored threads, then the choice of colors must be given special attention. If you know, color has a psychological effect on a person. Therefore, the colors for weaving must be combined. Each color has its own shade and nature of impact on a person. Therefore, the impression received from the woven item will depend on the colors chosen.
Tools for weaving macrame
Weaving macrame does not require special equipment. For weaving you will need scissors, a needle, a ruler, metal knitting needles, a hook, a spindle, clamps (for attaching the supporting thread), and blocks. If you want to start installing products, you will need glue.
Making macrame knots
The main thing in macrame is the Herculean knot. To tie it you will need two 10 cm threads.
They must be laid vertically on the pillow, and the end of each must be secured with a pin. The right thread must be brought under the left, and the left thread must be brought from the bottom up and into the loop. After this, the resulting knot needs to be tightened.
First flat knot. To begin, 2 threads must be secured to the base with an uneven fastening. Once you do this you should have 4 ends of thread. Next you must distribute them. You need to count from left to right.
Let's summarize. The horizontal thread is used for fastening. The second base is threads 2 and 3, which are necessary for tightening the knots. This is a must-know for anyone who is planning to get serious about weaving macrame. Now let's move on directly to weaving a flat knot.
You need to take the right working thread with your right hand and place it on the warp, as well as under the left working thread. After this, with your left hand, take the left working thread and bring it under the warp and from below into the loop that is formed between the warp and the right working thread. This way you will weave your first flat knot.
If you know how to weave it, you can try to make a left-handed twisted chain. All actions must be continued on the sample on which you weaved earlier. Tie the first 3 flat knots. If you look at the sample, you will notice that the group of nodes has turned slightly to the left. The sample on which you weave macrame must be turned 180 degrees to the left.

After this, you need to weave 4 more first flat knots. When everything is ready, the sample must be turned 180 degrees to the left again. Repeat weaving 4 knots again. If you continue, you will end up with a left-handed twisted chain. I advise you to make sure that the base is not visible. If you did everything correctly, your sample will be beautiful. And remember that for the convenience of weaving macrame, the sample must be secured with a pin at each turn.
Now let's try to learn how to weave a second flat knot. To weave, you need to strengthen the threads on the warp 2. The right working thread must be taken with your right hand and brought under the warp, as well as onto the left working thread. After this, with your left hand you need to take the left working thread and place it on the warp and insert it into the loop from above, which is formed between the warp and the right working thread. Thus, you have a second flat knot.
This way you can weave a right-handed twisted chain. Work must be continued on the started sample. First tie 3 second flat knots. If you look closely at the sample, you will notice that it has turned slightly to the right. Your next action will be to rotate the sample 180 degrees to the right. Next you need to weave 4 second flat knots. After this, the sample must be rotated 180 degrees again and the steps described above must be repeated.
Square flat knot. To weave it, you need to fasten two threads to the base. Next, tie the first flat knot, and immediately below it - the second. Combining them together, you get a square flat knot. To know for sure that it is finished, you need to create a lock, which can be obtained on both the left and right sides. It all depends on which knot was tied first. Knowing how to weave a square flat knot, you can create patterns.
Chain of square knots. Using the method of uneven fastening on the base, you need to strengthen 2 threads. After this, you need to tie the first flat knot, then the second flat knot. If everything is done correctly, then you have a square knot with a lock on the right. If you alternate flat knots, you get a chain of square knots.
Clothes woven using the macrame technique
A few examples of beautiful women's clothing, these clothes are a real masterpiece. Handicraft - macrame weaving is a rather complex hand job, but the result is impressive. any woman will be jealous when she sees such an outfit on her rival.


Macrame is a craft with a long history, based on weaving knots. Having mastered this technique, needlewomen begin to create products of incredible beauty. These can be key rings and bracelets, or longer voluminous works, including panels, flowerpots and even hammocks. Macrame for beginners seems to be an incredibly difficult form of creativity, but if you master the basics of this skill, then the process already arouses interest, not fear.
Macrame is a craft with a long history.
Macrame lessons begin with mastering the basic knots. Only after the technique of their implementation has been mastered, you can begin to perform the first work.
Master class in pictures step by step. Main nodes:
Flat right-handed. To perform this element, you need to take a couple of threads and attach them to the bar. The result is four ends. Weaving is done with outer threads, and the central ones act as the base. The fourth thread must be placed on the main ones, and the first thread must be passed under them, and then pulled out between the warp and the fourth.

Flat left-handed. This knot is performed by analogy with the right-hand one, only in this case the work begins on the left side, and a fourth thread is passed under the warp.

Square. This is the main element of weaving. To perform it, you need to perform first the right-sided and then the left-sided flat knots.

Having mastered these knots, you can already begin to weave a twisted chain. It is mainly used in the manufacture of flower pots and other hanging structures.
Gallery: macrame (25 photos)


How to learn to weave a keychain using macrame
Even novice craftsmen can make crafts such as keychains and baubles. Understanding the intricacies of weaving a keychain in the shape of a dragonfly takes just a few minutes. Then all you need to do is follow all the instructions.

Even novice craftsmen can make crafts such as keychains and baubles
Progress:
- Fold the lace in half and thread a couple of beads through it.
- Take the right tip and pass it under the center, then bring it out over the left tip.
- Take the left piece and pass it over the center, tighten it without allowing the beads to move.
- Take the left element again and move it under the center, bringing it above the right part.
- Tighten the knot that has formed.
- In order to form the wings, perform exactly the same element, only place it a little lower.
- To make the craft stronger, make an additional knot like this.
- Follow a similar pattern to make the second pair of wings, but a little smaller in size.
- Braid the body to the end, leaving only a small section with a loop.
Hide the ends of the lace inside the craft with a crochet hook.
Macrame technique for children 5 years old: making a bracelet
Even children can weave simple products using the macrame technique. preschool age. Just a few simple steps and your unusual bracelet will be ready. The child will be happy to wear his own jewelry.
Progress:
- Take a couple of meter laces and fold them together.
- From the edge, immediately retreat a length corresponding to the circumference of the wrist and add another ten centimeters to it.
- Make a loop in this place.
- Tie the laces around the back of the chair and place the main ends in the middle, and place the working ends on the sides.
- Throw the working element over the main one.
- Place the left end of the lace on the right and pass it immediately under the main one.
- Repeat the steps along the chain until the workpiece is twisted in the form of a spiral.
- After this, rotate the workpiece ninety degrees and secure it with a pin.
- Continue weaving and finally make a knot.
- Tie knots on the working threads as well.
- Attach a small bead to the other end.

Even preschool children can weave simple products using the macrame technique.
Trim the ends and coat with glue.
Pots using macrame technique: step-by-step instructions
Even a beginner who has mastered the peculiarities of tying basic knots can weave such a flower pot. No diagrams or complex devices are needed.
And the work will require a minimum amount of materials:
- pot or vase;
- white nylon threads;
- scotch.

Even a beginner who has mastered the features of tying basic knots can weave such a flower pot.
Progress:
- Cut the threads into eight equal parts and fold them into pieces.
- Attach them to the work plane using tape.
- Twist the eight prepared ones with an additional thread.
- Hide the end of the resulting loop.
- Divide the laces prepared for use into four parts.
- Make a twisted chain on each of these fragments.
- Measure the length and tie a knot under each strap.
- Leave about five centimeters from the top of the vase.
- Divide the parts of each element in half.
- Take a pair of threads from the first element and tie them with a pair of threads from the second.
- Make this pattern from all groups of elements.
- When the weaving reaches the bottom of the pot, knit four chains, making square knots.
- Repeat the same steps that were done at the very beginning of the work.
Trim the ends.
Advantages of weaving using the macrame technique
Increasingly, this type of handicraft is used in the learning process of children. Despite the fact that at the moment there are many other options for needlework, the choice is made on this one. This is due to a number of reasons:
- All lessons go from simple to complex. There are many schemes suitable for different age categories;
- crafts are characterized by increased strength and durability. You can store them in the most visible place and not be afraid that they will be appearance and integrity will suffer;
- In this way, you can make not only jewelry, but also useful things, including clothes, flowerpots and bags. This is an excellent motivation for action, since in the future such products can be used in everyday life;
- the possibility of making a mistake is reduced to a minimum, but even if there was one, it is very easy to correct it;
- Only simple and accessible materials are used in the work process;
- classes do not have to be held indoors. Amazing masterpieces can be created even in nature.
Handbag made using macrame technique (video)
Materials and tools required for work
The most important step in preparing for work is the choice of threads. Materials used are cotton, silk and even nylon. Regular laces are also suitable for weaving. Products made using twisted threads look incredibly beautiful. It is highly not recommended to use fluffy yarn for tying knots. Because of the fluff, the pattern will be barely noticeable, and the craft itself will seem very untidy.


