Original DIY crafts for the New Year. What crafts to make for school for the New Year New Year's fantasy DIY crafts
New Year 2017 is the year of the Red (Fire) Rooster, and the most popular gift will be its figurine or image. The Krestik needlewomen have a good tradition: to New Year's holiday prepare thoroughly. And this year will be no exception. Many of us will make or are already making a rooster with our own hands, or even not one, but several at once! After all, you must definitely please your family and friends with a handmade symbol of the year, and yourself with the fascinating process of creating this very symbol in various techniques handmade.
Creating a kind of GUIDE TO MASTER CLASSES from the Internet is also a tradition of our handicraft site, which was born a year ago. For you, dear craftswomen, we have selected only the best master classes online. Admire, look closely, discuss and choose the most colorful rooster! And then sew/knit/draw/blind/weave it. So, what technology can you use on the eve of the New Year holiday?
If you don’t have time to work, it doesn’t matter. The article contains links to craftswomen who sell finished works.
Cockerels made of paper and on paper
Making cards with the kids
If you are not a professional cardmaker, then before you start creating cards, be sure to read our article “Learning to make New Year cards with your own hands using the Scrapbooking technique.” In it you will not only find many ideas, but also get acquainted with the basic rules for creating postcards.
Any cockerel drawn by your child can be placed on a postcard. If it’s difficult for your child to figure out how to draw a rooster with his own hands, then show him this step-by-step instructions:

And then, it’s a matter of technology. Cut out the cockerel and make it the centerpiece of the composition. For example, your card can be this simple but cute. Use in your work New Year's paper and a bright red ribbon, add snowflakes, twigs and other holiday paraphernalia. Once you have a basic idea, the process of creating a card becomes much easier!

Photo from the site http://itsapatchworklife.blogspot.ru
If your child likes to color black and white pictures, give him this opportunity. Print the card template with a cockerel on thick cardboard and let your child get to work. Next, by cutting out the ball blank, you can add to the card voluminous snowflakes, adhesive half-beads imitating christmas balls etc. etc. Give free rein to your imagination with your baby))

YOU WILL NEED IT
8 more templates for coloring, as well as 2 step by step instructions for drawing more realistic roosters you will find in the archive, which you can download quickly and for free!
Take note of the idea with a cockerel on a stick, like on Elena Yurchenko’s postcard. Her cockerels are cut out of felt, or you can cut them out of paper.

Roosters made of colored paper
An applique made of colored paper can also be placed on a greeting card. But such an application can itself act as a postcard. To draw and carefully cut out all the details, children will need the help of their parents, but they can glue them themselves.

Olga-15 suggests making funny cockerels out of paper in her master class.

The Rooster blank is a rectangular sheet of flexible paper or thin cardboard, folded in half lengthwise. Its size is 13.5x10 cm. We make 7-10 inclined slits along the fold line (approximately every 1 cm). Their angle of inclination is 50-70 degrees, and their depth is ¾ of the height of the folded sheet.
Ekaterina Ivanova in her video tutorial shows how to make a red rooster using the Origami technique:
Roosters using Quilling technique
A very interesting idea is to lay out only a luxurious rooster tail from quilling paper. It's not as hassle as laying out a whole rooster, and it can turn out very impressive! Here is a rooster without a tail as a basis (see the photo below for how it looked in the original).

Print it on a color printer, and then fantasize about the tail. As an example, here is one such work (although the tail here is modest, but you will try, right?))

And if you are not afraid to make a whole rooster using the Quilling technique, then you can use this ready-made postcard as a basis:

Or this template:

A cheat sheet on the basic elements of Quilling to help you:

Button applique
And here are absolutely stunning handsome roosters, made of multi-colored buttons, half-beads, rhinestones and beads! You can take the contours of the cockerels from our archive as a basis (link just above).


Crochet cockerels
Many needlewomen are familiar with the crochet hook and will be happy to knit a cockerel from multi-colored threads. And Krestik will help you decide on a model and offer several master classes on this type of needlework.

You can also buy knitted cockerels from Svetlana.


Felt roosters
The fastest and easiest options for creating a symbol of 2017 are felt roosters. The material is easy to process, holds the shape of the toy well, and does not require processing of seams. Vice versa, hand stitches the products give it a special flavor and charm.


Photo from the site https://madeheart.com


Photo from the site http://ktototam.ru/
A rooster figurine carefully cut out of thick felt will be both a Christmas tree decoration and a pendant.

Photo from the site http://ktototam.ru
And if you decorate felt cockerels with embroidery, flowers and other decorative elements, it will turn out incredibly beautiful!

Photo from the site http://mmmcrafts.blogspot.ru

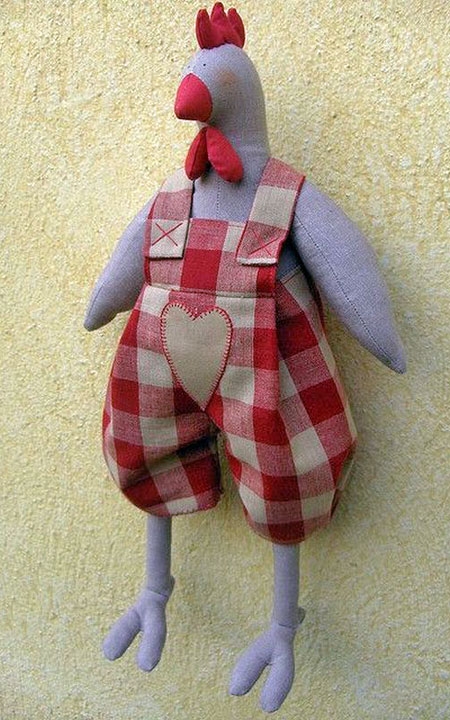
Roosters in Tilda style
Well, how can we manage now in our lives without the tilde-Rooster? On the ToySew website there is a master class on sewing this popular toy.

Master Vetic on her blog posted patterns for the Rooster and Chicken Peas based on the tilde pattern. An interesting couple will turn out if you put in the effort and patience!

And for inspiration:

Cockerel Yurik from Orange Toys
Maria Fedorova made a funny video about her tilda roosters (the link to the patterns is in the description of the video!):
Coffee cock toys
Aromatic, or coffee, toys compete with tildes in popularity. There are roosters using this technique.

A coffee cockerel can be like this:

Photo from the site http://zabavochka.com
You can easily sew it yourself using one of the patterns suggested above. “Cross” talked about all the intricacies of creating coffee toys in this master class.
If you think that you cannot cope with such work yourself, contact a specialist. Yulia Charikova made enough branded toys with the smell of coffee and put them up for sale at this address.

Fur interior toys
Oksana Svyatkovskaya will show her vision of a rooster and show how to properly sew it ready-made patterns. Her Rooster is made of faux fur, but who’s to say that it doesn’t happen or that it’s not good?)


In the workshop Everything for creativity (dljatvorchestva) there are a lot of blanks for painting and decoupage. Choose and create!

This is the beauty you can get:


If you don’t want to make a souvenir in the shape of a rooster, then you can decorate any wooden surface with an image of a rooster. The scope for creativity here is simply limitless!!! Here are just a few examples for inspiration:


Roosters felted from wool
Some craftswomen make wool toys that look like real ones! Let's admire and be inspired! And if you really want to buy one of these beauties, then look for them at the Masters Fair (the link is on each photo).


Elenia collected in one place many different Roosters felted from wool and suggested to MK how to create one of them. It turns out very cute!
Roosters embroidered with cross stitch, beads and ribbons
Perhaps you love embroidery more than other types of needlework. Then you can place the symbol of the year on a pillowcase, decorate it in the form of a panel, a picture in a frame or a brooch. The main thing is that the image of the Rooster warms your soul. And if you give away your work, find out the preferences of the recipient.
You will find more than 50 different patterns for embroidering roosters and cockerels in a special album
Useful tips
To decorate on New Year Christmas tree, table or house, it is not necessary to purchase various toys and decorations - many different original New Year's crafts you can do it yourself.
You will only have to purchase a few simple things (paper, cardboard, skewers, ribbons) and tools. You may already have many of these at home.
Read also:How to make a beautiful SNOWFLAKE
Here you will find interesting ideas and instructions for creating beautiful crafts for New Year:
Easy crafts for the New Year: candy canes

Even though the instructions are long, this craft is very easy to make.
You will need:
Felt in different colors
Hot glue, super glue or PVA glue
Ribbon or string (to hang the decoration)
Toothpicks, skewers or other parts that will act as lollipop sticks.
1. Cut one strip from each sheet of felt. You can choose its dimensions yourself, but in this example the length of the strips varies from 17.5 to 30 cm, and the width is 1 cm.

* For one lollipop you will need 6 strips. In this example, 2 stripes are used for each of the 3 selected colors.
2. Place all 6 strips on top of each other. Remember that as you roll the strip into a tube, some will start to stick out and you will need to trim them. The strip that is inside the tube will be the shortest, and the outside will be the longest.

* You can cut the strips with scissors as you twist them, or you can cut the necessary strips in advance (approximate length of each strip: 17.5, 20, 22.5, 25, 27.5, 30 cm).
3. Start rolling the strips, adding a little glue between them. Finally, make sure that the outer strip is longer than all the others. Glue the ends of the strips together.


4. Using hot glue, glue the stick to the resulting candy. If desired, you can paint the toothpick or skewer with white acrylic paint.

5. Glue or sew ribbon to the back of the candy so it can be hung on the tree.

New Year themed crafts: Christmas tree made from wine corks
To get the required number of wine corks, you don’t have to buy wine; you just need to order the corks on the Internet or in a store.

You will need:
Wine corks (26 corks were used in this example)
* Instead of corks, you can use cardboard or wooden thread spools.
* If you replace the plugs with toilet paper rolls, then by painting them you will also get required material for the Christmas tree. In this case, the Christmas tree will turn out larger than a Christmas tree made from corks.
PVA glue
Hot glue or superglue
Paints or glitter (to paint plugs or bushings)
Twine and a cardboard toilet paper tube (for the stump on which the Christmas tree will stick).

1. Paint the corks with acrylic paint or, best of all, apply PVA glue and sprinkle glitter on top.

2. After painting the corks (reels), glue them together in a pyramid (see image) using hot glue or superglue.

* It is advisable to glue one row of corks first, then another, and so on until you have the required number of rows. After that, simply glue all the rows together.
3. Cut part of the cardboard tube from the toilet paper, start wrapping it with twine, adding PVA glue to help the twine stick better. You've got a stump.

4. Using hot glue, glue the stump to the tree.
You can glue a button, ribbon, toy or paper star, or a small suitable object in an arc to the top of your head.

Crafts for the New Year (step-by-step photo instructions): snowflakes from clothespins

You will need:
Regular wooden clothespins
Small decorative clothespins (optional)
Medium clothespins (optional)
White acrylic paint
Sponge brush
Glitter, fake snow or salt
PVA glue
Thin wire.
* In this example, 6 clothespins of each size are used to make one snowflake. Therefore, purchase the required quantity and better with a reserve.
1. First, get rid of the spring mechanisms on the clothespins.

2. Paint all the clothespins.

3. Using hot glue or superglue, glue large clothespins together to form a snowflake (see image).

4. Glue medium ones on top of large clothespins, and stick small ones on top of medium ones.

5. Cover the resulting decoration with PVA glue and sprinkle glitter, artificial snow or salt on top. You can also use decorative snow (spray).

6. Thread a wire or ribbon through the hole in the clothespins to create a loop to help hang the clothespin.
Crafts for the New Year on the Christmas tree: patterns from puzzle pieces

You will need:
Small parts from old puzzles
Acrylic paint (in this example red, green and white)
Tassels
PVA glue or hot glue
Twine or thin ribbon
Small bell (optional)
Various decorations (optional).
You can create several variations of wreaths and other Christmas tree decorations from puzzle pieces, and here are some of them:
Puzzle candy
1. First, paint a few parts that you are going to use for the craft. In this example, 6 parts were painted red and 6 white.

2. When the paint is dry, use PVA glue to connect the parts together.
3. All that remains is to add the ribbon. If you have a hole between two puzzle pieces, insert the tape through it, and if there is none, just glue it, staple it, or make a hole with scissors.
Puzzle wreath

1. First glue all the parts together to make a circle (wreath).

2. Paint the parts in the desired color.
* If desired, after the paint has dried, you can paint some details in a different color.

3. You can attach a bell to the wreath. Thread the ribbon through the bell and then through the wreath and you can decorate your Christmas tree.
The best crafts for the New Year: New Year's candles

You will need:
Cardboard rolls for paper towels and toilet paper
* In this example we used: 3 bushings of 30 cm, 2 bushings of 20 cm, 3 bushings of 15 cm, 2 bushings of 10 cm, 1 bushing of 5 cm. But you can use other sizes by cutting some of the bushings.
Electrical tape or tape
Hot glue
Spray paint or acrylic paint
Battery-powered electric candles
Sequins
PVA glue.
1. Glue the sleeves together to form one large candlestick.
2. Using electrical tape, duct tape or tape (preferably double-sided), attach the spark plugs to the bushings.

3. Use hot glue on the sleeve to imitate candle wax. Squeeze the glue to create large and small drips of wax.

You can make several layers of “wax” - first apply one, wait until it dries, and then apply a second one on top.
*You will need a lot of glue.

*Hot glue may create unwanted "strands". They can be cut with scissors or melted with a hair dryer.
4. Prepare acrylic paint and start painting the entire cardboard tube candle holder. Choose the color yourself.
5. When the paint is dry, cover the candle holder with PVA glue and sprinkle glitter on top of it.

6. Apply PVA glue to the lower part of the candlestick (the lower parts of the bushings) and glue it to paper plate so that the structure holds up better.
7. Using hot glue, attach tinsel or garland to the candle holder and plate. You can add other decorations, such as a toy bird, artificial berries and flowers, ribbons, stars and beads.

Crafts for the New Year with children: New Year's lights from cardboard tubes

You will need:
Cardboard toilet paper rolls (their number depends on the number of lights)
Twine
Colored paper or colored cardboard
Hot glue or PVA glue
Scissors.
1. First, all the bushings need to be pressed down.
2. Cut each bushing into pieces (rings) 5-7 mm wide.

3. Glue the rings to the colored cardboard.
4. Trim the glued rings.

5. Now all the resulting lanterns need to be connected with twine.
To do this, the twine can be glued directly to the lanterns (with reverse side colored cardboard).

* Or you can cut out small rectangles from cardboard or paper, bend them in half and glue them to the lanterns. Next, glue twine to these rectangles, bend them and glue the ends.


Lanterns can be hung on the Christmas tree or used to decorate your home or other objects.

Creative DIY crafts for the New Year: burlap Christmas tree

You will need:
White jute burlap (decorative, for needlework)
*You can use other fabric, such as linen.
Scissors
Double-sided tape
Cone (you can buy foam or make it yourself from paper)
To learn how to make a cone, check out our article:Paper cone .
1. Cut the fabric into wide strips - about 5 cm.

2. Using double-sided tape, start gluing the strips around the cone, from bottom to top (see image). Each subsequent strip should slightly overlap the bottom strip.

* If necessary, use scissors to shorten the length of the strips.
*Adjust the fabric to make it lie the way you like.

3. The Christmas tree can be placed on a small pot, which can be filled with artificial snow, pebbles or sand.
* You can decorate the Christmas tree by gluing various decorations to it (using PVA glue or hot glue) - pompoms, stars, buttons, etc.


You will need:
Small fir branches(preferably artificial)
Artificial berries
Small tray.
1. First place the tray on a flat surface. Add spruce branches to the sides.


2. Now add the pine cones. They can be placed on top of the branches.

3. Continue adding pine cones to the tray, distributing them however you like.

4. Add a few more spruce branches between the cones.

5. Now you can add a few branches with artificial berries.

*If desired, some parts can be attached using hot glue.
* You can also sprinkle this New Year's decoration with artificial snow, salt or glitter, and to make this “snow” stick well, you can lightly coat the top of the cones with PVA glue.


Homemade crafts for the New Year: elegant spruce wreath

You will need:
Wreath (you can buy ready-made or make it yourself)
To find out how you can make a wreath with your own hands, visit our articles with detailed instructions: DIY New Year's wreath and DIY Christmas wreath
Decorative snow (spray and in regular form)
* As an alternative to decorative snow, you can use salt and PVA glue. Place the wreath on the table and apply glue to the top part, then sprinkle generously with salt.
Candles (battery-powered decorative candles can be used) of various sizes
Decorative branches (preferably white)
Round tray (you can use a board).
1. Place the wreath on a flat surface and sprinkle its top branches with decorative snow. After this, wait until the “snow” dries and hardens.

2. Place the snow wreath on a round tray, board or even cardboard.
3. Place candles in the center of the composition. To make candles look beautiful, try to place an odd number - 3 or 5, for example.


4. Now add white decorative branches.

5. Add decorative snow or a few piles of salt to the base of the candles.

Cool crafts for the New Year: table decorations

You will need:
Christmas balls
Superglue or hot glue
Decorative twigs and berries.

1. Remove the fasteners from the ball.
2. Apply glue to the branches in those places that will come into contact with the neck of the New Year's ball.

* You can fill the balloon with water so that you can insert a real flower or a couple of real spruce branches into it for scent.
DIY craft ideas for the New Year: a simple star made from ribbon

You will need:
Small board (plywood)
Small nails or screws
Chalk, marker or pencil
Bright ribbon
Scissors.
1. Draw a regular 5-pointed star on the board.

2. Nail or screw screws to the ends of the drawn star.

3. Starting from the top point, begin wrapping tape around the nails (screws) along the lines of the drawn star. You can tie a bow on top. Use scissors to cut off the excess tape.

Craft for kindergarten for the New Year: ice cream for the Christmas tree

You will need:
Corrugated paper or thin wrapping paper
Brown colored paper or cardboard or paper bag
Scissors
PVA glue
Thread and needle (if necessary)
Thread or ribbon (to hang the toy on the Christmas tree).
1. Make small cones out of paper or cardboard. To do this, cut out a circle (in this example, the diameter of the circle is 12 cm). Cut the circle in half and roll each of the resulting semicircles into a cone, gluing the ends together.

You will find more detailed instructions on creating a cone in our article: Paper cone.
2. Crumple a few pieces corrugated paper or thin colored paper so that you get small balls- these will be balls of paper ice cream.

3. If you want to hang your decoration, then thread a thread and a needle through the center of the paper ball. Secure the ends of the thread in place with glue and trim off the excess.

*If you want to use ribbon, just glue it to the cone and you can hang it on the tree.
4. Apply glue to the bottom of the paper ball and glue it to the cone. You can also apply glue to the edge of the cone.

The ice cream is ready and you can decorate the Christmas tree with it.
How to make a craft for the New Year (video): a snowman from a sock
Sometimes, in order for a holiday to become special, the presence of traditional attributes is not enough. Yes, you can’t go anywhere without a Christmas tree and the capital’s salad in the New Year, but it’s time to include it in the traditional celebration fresh ideas. Do-it-yourself New Year's crafts for the new 2017 Year of the Rooster will help us implement this idea.
Many of us carefully preserve real rarities from our childhood in the form of rare ones even now Christmas decorations, others are purchased every year in modern shopping centers something new, trendy from the latest collection of some designer brand... All this, of course, is good, but if you add to holiday decor A couple of handicrafts, made with your own hands, will immediately become clear - in this house they love and look forward to the New Year.
The first idea. Variegated balls
I want to completely transform a boring set Christmas balls, but don’t want to buy new ones? Then you will like the next craft. To implement this idea, we offer a fairly simple master class:
- take the balls and wrap them in bright scraps of fabric,
- tie with satin ribbon, braid,
- add spruce branches or an artificial flower to the knot.
Such New Year's balls, decorated in a single color scheme in graphic solutions that are consonant with each other, they will become an excellent decoration for the Christmas tree. And if desired, the craft can sparkle with all the colors of the rainbow (it is better to choose the palette that the Rooster loves - fiery, from bright red to pastel yellow). You can simply put the balls in a vase or put them on a bookshelf, or you can assign them the role of cards for guests, providing each decoration with a sign with the name of the guest.
Idea two. New Year's installation in a frame
An object for inspiration that will help you create DIY New Year's crafts for the New Year of the Rooster 2017 can be the most ordinary photo frame. Paint the frame red - a traditional color. winter holidays and place it (hang it, lean it against the wall, against books) in a visible place. The craft will look organic with the same balls or snowflakes. Anything dear to your heart will do, new Year decoration. It doesn’t matter whether there are many toys or just one - an advantageous frame will give any content a wonderful sound. Don’t forget about the bow, which can crown the top of the frame, be located on the side, or take on the democratic appearance of a ribbon that secures the craft to the wall. 
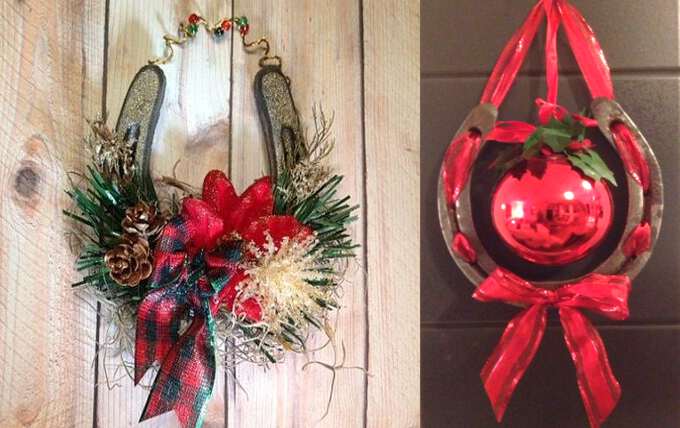
Idea three. With new happiness!
How do you like DIY New Year 2017 crafts with a horseshoe? This accessory can be purchased at a specialized souvenir store, or you can use one that was inherited from your grandmother. The effect in both cases will be amazing. A master class on turning an ordinary horseshoe into a bright New Year's souvenir can be presented in 2 versions.
Option one:
- Having placed the horseshoe with its “horns” up (this is the only way it will work to attract good luck and happiness), decorate its base with tinsel, spruce branches, cones, ribbons, in other words, whatever you have on hand.
- Attach wire, ribbon, braid to the horseshoe horns, as shown in the photo, to fix the impromptu Christmas wreath on the wall or door.
Option two:
Idea four. Hello Dedushka Moroz!
You have definitely never met such a Santa Claus as you see in the photo. Original master The class on turning the most ordinary object into a favorite of adults and children is simple and at the same time ingenious.
When you decide to decorate your home with funny New Year symbols, just follow these instructions:
- take a regular paint brush, paint the handle red and paint a few snowflakes on its surface,
- We cut out a rectangular strip from fluffy material and attach it to the handle. This will be Santa Claus's hat. Glue a contrasting star or snowflake to the side,
- glue on the eyes and nose, as shown in the photo. You can use black buttons as eyes, and a round piece will serve as the nose, which can be purchased at craft stores.
- we thread a coarse twine through the hole in the handle and place the resulting craft where we like.
A funny Santa Claus can also be made from a round brush. The face can be made from pink paper or fabric, placing eyes and a round nose there, on which we can safely place wire glasses. We make the hat more elegant - for the fur trim we choose fluffier fur, and we roll the cap out of red thick cardboard. Such New Year's crafts will look great on a Christmas tree or become the center of a decorative composition. 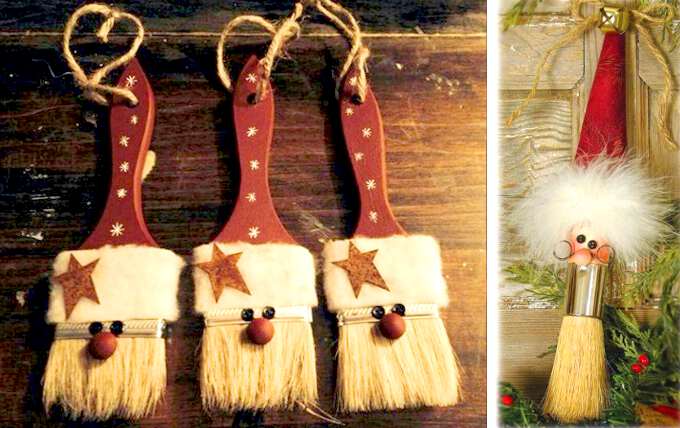
Idea five. Christmas wreath holder for photo
Master class on creating a creative wreath that can simultaneously serve as a holder for memorable photos or greeting cards, consists of the following steps:

Idea six. Funny snowmen
Make a whole family of funny snowmen and decorate your house with them - great way creation festive mood. Crafts using our master class are easy to make. So:

Idea seven. New Year's beauty with your own hands
Surprise your guests with an unusual version of place cards by making a small creative Christmas tree. The craft is easy to make, so take our master class and get started:
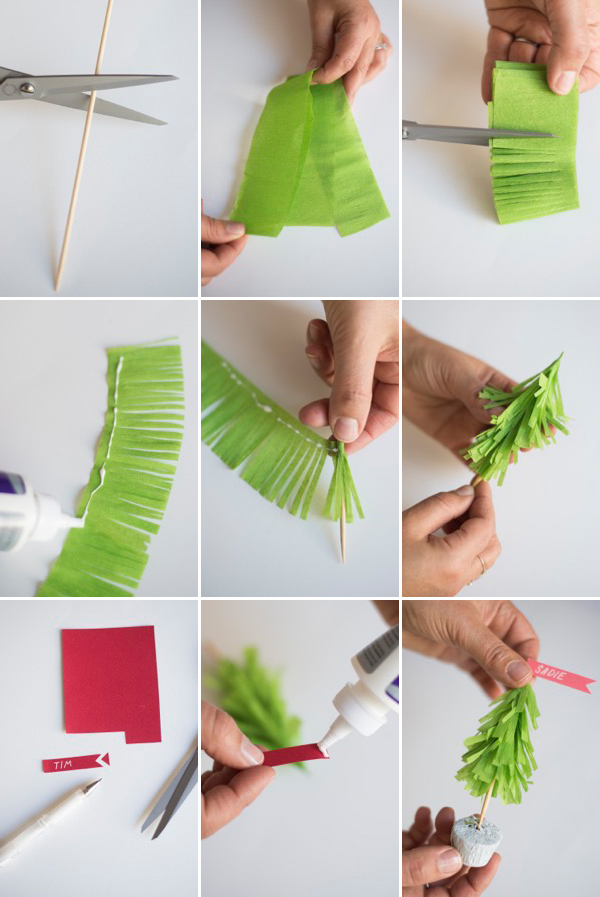
Idea eight. For fans of minimalism
Try to “grow” a whole forest of Christmas trees from paper cones. This unusual craft requires thick paper, beads, braid, scissors and glue. Having rolled up a cone from paper of the desired color (not necessarily green, it all depends on your vision and preferences), decorate its top with a gold star - the main attribute of the New Year is ready with your own hands! And if you want to create something special, decorate the Christmas tree with rhinestones, snowflakes, and placing a transparent ribbon on the top. The base of the craft is decorated with a braid of beads - it will be very beautiful! Place such decorations around your apartment, decorate a table, mantelpiece or dressing table with them and you will immediately feel that the New Year is just around the corner. 
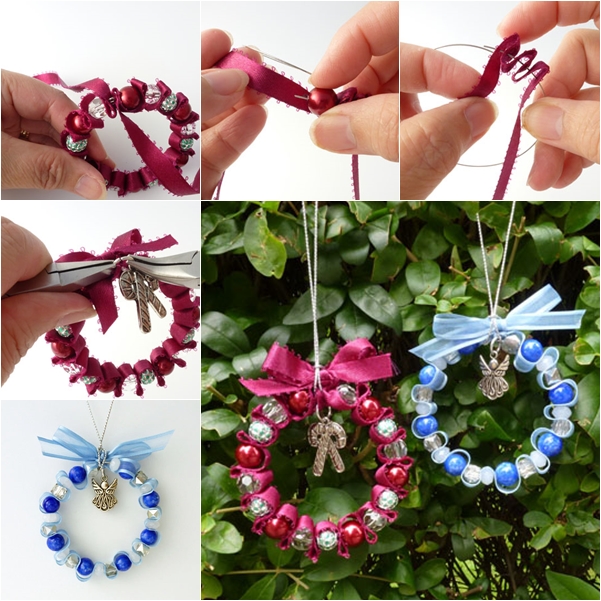
Idea nine. Charming wreaths
A very delicate and interesting Christmas wreath will be a wonderful element New Year's decor. Making such decorations is quite easy; you need a minimum of materials and time. Prepare a thin wire satin ribbons desired color and matching beads, a strong thread for hanging and get to work, based on the following master class:
- form a ring from the wire and start stringing a ribbon on it,
- alternate one fold of ribbon with a bead until the end of the wire,
- when the wreath is ready, hang a decorative figurine on top and tie a bow,
- secure the thread on which you will hang the wreath.
And finally. The owner of the coming year, the Fire Rooster, has great respect for handmade (English: hand made - made by hand), so much so that it prevents us from conquering the proud bird with our creative abilities? Using the photos presented in the review from original ideas New Year's crafts, you will succeed in this, surprising not only the eastern ruler of the year, but also all your loved ones with New Year's crafts with your own hands for the 2017 year of the rooster.
Sometimes, in order for a holiday to become special, the presence of traditional attributes is not enough. Yes, you can’t live without a Christmas tree and the capital’s salad in the New Year, but it’s time to introduce fresh ideas into the traditional celebration. Do-it-yourself New Year's crafts for the new 2020 Year of the Rat will help us implement this idea.
Many of us carefully keep real rarities from our childhood in the form of now rare Christmas tree decorations, others every year in modern shopping centers purchase something new, trendy from the latest collection of some designer brand... All this, of course, is good, but if Add a couple of crafts to the holiday decor, and it will immediately become clear that in this house they love and look forward to the New Year.
Variegated balls
Do you want to completely transform your tired set of Christmas tree balls, but don’t want to buy new ones? Then you will like the next craft. To implement this idea, we offer a fairly simple master class:
- take the balls and wrap them in bright scraps of fabric,
- tie with satin ribbon, braid,
- add spruce branches or an artificial flower to the knot.
Such New Year's balls, decorated in a single color scheme and graphic designs that are consistent with each other, will be an excellent decoration for the Christmas tree. And if desired, the craft can sparkle with all the colors of the rainbow. You can simply put the balls in a vase or put them on a bookshelf, or you can assign them the role of cards for guests, providing each decoration with a sign with the name of the guest. 
New Year's installation in a frame
An object for inspiration can be the most ordinary photo frame. Paint the frame red - the traditional color of the winter holidays - and place it (hang it, lean it against a wall, against books) in a visible place. The souvenir will look organic with the same balls or snowflakes. Any New Year's decorations dear to your heart will do. It doesn’t matter whether there are many toys or just one - an advantageous frame will give any content a wonderful sound. Don’t forget about the bow, which can crown the top of the frame, be located on the side, or take on the democratic appearance of a ribbon that secures the craft to the wall.
With new happiness!
What do you think of the New Year's craft for 2020 with a horseshoe? This accessory can be purchased at a specialized souvenir store, or you can use one that was inherited from your grandmother. The effect in both cases will be amazing. The transformation of an ordinary horseshoe into a bright New Year's souvenir can be voiced in 2 options.
Option one:
- Having placed the horseshoe with its “horns” up (this is the only way it will work to attract good luck and happiness), decorate its base with tinsel, spruce branches, cones, ribbons, in other words, whatever you have on hand.
- Attach wire, ribbon, braid to the horseshoe horns, as shown in the photo, to fix the impromptu Christmas wreath on the wall or door.
Option two:
Hello Dedushka Moroz!
You have definitely never met such a Santa Claus as you see in the photo. The original lesson on turning the most ordinary object into a favorite of adults and children is simple and at the same time ingenious.
When you decide to decorate your home with funny New Year symbols, just follow these instructions:
- take a regular paint brush, paint the handle red and paint a few snowflakes on its surface,
- We cut out a rectangular strip from fluffy material and attach it to the handle. This will be Santa Claus's hat. Glue a contrasting star or snowflake to the side,
- glue on the eyes and nose, as shown in the photo. You can use black buttons as eyes, and a round piece will serve as the nose, which can be purchased at craft stores.
- We thread a coarse twine through the hole in the handle and place the resulting work where we like.
A funny Santa Claus can also be made from a round brush. The face can be made from pink paper or fabric, placing eyes and a round nose there, on which we can safely place wire glasses. We make the hat more elegant - for the fur trim we choose fluffier fur, and we roll the cap out of red thick cardboard. Such New Year's souvenirs will look great on a Christmas tree or become the center of a decorative composition.
Christmas wreath holder for photo
A master class on creating a creative wreath, which can also serve as a holder for memorable photos or greeting cards, consists of the following steps:
Funny snowmen
Making a whole family of funny snowmen and decorating your home with them is a great way to create a festive mood. Using our master class, making a souvenir couldn’t be easier. So:
Christmas tree
Surprise your guests with an unusual version of place cards by making a small creative Christmas tree. The craft is easy to make, so take our lesson and get started:
For fans of minimalism
Try to “grow” a whole forest of Christmas trees from paper cones. This unusual craft requires thick paper, beads, braid, scissors and glue. Having rolled up a cone from paper of the desired color (not necessarily green, it all depends on your vision and preferences), decorate its top with a gold star - the main attribute of the New Year is ready! And if you want to create something special, decorate the Christmas tree with rhinestones, snowflakes, and placing a transparent ribbon on the top. The base of the craft is decorated with a braid of beads - it will be very beautiful! Place such decorations around your apartment, decorate a table, mantelpiece or dressing table with them and you will immediately feel that the New Year is just around the corner.
Charming wreaths
A very delicate and interesting Christmas wreath will be a wonderful element of New Year's decor. Making such decorations is quite easy; you need a minimum of materials and time. Prepare thin wire, satin ribbons of the desired color and beads to match them, a strong thread for hanging and get to work, based on the following master class:
- form a ring from the wire and start stringing a ribbon on it,
- alternate one fold of ribbon with a bead until the end of the wire,
- when the wreath is ready, hang a decorative figurine on top and tie a bow,
- secure the thread on which you will hang the wreath.
And finally. The owner of the coming year, the White Rat, has great respect for handmade (English: hand made - made by hand), so what prevents us from conquering the proud bird with our creative abilities? Using the photos presented in the review with original ideas for New Year's crafts, you will succeed in this, surprising not only the eastern ruler of the year, but also all your loved ones with New Year's crafts for the new year 2020.
Everyone wants this holiday to be remembered forever. Some time before the holidays, everyone begins to prepare for the New Year.
During the New Year's period, many people try to make crafts with their own hands. In this article we will tell you how to do crafts for New Year Rooster 2017 kindergarten from paper and not only. We will show photos and videos.
Crafts for the New Year of the Rooster 2017 in kindergarten.
Children in kindergarten are constantly making crafts. New Year 2017 is perfect occasion do something with your own hands in kindergarten. Let's give a few interesting ideas and show you the photo.
Felt Christmas tree toy.
Making such a toy with your own hands is very simple. Even the smallest child can do it.
- First of all, we make several strips of felt 10 centimeters wide. Then we make cuts on these strips.
- We roll the resulting material into rolls and tie it in the middle with a beautiful thin rope.
- All that remains is to fluff the strips and give them the shape of a ball.
This is such an interesting craft.
Beautiful bells made from disposable cups.
 Photo: Bells made from disposable cups
 You probably have unnecessary ones lying around at home. disposable cups from under tea or coffee. You can make wonderful Christmas tree decorations from them. We'll tell you how to make such a decoration step by step:
- We take disposable cups.
- We paint them with silver or gold spray paint.
- We make a hole in the bottom.
- Then we take a wire that is covered with New Year's tinsel and make a loop on it, leaving a long end.
- We tighten the wire into the hole and attach the ringing ball.
- The bells are formed into a beautiful “bouquet” and hung for decoration.
Christmas tree made of wire with tinsel.

Very simple craft for New Year 2017. Even the little ones can do it. The main thing is to give the children materials and tell them to be careful.
To make such a wonderful Christmas tree you will need iron wire, which is covered with festive tinsel. Nowadays it is not a problem to buy such wires in stores. You need to bend the wire in the shape of a Christmas tree, and attach some kind of star or button to its top.
Crafts for kindergarten: a house for children.

You can make such a wonderful house for a kindergarten. To make it you will need cardboard, paints and plasticine. You can also add some New Year’s attributes to the house, such as a Christmas tree and a snowman.

A very interesting craft can be made from transparent glue. In order to make such a craft, you need to prepare silicone glue and a baking mold in the shape of a Christmas tree.
- Pour glue into the mold halfway.
- Place sequins on top.
- Then add glue.
- While the glue is hardening, place some weight on the mold, for example a glass of water.
- Make a hole in the top of the craft and stretch a beautiful rope.
- The resulting craft can be hung on the Christmas tree.
Beautiful rooster 2017 with your own hands.
It's no secret that 2017 is the year fire rooster. Therefore, you definitely need to make a symbolic craft.
You can make a symbol of 2017 from cardboard. Detailed instructions here it is not enough to show a few photos:

 Photo: Rooster 2017


DIY crafts for the New Year 2017 made from paper.
Paper is a wonderful tool for creativity. DIY crafts for the New Year 2017 from paper are made quite simply and with minimal costs of materials.
You can make a huge amount out of paper interesting crafts for the New Year. Let's show you some beautiful ideas.

To make this wonderful craft you will need cardboard and colored paper.
- Make a cone out of cardboard.
- Take several shades of green construction paper at once.
- Using green colored paper, cut out many circles at once.
- Glue the circles onto the cone. Start from the bottom. Glue to the top edge of the circle.
This kind of Christmas tree can be made from cardboard and colored paper.
Tinsel tree.
 Craft: Tinsel Christmas tree photo
 You can make a Christmas tree using the same principle as the previous craft, only decorate it with New Year's tinsel.
Snowflakes made of paper.


 Photo: DIY crafts for New Year 2017
Everyone made paper snowflakes before the New Year. You can decorate windows with them, hang them beautifully on a Christmas tree, you can find a lot of uses for them.
Christmas tree made of napkins.
 Photo: beautiful New Year's crafts
 Very beautiful Christmas trees obtained from ordinary napkins. This craft is very simple. Even the smallest children can cope with the task of making it. To make it you will only need round paper napkins. You can also take wooden skewers. They will become the basis of the Christmas tree.
- Cut the napkins along the radius.
- Glue them together in the shape of cones.
- Place three of these cones on a skewer.
- It is best to attach it to beads glued to a skewer.
- The last smallest napkin is glued to the very top. It should be smaller than everyone else.
Craft ideas for New Year 2017: photos.


 Crafts for the Year of the Rooster 2017 photo


Crafts for the Year of the Rooster 2017: video.
Video tips from bloggers. How to make crafts for the New Year of the Rooster 2017 with your own hands.


