DIY postcard on the theme of winter. DIY New Year cards
Hello everyone, hello! Do you remember that I recently promised you that I would make a detailed article on the topic of creating New Year’s cards with your own hands?! I keep my promise and share my work.
So, today I will show you ways to make original cards for the New Year 2020, which you can make with your children. These will include voluminous congratulations, and simple applique, as well as origami and drawing.
Remember that such homemade ones will be a pleasure not only to give, but also to receive. And joint creativity will bring a lot of pleasure to both children and their parents.
The main elements of holiday souvenirs will be Snowmen, Santa Claus and little animals. All winter landscapes and all subjects associated with this magical event will also be appropriate. Whatever your imagination is enough for, then depict it!
And if you're ready, then let me begin.
The most unpretentious and affordable material for making this kind of crafts is colored paper and cardboard. You can build anything you want with these tools! And most importantly, the products are made quickly and simply.
Here, for example, is an applique in the form of a Snowman. Look how bright this congratulation looks. I suggest you definitely make such a card with the kids.
"Snowman with snowflakes"

You will need:
- thin colored cardboard (2 sheets: white and blue);
- colored paper;
- stamp ink: blue or gray;
- scissors (curly and regular);
- glue;
- pencil, markers, ruler;
- figured hole punch with snowflakes;
- compass.

Manufacturing process:
1. Take cardboard white and draw on it using a compass or round objects 3 circles of different diameters. These are the parts for the Snowman. Cut them out.

2. Now use stamp ink to draw circles to outline the outline a little.


4. Take the largest cardboard circle and coat it with glue in the center. Glue to the blue base. And glue a circle of smaller diameter on top.


5. Cut out two strips from construction paper of any color and glue them on top of the second circle. This is a scarf. Glue the smallest white circle on top.

6. Use a black marker or felt-tip pen to draw eyes and hands. Cut out a carrot nose from orange paper and glue it on.

6. Take white cardboard and cut out snowflakes from it using a shaped hole punch.

7. Glue them anywhere and in any order near the Snowman. Turn the base over and write or glue a greeting. That's all!

"Christmas tree with gifts"

You will need:
- blue, yellow, purple, gold, red and white cardboard;
- blue and green paper;
- multi-colored braid;
- snowflakes;
- toothpaste and brush;
- comb with teeth;
- PVA glue;
- transparent glue;
- regular and curly scissors.
Manufacturing process:
1. Take a piece of blue cardstock and cut it in half. Or you can fold the cardboard in half if you want to create an opening option. Using curly scissors, cut out a rectangle 110 by 150 mm from white cardboard. Glue it to the blue cardboard using PVA glue. Next, cut out a 120 by 20 mm rectangle from blue paper with curly scissors. Make an inscription on it: “Happy New Year!” and glue the rectangle to the white cardboard.

Now cut out a square with sides of 25 mm from purple cardboard, 30 mm from yellow cardboard, 40 mm from gold cardboard, and a 20 by 50 mm rectangle from red cardboard. Tie these parts with braid and glue the ends with reverse side transparent glue.
2. From green double-sided paper, cut out 3 squares with sides of 70 mm, 100 mm, 130 mm. Fold the squares like this: diagonally in half, unfold along the other diagonal as well. By unfolding the square, you will get lines along the diagonals. Fold the blanks as shown in the photo to form a triangle. Fold the top edges inward.


3. When you have folded all three squares, start gluing them with the smallest amount of PVA glue to the base. The next square needs to be glued inside the top one, and the third one - inside the second one.

4. Cut out snowflakes or make them using a shaped hole punch. Glue it onto the workpiece. Next apply toothpaste on the brush and using the “spray” method, running the brush over the comb, apply toothpaste to the Christmas tree and the entire product as shown in the picture. Additionally, the Christmas tree can be coated with transparent nail polish with glitter. Your craft is ready.
Now try to make a product not only from paper and cardboard, but also from beads.
"Christmas tree made of beads"

You will need:
- Scrapbooking paper;
- Beads different sizes, but of the same color;
- Glue gun;
- Cardboard;
- Double-sided tape;
- Scissors;
- Glue gun;
- Satin or organza ribbon;
- Pencil.
Manufacturing process:
Take cardboard and cut out a rectangle of the desired size - this is the base of the product. Then cut out a rectangle of scrap paper slightly smaller than the cardboard base. Glue this rectangle to the base using double-sided tape. Cut out several different sized squares and rectangles from colored paper. Glue them on top of the workpiece. Now, on the base, mark with a pencil a schematic image of the Christmas tree. And cover the picture with beads, ranging from large to small in size. Next, decorate the craft with a ribbon or organza bow.

By the way, in addition to beads, you can also use buttons. Here, for example, is the “Wreath” applique. This work is great for children 2-3 years old.

And here’s what kind of volumetric beauty you can create.


Or try making a hugging Snowman with your child. Here's an idea and a template for implementation.


Also use a regular hole punch to create small colorful circles. You can then easily and simply make an applique out of them. For example, depict Christmas balls.

Or the easiest and quick option for babies.

Don't forget about 3D postcards.
"Volume Christmas trees"

You will need:
- colored cardboard;
- scissors, simple and curly;
- pencil and ruler;
- decorations.
Manufacturing process:
1. From white cardboard you need to cut out triangles of different sizes for Christmas trees. Trim the edges of the triangles with curly scissors.
2. Take cardboard blue color and fold it in half. You need to make two such blanks.

3. Make markings in one of the blanks and cut out the steps on which the Christmas trees will stand.
4. Glue the cut piece inside the whole piece. No need to glue the steps! Then glue the Christmas trees onto the steps and decorate them to your liking.
Take a look at the next option. It turns out to be real magic. There are no difficulties at all. But how the kids will love to perform such a trick.
Or here's another idea with voluminous congratulations. The accordion bending technology is familiar to everyone, and with this approach, a real masterpiece is obtained.
"Star with balls"

You will need: cardboard, scissors, pencil, ruler, self-adhesive tape, colored paper, glue, gift paper, ribbon.
Manufacturing process:
1. Take cardboard and fold it in half.

2. Draw half a star and cut it out along the outline.

3. Then mark 7.5cm from the left edge of the base using a ruler and pencil. Do the same by turning the product over. Bend the cardboard along these marks, as shown in the photo below.


4. Now take the braid and use it to decorate the star. Cut out balls from colored paper and glue them.


5. Take another A4 sheet of cardboard of the same color and fold it in half.

6. In inner part glue a square piece gift paper with a New Year theme.

7. Glue two parts of cardboard blanks together as follows.

8. Close the product and decorate the front part with squares. Tie a ribbon.


Well, now the most interesting ideas for children's creativity from paper and cardboard.
Simple application of New Year's heroes using templates.

Option for making another volumetric Christmas tree + diagram.


But what a beautiful Snowman you can make on the front side of a postcard. Decorate with ribbon and real eyes. 
Or make bells out of cardboard. It looks very impressive and festive.

Don't forget to put into action corrugated paper. All products from it immediately turn out to be voluminous.

And here is a combination of appliqué and palm painting. Well, just lovely!

And what cute mittens you can cut out and glue to a festive background. In this way, bright congratulations are obtained.

The next idea is for older children, for seniors and preparatory groups in kindergarten or for students primary school. Here you have to cut and glue the parts yourself.

Or choose templates of New Year’s characters for the kids, and let them decorate the products too.

The main thing in this matter is imagination and accuracy, and your help in creation).
Templates and diagrams for making New Year cards
But for those who have little imagination, it’s best to use ready-made ideas and templates. Then you, too, will make cool products and give them to your closest people.
For example, you can easily and simply make Christmas trees from adhesive tape. Here are the samples.


Or, according to the following scheme, make a three-dimensional postcard.

According to the instructions below, cut out and create a congratulatory tree. 
Or use this template as a basis.

And everyone's favorite Snowmen.

Or mittens for creativity.

Here is a paper bunny for applique.

Or a template for a finished postcard. Print, cut out and color.

Another 3D option with a Christmas tree and snowmen.


A simple spruce in the form of an applique or regular coloring. Just right for children's creativity.

I also found a scheme for creating a three-dimensional product as a gift. I hope you find it useful.

AND beautiful description on creating winter candles. It looks very original.

How to make a DIY New Year's card with snowflakes flying out of it
Now I want to talk about how you can beautifully combine winter beauties - snowflakes - in such crafts. Everything is very simple. Let's take the basics and start the process.
"Carved Snowflake"

You will need:
- Snowflake stencil;
- Shiny cardboard;
- Scissors;
- PVA glue;
- Glue crystal (moment);
- Stationery knife;
- Rhinestones;
- Eraser;
- Ruler;
- Pencil;
- White ribbon.

Manufacturing process:
1. Download and print the snowflake stencil.

2. Select a dark blue cardstock and fold it in half (recommended size is 12 by 15).

3. Now cut the gray snowflake stencil with scissors.

4. Attach the cut out snowflake to the middle of the card on the left inner side and trace it with a pencil.

5. This is how the snowflake should appear.


7. Trace the small snowflake around the center of the larger one.

8. Take a sharp utility knife and slowly, carefully cut out the design as shown in the photo.

9. As a result, you should have 2 snowflakes: cut out and on cardboard.

10. Grease the cut out snowflake with glue.

11. Fold the base and glue a small snowflake (smeared with glue) in the center of the cut out snowflake.


12. Decorate the product with rhinestones.


Here is the finished sample. 

"Snowflake Kirigami"

You will need: white and blue paper, template, sharp stationery knife.
Manufacturing process:
1. Save and print the template on white A4 paper.

2. Place the blank on the cardboard and begin to carefully cut out a snowflake along the contour with a sharp knife.

4. Additionally decorate the front side, glue wishes or sign the card.
"A simple option for preschoolers"
You will need: snowflake diagram, cardboard, knife.
Manufacturing process:
1. Print out the snowflake template.

2. Choose a base for the product. Transfer the snowflake according to the stencil to the inside of the base. Carefully cut out the design. Fold the cardboard in half. Decorate the front as you wish.

These are such simple, but simply awesome ideas for creating greeting souvenirs with snowflakes.
Master class on making a postcard in the form of a mitten. The most interesting and easy ideas
"New Year's mittens"
You will need: background paper, card base, lace, ribbon with an inscription, lace, figured cardboard frame, double-sided tape, cardboard gloves, stamps, paint, fancy braid, glue.

Manufacturing process:


Well, now the selection of ideas is a little simpler, there are already options for preschoolers. Look and choose!


And of course, templates for making such products.


Postcards for the New Year 2020 with the symbol of the year Rat (Mouse) for children
As you know, this year will be held under the symbol of the Metal Iron Rat (Mouse). Therefore, a great idea would be to depict this animal on the product itself.
"Piggy"

You will need:
- colored paper pink shades(dark, light);
- base - a rectangle of cardboard;
- felt-tip pen or gel pen;
- pencil;
- scissors;
- glue.
Manufacturing process:
1. Save and print the pig template. Cut out the stencils.

2. Transfer the details onto paper using stencils and cut them out. At the same time, use darker pink paper for the legs and muzzle, and cut out the heels and ears from light paper. Also, do not forget to draw the fold lines, that is, all the dotted lines. Make a cut on the muzzle.


3. Take the base and fold it in half. Draw nostrils on the heel and eyes on the muzzle.

4. Fold the legs along the dotted lines. Lubricate the bent parts with glue and glue them to the base as shown in the picture.


5. Now make folds on the head. Lubricate the bent corners with glue and glue the muzzle.

6. Fold the heels and ears. Glue them too. Sign the front side.
And here is another idea with the image of the main character of this New Year. Watch it quickly and make it with the guys.
New Year card using scrapbooking technique. Step-by-step instructions:
Next, I prepared a product for you using the scrapbooking technique. Moreover, I chose the simplest option so that the kids could easily create their plans. Of course, if you have big kids, then choose more complex options.
“Christmas tree in scrapbooking style”

You will need:
- thick colored paper or colored cardboard;
- scrap paper;
- PVA glue;
- pen, felt-tip pen (or other similar item);
- decorations.
Manufacturing process:
1. Decide on the size of the Christmas tree that will appear on the craft. Based on this, cut several rectangles of different widths from scrap paper.

2. Using a pen, roll each rectangle into a tube. Secure each tube with glue so that they do not unwind.

3. Glue the tubes together.

4. Make a base and glue our glued Christmas tree onto it.

5. Decorate the spruce and the base itself as you wish.


And here are just more complicated ideas for creating New Year’s cards using this technique.


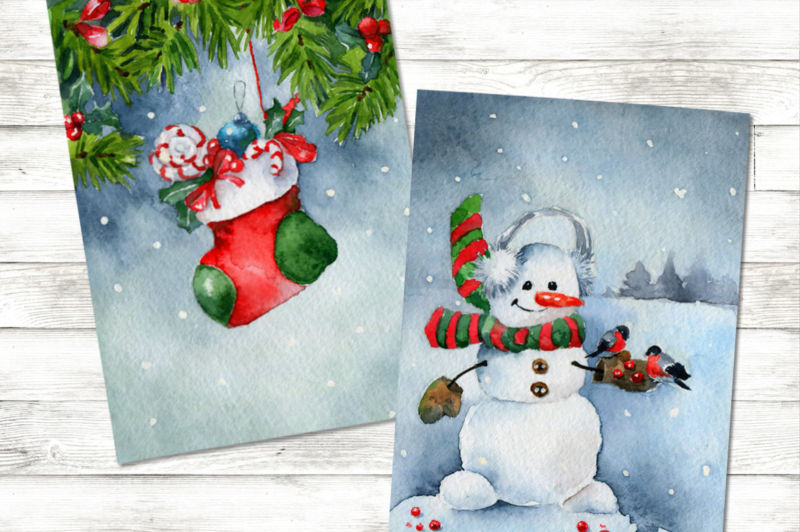
We draw New Year cards in watercolors
In addition to appliqué and paper folding, such works can also be created by simply drawing or painting certain subjects.
"Multi-colored garland"

You will need:
- scrap paper (or regular thick paper);
- scissors;
- paints;
- brush;
- simple pencil.
Manufacturing process:
1. First prepare the base for the craft. To do this, fold a thick sheet of paper or scrap paper in half.


3. Color the lanterns with paints and write the inscription “Happy New Year”.

Finger painting is a great option for kids. It turns out very beautiful.
"Finger Christmas tree"

You will need:
- thick sheet of paper;
- marker;
- ruler;
- paints.
Manufacturing process:
1. Fold a white sheet of paper in half. Now, using a ruler and marker, draw the “skeleton” of the spruce.


And instead of one finger and its print, you can use the entire palm at once. Just help your child color in the right way color scheme palm and leave its imprint.


Or draw the characters from the resulting trace.
You can also add various decorations to the drawn elements, such as buttons.

Basically, of course, you first need to come up with or choose a plot, draw it in pencil, and then color it. You can also use ready-made templates.


I would be incredibly happy to receive such a work created with my own hands.
Interesting ideas for cards made from cotton pads and felt with wishes
And I want to show you how you can use ordinary cotton pads and felt in crafts.
Again, everything is easy and simple here. Choose a theme, cut out felt or discs in the desired shape and quantity, glue it to the base and sign your wish. Voila, everything is ready!
I offer a variety of compositions for your choice.
- "Snow City";

- "Snowman";
- "Herringbone";

- "Father Frost";

- "Christmas decorations";

- "Bunny";

- "Christmas tree and bell."
Here comes the felt art.
- “Spruce from stripes”;


- "Cut-out silhouette";

- "Bear in the north";

- "Gorgeous";

- "Winter composition";

- "Round dance";

- "Forest Dweller"

And now I offer you ready-made options congratulations and inscriptions. Print them out, cut them out, and let the kids put stickers on their crafts.


DIY New Year cards for kindergarten - video selection
And finally, I have prepared a selection for you greeting cards from different materials for creating with your own hands in children's institutions. Be sure to check it out, great ideas!
That's all! As always, I wish you creative inspiration, good mood and a winter miracle! Happy New Year, friends! Bye bye.
35,086 ViewsNew Year It is not without reason that it is considered one of the favorite holidays in most countries of the world. Perhaps there are not so many celebrations on the calendar of celebrations that can create an unforgettable atmosphere, as if straight from the pages of ancient stories. Every year this fairy tale, embodied in reality, is created by the hands of tens of thousands of designers. They are the ones who think through New Year's decoration cities and thematic design shop windows and facades.
Ordinary people also make their contribution - on the eve of this celebration, we can let our imagination run free and plunge into the world of creativity, preparing a lot of hand-made toys, decorations, templates and designs, which will then become wonderful gifts and decor for the home or office. Of course, even if we make gifts with our own hands, it is not possible to reach everyone we would like to give. To do this, one would have to sew, glue and knit gifts for a whole year. Yes, and there is a problem with sending gifts.
Congratulate your loved ones by writing your wishes into the template you like!
Many of us have friends, relatives and acquaintances who live abroad, and postal services for international shipments are not a cheap pleasure. However, this does not mean that you should give up the idea of sending dear people at least small New Year's surprise. Moreover, the Internet makes it possible to reach thousands of kilometers in the blink of an eye by sending out at least a hundred postcards. And most importantly, such an e-card can become a tool for realizing your wildest creative ideas!
It is not necessary to take a postcard with ready-made text. It’s better to download a template that leaves space for placing wishes, and write a poem of your own composition or a congratulation addressed to a specific person. By the way, such a card can be printed, decorated with glitter, rhinestones or sequins, and then given to a colleague or friend. For the New Year of the Yellow Pig, we have prepared a whole collection of templates for postcards with thematic designs and symbols of the year. Download, save and create!
Templates for postcards with Pig
 Postcard “Symbol of the Year”
  Postcard “Pig for good luck”
  Postcard "Golden Pig"
  Postcard “Cute Pig”
  Postcard “Year of the Yellow Pig”
 Templates for postcards for the New Year 2019
 Postcard “Scarlet Haze”
  Postcard " Christmas decorations»
  Postcard "Hot Chocolate"
  Postcard “New Year's coolness”
  Postcard "Postcard"
  Postcard “Drawing on the snow”
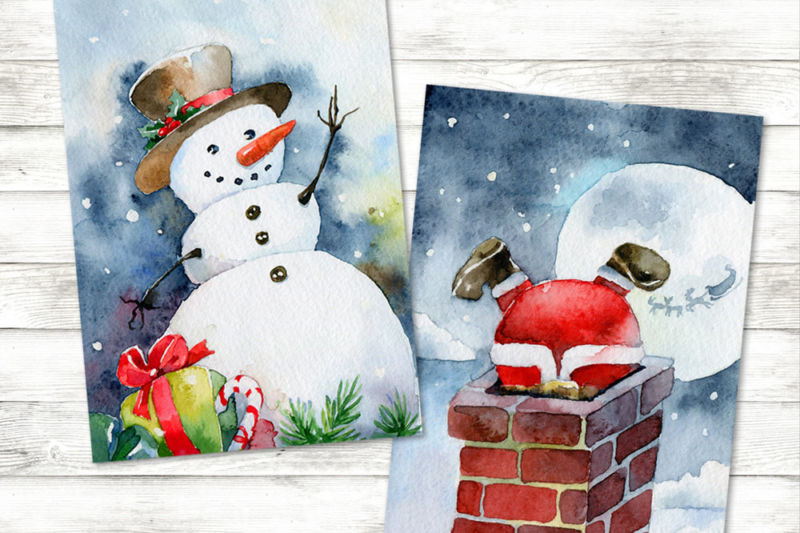
  Postcard “Gifts from Santa”
  Postcard "Christmas House"
  Postcard “Fir branches”
  Postcard “Christmas ball”
  Postcard “Oranges and cinnamon”
  Postcard “Cinnamon Christmas Tree”
  Postcard “Scarlet Sparks”
  Stocking Card for Gifts
  Postcard “Decorated Christmas tree”
  Postcard "Santa Claus Hat"
  Postcard "Christmas decor"
  Postcard “Snowy morning”
  Postcard “In Soviet style”
  Postcard "Golden Christmas"
  Postcard “Bunny with Christmas tree”
  Postcard “Light Snow”
  Postcard “Cute Snowman”
  Postcard “Snowfall in the forest”
 In an unusual and original way, you can congratulate your family, colleagues and friends on the upcoming New Year holiday not only with purchases, but also homemade gifts. For example, you can make New Year's cards with your own hands, using scrap materials and inexpensive sets of paper and decor. It is recommended to use regular cardboard as a base. But for decoration homemade cards Lace, multi-colored paper, and even beads are perfect.
After carefully studying our master classes, you will find many options for crafts and great ideas for creating bright and fun cards. However, most of the instructions are suitable for making crafts together with children and teenagers. Pupils of kindergartens and schools will certainly enjoy working on New Year's cards using all kinds of materials.
Benefits of making your own postcards
Making New Year's cards does not take much time, and you can create a truly unusual and very stylish product that the recipient will never find on store shelves. In addition to the uniqueness of such crafts, we can also highlight the opportunity to work together on original cards with children and teenagers. Among the master classes listed below, it will not be difficult to choose simple and interesting instructions that even kids will like. When making your own New Year's card, you can use a variety of materials, which eliminates the need to separately purchase any elements to decorate the craft. Stylish and very beautiful postcard for the New Year you can even make it from available and available natural materials.
Original postcard “snowflakes in a frame”
The master class on making a simple postcard discussed below is ideal for parents and children working together on crafts. That is why we recommend using these instructions to create light and stylish New Year's crafts and gifts. The actual production of such a postcard is carried out as follows:
- A rectangle is cut out of blue or light blue cardboard (the base of the postcard). A rectangle of the same size is cut out of white cardboard.
- On the white rectangle you need to make a small indentation inward on each side of 1-2 cm. The resulting small rectangle needs to be cut out. Thus, a kind of frame will be made.
- Cut out many different sized snowflakes from white paper. Glue these snowflakes onto blue/light blue cardstock. Glue the previously made frame on top of the snowflakes.
Multilayer cards
The most simple option To make a multi-layer card, you will use a scrapbooking kit and double-sided tape. The work is carried out as follows:
- A small circle is cut out on white cardboard. A golden or bronze stand is glued to it below. This element will act as a snow globe.
- Circles are cut out of colored cardboard and transparent durable film with a radius 1 cm larger than the circle in white cardboard. The film circle is glued from the back to white cardboard.
- Decor from a scrapbooking kit and sequins are glued onto a circle of colored cardboard.
- Pieces of double-sided tape are glued along the perimeter of the film circle.
- The circle with the decor is glued to the card using previously prepared double-sided tape.
Another simple one multilayer postcard You can also do it using the following master class:
- On three equal-sized “pages” of the postcard, different motifs are drawn on the theme of a snow-covered forest.
- “Extra” details are cut out from the prepared pages.
- The fourth page (of a similar size) is painted with blue and blue paint, complemented by shiny sequins (stickers) in the form of stars.
- And two pieces of white paper are cut out with a width of 12 cm and a height equal to the height of the previously prepared pages.
- Every 1.5 cm, a vertical line is drawn on the prepared paper elements and a bend is made (back and forth, alternating). Thus, sidewall accordions are made.
- The prepared central sheets of the postcard are glued between the accordions, creating the effect of a multi-layered postcard.
Silhouette applications
To create a beautiful silhouette card, it is recommended to use New Year's cardstock. Simply by printing such templates, you can easily prepare a large number of patterns to create various crafts. But also make a silhouette New Year's card you can do it yourself and “from scratch”:
- Draw the outline of a New Year's character or object (Christmas tree decoration, Santa Claus, bullfinch, snowman) on a white sheet of paper.
- Cut out the drawn silhouette and glue it onto a sheet of blue, blue or gray cardboard. Complete the picture with other elements (snowflakes, Christmas trees). They are cut according to a similar pattern.
- If you wish, you can make such a postcard a thin frame of white paper. This frame can be located either around the perimeter of a sheet (or half a sheet) of cardboard, or placed directly around the silhouette picture.
Memorial card from a child
Making a cool memorable card for the New Year with your child is both easy and simple. Below we looked at simple master classes with drawing with prints that will help you make very beautiful and funny crafts. We recommend using white cardboard as a base (a whole sheet or folded in half).
- "Penguin".
The central part of the child’s leg is painted over with white paint, the outline – black. An imprint is made and the beak, eyes and fins of the penguin are added to it.
- "Father Frost".
The fingers (from the index to the little finger) and the tubercles under these fingers on the palm are painted with white paint. Thumb and part of the palm under the wrist is painted with red paint. An imprint is made and completed with a face, fur and a pompom on the hat.
- "Herringbone".
The leg is painted with green paint and an imprint is made. When the paint is dry, toys and decorations are added to the Christmas tree.
Stained glass card from ready-made lasagna sheets
You can make a cool and original New Year's card not only from cardboard, paper and various decor, but also from food products. For example, on sheets of lasagna, you and your children can draw a very beautiful stained glass image. To work you will need the sheet itself, markers, and a ruler. The production of crafts is carried out according to the following scheme:
- On a sheet of lasagna, use a black felt-tip pen to draw thematic images (Christmas tree, house, snowman, bullfinch, pig).
- Chaotic lines are drawn under the ruler on top of the main drawing (like on stained glass). It is recommended not to do this a large number of auxiliary lines so that the main drawing is clearly visible.
- Using colored felt-tip pens with similar tones, the background is painted (for example, light yellow, orange, beige). The character himself is painted in the appropriate colors according to a similar scheme. For the pig you can choose pink and red markers, for the Christmas tree - green, light green, emerald.
- It will take about 1 day for the markers to dry on the lasagna sheet.
Postcard using colored stripes
You can make a very beautiful piece of paper using the applique technique from multi-colored paper. Christmas tree. For work, it is recommended to use 3-4 sheets of designer paper (with patterns, dots) or 5-6 sheets of regular colored paper. To make the craft, you will additionally need PVA glue and white cardboard. The work is carried out as follows:
- Strips are cut from colored paper with a thickness of 0.5-1.5 cm and a length of 10 to 1 cm (as the Christmas tree narrows).
- The longest strips are glued onto a sheet of cardboard first, gradually moving upward, you need to select strips with a shorter length. They can be placed on top of each other, with a slight indentation.
- You can complement the applique with a Christmas tree trunk cut out of brown cardboard. In the upper part (as a top) you can glue a rhinestone, half bead, or button.
A stylish card with a striped Christmas tree can also be made from strips from colorful magazines, cut-outs from musical notes or foreign newspapers.
Snow-covered cards using glitter
Making a snow card to give as a gift will not be difficult for either a teenager or a child. But to work with glitter, you need to take into account the need to use a transparent universal glue with a thick texture. You can use it as a base for crafts. old postcard or draw a thematic picture. It is also recommended to use both silver and white glitter, as well as larger hexagon sequins and shiny snowflake sequins. The following master class will help you easily make an original craft from such materials:
- Apply glue around the perimeter of the card and sprinkle it with white, silver sparkles.
- In the lower part and lower corners of the card, apply glue in larger quantities (creating a snowy effect) and similarly sprinkle with sparkles, as well as shiny hexagons.
- Separately glue star sequins on top and bottom (next to the shiny frame).
- Let the glue dry for 1 day.
Volumetric cards
Unusual voluminous postcards Great for congratulating relatives and friends. Your child can give this craft as a gift to his friend, class teacher or kindergarten teacher. There are many ways to create three-dimensional crafts. They can be made from cardboard and paper, cotton balls, pompoms and other available materials and elements. In this case, three-dimensional details can be located not only on the front part of the card, but also in the middle of the greeting “book”. Therefore, before starting work, it is recommended to study all the available options, their level of complexity and the required materials. Some of the master classes listed below are suitable only for adults or teenagers, but most of them even kids can repeat with their parents.
Postcards using origami technique
You can make a simple and original New Year's card using the origami technique using our next master class. For work, we recommend using designer paper with New Year's patterns. The work itself is carried out step by step according to the following instructions:
- 3 squares are cut out of paper with side sizes of 10, 15 and 20 cm.
- The smallest square is folded into a triangle along one and then along the second diagonal (the colored side remains visible).
- An unfolded triangle with visible folds is turned with one side down. Between the upper and lower parts of the diagonals on the left, the paper is folded downwards. Similar work is being done for right side. The square returns to its original position (flatten).
- The square is folded in such a way that the folds of the diagonals protrude to the left and right, and the horizontal folds between them are “recessed”. You will get an isosceles triangle.
- Taking the right diagonal (one!), you need to turn it towards the center line of the equilateral triangle and iron it. Repeat the work for the left diagonal.
- Using a similar pattern, fold the remaining squares. Glue them to a sheet of cardboard, from smallest to largest, forming a Christmas tree and carefully inserting the lower modules into the upper ones.
You can decorate a New Year's card with any thematic characters. To create an original craft with your children, we recommend choosing Santa Claus. All kids love this character. To make a postcard you will need a sheet of cardboard, colored paper, cotton wool, PVA glue, scissors, and a pencil. The work is carried out like this:
- Details are cut out from red, white, pink paper for gluing the applique (suit, face, shoes). The applique is glued onto cardboard.
- Balls are made from cotton wool to cover “fluffy” elements: beards, fur on a hat and a suit.
- Using PVA glue, cotton balls are glued onto the prepared base.
Additionally, you can glue not paper, but glue toy eyes. They will give the figure greater realism.
Volumetric Christmas trees
Do it step by step funny postcard with a voluminous Christmas tree – it couldn’t be easier. To work you will need cardboard (2 sheets), a pencil, PVA glue, scissors, 2-3 types of green paper. You can easily and simply make such a craft using the following master class:
- Draw a symmetrical Christmas tree on one sheet of cardboard.
- Cut out a Christmas tree from cardboard and transfer it to green paper of different colors (use the blank as a stencil). It is advisable to make 4-5 of these Christmas trees.
- Cut out paper Christmas trees. Fold each of them vertically in half (the colored part of the paper should be inside).
- Glue the Christmas trees folded in half together, alternating paper different types. That is, glue half of one folded Christmas tree to the other and repeat similar work for the remaining pieces. As a result, only the halves of the side Christmas trees should remain free.
- After the workpiece has dried, coat the side halves of the Christmas trees with glue and glue the finished figurine to the postcard. If desired, you can decorate it with rhinestones.
Volumetric figures
From ordinary paper you can make not only three-dimensional Christmas trees, but also other thematic ones. New Year's figures. For example, using blue, yellow and black cardboard and white paper, you can make this postcard with your own hands with a three-dimensional snowman:
- Cut out a large circle from white paper. Fold it 5-6 times.
- Cut the edges of the folded circle in a figurative manner (you can use the same method as cutting out curly edges for paper snowflakes). Lay out the workpiece and iron the resulting accordion ribs well to form a beautiful three-dimensional circle.
- Glue the circle to the blue cardboard. Cut out a small cylinder and eyes from black cardboard and glue to the snowman.
- Use yellow cardboard to make a strip for the cylinder and a carrot nose. Glue them to the figure.
Similar to the master class on making volumetric Christmas trees You can also make voluminous balls:
- Cut out 9 identical circles from multi-colored paper and fold each of them in half.
- Glue the halves of the folded balls together (make 3 separate balls from 9 blanks).
- After the three-dimensional blanks have dried, glue them to the cardboard and make a congratulatory inscription on the postcard. If you wish, you can make not 3 identical ones, but three different balls or one large volumetric ball.
3D effect inside the postcard
Using colored thick paper and plain white paper, you can make a cool three-dimensional New Year's card in no time. With the below simple master classes you will learn how to assemble such crafts with a Christmas tree and gifts.
- On a white sheet of paper, mark the vertical middle. You need to carefully draw it on the back side with scissors.
- Relative to the marked line on the front side of the sheet, draw a Christmas tree (or a stack of gifts) with the same left and right sides.
- Make cuts in the drawing along the prominent horizontal lines. For the Christmas tree this will be the transition between tiers (+ the bottom of the tree itself), for gifts - the lines between 1 and 2, 2 and 3 gifts (+ the bottom of the last gift).
- Bend the Christmas tree (gifts) towards you, along the vertical line previously marked with scissors. The sheet of paper itself will be folded with the protruding pattern inward.
- Dense colored paper fold in half vertically.
- Glue the white paper to the colored paper, ensuring that their central vertical lines match. Thus, when opening cards, protruding Christmas trees or gifts will unfold and become voluminous.
Felt cards
An unusual and very “cozy” postcard in honor of the New Year holiday can be made using felt. For work, it is recommended to purchase rigid fabric with a thickness of about 2 mm. Felt parts should be glued using transparent universal glue (thick). Regular PVA will quickly absorb into the fabric and the parts simply will not stick. You will also need a washable or disappearing fabric marker. The work itself is carried out as follows:
- On felt of different colors, draw the details of the house: roof, walls, door, window. Additionally, draw small snowdrifts on white felt (they will be located to the left and right of the house).
- First glue the walls to the cardboard base, then the roof and the remaining elements of the figure.
- Glue snowdrifts to the left and right. Additionally, the felt applique can be decorated with small felt cut-outs in the shape of Christmas trees.
Figured cards
Using ordinary cardboard and paper, you can easily and simply make cool shaped cards. To make any type of craft (in the form of a New Year's ball, Grandfather Frost or Santa, a snowman), you need to prepare the base (cardboard or thick paper) as follows:
- Fold the sheet in half.
- Use a pencil to draw half of the selected character or New Year's element. This must be done in such a way that the middle of the picture is located exactly on the vertical fold.
- Cut cardboard or paper along the contour of the created pattern.
- Lay out the shaped card and draw the “missing” half from the back of it.
To create another type of shaped cards (not with halves, but with a front and front part), you also need to fold the base in half, but place the fold on top. The object or character should be drawn as close to the fold as possible and cut out in such a way that the front and back of the craft remain connected. Next, you will need to draw the back part of the card, and glue some decor to the top of the front part that will partially cover the fold: for the snowman - a small cylinder, for Santa Claus - a hat with a pompom, for the Christmas tree ball - a shiny “cap” for hanging on the tree.
Postcards using improvised means
Even from such simple and affordable materials as ribbons, lace and beads you can make very beautiful and funny New Year cards. For selection best idea you can use the following hint:
- lace: glue it to cardboard in the shape of a Christmas tree, sew a Christmas tree from lace and then glue it to the card, use it to frame the perimeter of the card or create an openwork frame;
- beads: glue on thick transparent glue in the shape of a New Year's character or thematic element;
- ribbons: glue in the shape of a Christmas tree, use as “strings” to complement the balls shown on the card;
- buttons: by analogy with beads, they can be used to paste over a contour image (Christmas tree, snowman, Christmas ball);
- small cones: they will be a beautiful addition to the postcard; they can be glued both in the central part of the craft and in one of the corners;
- herringbone;
- New Year's flowers;
- Christmas decorations in the form of cones;
- ordinary cones;
- snowflakes;
- Christmas wreaths.
Making a postcard using the quilling technique
Working with quilling to make cards requires perseverance and attention. That is why this material is suitable for children school age. It will still be quite difficult for a child attending kindergarten to make many individual elements from quilling. For work, it is better to make the simplest shapes: twisted spiral circles and droplets. You can easily and simply make figures of Santa Claus, Snow Maiden, Snowman, and original Christmas tree balls from circles. The following figures are easily assembled from droplet elements:
You can also use quilling strips to make frames for contours or thin patterns on a contour drawing. With their help, you can complement the silhouette of a Christmas tree or Christmas ball with very beautiful patterns.
Ideas for decorating postcards with paints and pencils
To quickly and easily make a children's card for the class teacher, teacher or grandparents, you can use the most affordable materials - pencils and paints. The most simple solution will be drawing basic objects with your fingers. For example, you can make a cool snowman with white spots placed with your fingers one under the other. To do this, you just need to finish drawing his face, buttons, and handles. Using this principle, you can draw funny elves, bullfinches, penguins, and a Christmas tree. The main rule is to supplement the prints with an outline or other important elements. But with the help of ordinary pencils, using the following master class, you can also make stylish and unusual postcards:
- On a piece of paper, draw the outline of a New Year's character or a thematic element.
- Cut out the drawn picture.
- Attach the stencil remaining after cutting to a sheet of cardboard and paint over it with a pencil of the appropriate color.
- Complete the picture with the missing details (for example, you can add stripes to Santa Claus’s sleigh, and a hairstyle and nose, mouth, eyes to the Snow Maiden’s face) using a black pencil or felt-tip pen.
Using threads when decorating
Using cardboard and multi-colored threads you can make a stylish and an interesting postcard for the New Year's holiday in literally 1 hour. True, such work is more suitable for teenagers and adults than for children. Produce step by step original crafts The following short master classes will help you:
- "Embroidered Christmas tree."
The silhouette of a Christmas tree (the simplest) is drawn on cardboard. Holes are made around the perimeter. The Christmas tree is stitched with green threads. The finished card is glued to an additional sheet of cardboard (to hide the back of the embroidery).
- "Volume Christmas tree made of threads."
A pyramid is cut out of cardboard. At the bottom, the edge of the green knitting thread is glued. The entire pyramid is wrapped with this thread (the thread is periodically fixed with glue so that the figure does not unwind). The finished decor is decorated with rhinestones and glued to a greeting card.
- “The fluffiest Christmas tree made of threads.”
Green knitting threads are cut into small pieces. The outline of the Christmas tree is drawn on a sheet of cardboard. The entire space inside the contour is coated with glue. Immediately (until it dries) the trimmings made are poured on top of the glue. For better fixation, they can be slightly pressed down.
Conclusion
Presenting a handmade New Year's card is a pleasant experience. Additionally, using simple materials, you can easily make both a stylish and cool craft. Manufacture original postcards allowed not only from paper and cardboard. These can be ordinary applications or modern protrusions, volumetric crafts, not inferior to purchased postcards. You can also add various available materials to the cardboard: threads, lace, beads, pieces of fabric. These “ingredients” make for the most unusual and at the same time the most festive crafts. You can make simple New Year cards for both adults, teenagers and children. Simple instructions will help even kids from primary school or kindergarten create bright products with their own hands that they can give to their grandparents or give to their favorite teachers and educators.
Ten to fifteen years ago, almost all of us bought postcards to congratulate our family and friends on the holidays. Today we are less and less likely to regard this as something significant and valuable: it is easier to call distant relatives, and to give a gift to loved ones without “loading” them with extra waste paper.
However, cards made together with children can become not just a greeting card, but also a holiday decoration for your loved ones. They can be hung on the Christmas tree or placed on a shelf along with other New Year's accessories. We offer several simple ideas homemade cards.
Christmas tree made of threads
You will need:
Knitting;
hot glue;
pasta in the form of letters;
colored paper;
a can of artificial snow.
Make the base of the card out of cardboard according to your wishes (can be double or single, large or small). Cut out a triangle from another sheet of cardboard - this is the future Christmas tree, it should be slightly smaller than the postcard.
Take a triangle and wind threads around it in any shape so as to hide the cardboard base of the Christmas tree. The threads can be plain (preferably green) or multi-colored.
Hot glue the finished tree to the card base. Make sure the threads are not unraveling. Glue beads on top - decorations. Sprinkle with fake snow.
Use pasta or other letters to create the inscription of your congratulations. You can paint the letters in bright colors.
Serpentine can be cut from self-adhesive or regular colored paper using a hole punch.

Application "Snowman"
A regular applique will be interesting if it is made from different materials. We took felt and shiny sticky paper. You can also use other materials: foil, velvet and corrugated paper, pieces of fabric of different textures.
Otherwise, this craft is no different from a regular applique: the details of the plot are cut out and glued on. It is better to use PVA glue here.

Postcard “Mittens”
You will need:
Knitting;
PVA glue;
sequins, confetti or colored paper;
gel pen.
On cardboard - the base of the postcard - draw with a simple pencil contours of mittens. Then shade this pattern liberally with PVA glue. It is advisable that the glue jar have a sharp nose, then you can “draw” with it more accurately.
Cut 15-25 pieces of approximately 5 cm from the thread. Connect them in a bunch so that the ends are at the same level. Then start finely chopping them with scissors right above the “mittens” filled with glue. Thus, you need to cover the entire surface covered with glue. Correct the drawing with a sharp object - a toothpick, etc. Let the mittens dry and shake off excess lint. Make sure there are no bald spots - places where cardboard is visible.
Using a gel pen, draw a rope on the mittens and write your congratulations.
Stick on sequins, confetti or colored paper details.
Draw the outline of the card with PVA glue and glue a knitting thread of a different color (or the color of the mittens) onto it.
In this way, you can make “knitted” designs not only of mittens, but also of other items: socks, hats, scarves, and also decorate postcards, turning the details on them into fur, giving fluffiness to animals, snow, etc.

Card made of beads
You will need:
PVA glue;
beads or beads;
green felt.
Draw two circles of different sizes on cardboard - these are future Christmas tree decorations. Shade them liberally with PVA glue. Carefully sprinkle beads or beads so that the circles retain their shape and there are no empty spaces left in them.
Cut out of green felt spruce branch and stick it on top.
Do New Year's balls“pendants” in the form of a thread of beads.

Christmas tree made from magazine sheets
A Christmas tree made from multi-colored magazine pages will look original if you stick it on colored cardboard (we used velvet paper). Simply cut magazine sheets of different widths and roll them into tubes, securing them with PVA glue.
When the tree is glued, place a star or other decoration on top. You can also glue beads onto the Christmas tree itself.

Christmas tree made of tangerines
Prepare tangerines in advance by cutting them into slices and drying them on a radiator or in another way. This craft will be good decoration for kitchen.
You will need:
tangerines in circles;
hot glue or PVA;
flax seeds, sesame seeds, coriander;
sugar or gelatin.
Glue mugs of dried tangerines in the middle of the cardboard, creating a triangle.
Then use PVA glue to outline them and draw a trunk. Sprinkle these areas with coriander and flax seed.
Sprinkle sesame seeds on top of tangerines. This can be done without glue. If the mugs are completely dry and the sesame seeds do not stick to them, run a wet finger over them, then decorate with the seeds and let dry.
Draw snowflakes around the tree with PVA glue and sprinkle them with either sugar (they will be white) or gelatin (they will be tinted).
You can make a loop on the top of this card so that it can be hung in the kitchen.

Christmas tree made of pasta
You will need:
pasta of any shape;
hot glue;
colored paper;
gold paint.
Cut out a Christmas tree from cardboard. Stick some pasta in the middle and cover it with gold paint. Then glue the beads on top of the pasta.
Decorate the ends of the branches with sequins. Make a star out of colored paper.
This card can also be hung on a Christmas tree, so a loop at the top would be a good idea.

Volumetric Christmas tree
You will need:
velvet paper or colored cardboard;
sequins, confetti, colored paper;
Fold the card base in half.
Also fold velvet paper or colored cardboard in half and cut out a Christmas tree.
Glue sequins, confetti or colored paper appliqués onto the tree.
Glue the tree by the tips of the branches into the middle of the card so that it becomes voluminous when opened.

Bouquet with holly
As you know, holly is a symbol of Christmas, so it, like spruce, can be used in holiday decorations.
You will need:
green paper;
hot glue;
velvet paper;
toothpicks;
Take 30 toothpicks, connecting their ends like a fan. Generously coat the area on the velvet paper where you will attach the bouquet with hot glue. Quickly, before the glue hardens, stick on the “fan”; if necessary, coat not only the base with glue, but also the top of the toothpicks in the place where they are attached. It is important that all toothpicks are held tightly.
Then drip glue into the hole in the bead and put it on a toothpick, creating a bouquet of your choice.
Cut two holly leaves from green paper and stick them at the base of the bouquet so that all the glue is hidden. Cut out a bow from paper of a different color and glue it onto the holly.
If desired, you can make toothpicks different lengths and then the bouquet will be more magnificent, because... the beads in it will be at different levels.

Quilling style postcard
You will need:
colored paper;
PVA glue;
letters made from pasta.
Cut out 4 long strips of green paper and twist their ends into a tube: bend one in one direction, the other in the other. Make several strips of colored paper, twist them into a tube and glue the ends to form balls.
Apply PVA glue to the cardboard in the places where your ornament will be located, and glue the twisted strips to create a pattern.
Decorate your card with glitter paper snowflakes. Cut out a ribbon from red paper and stick it at the bottom. Glue your congratulations from macaroni letters onto a red ribbon.
Guys, we put our soul into the site. Thank you for that
that you are discovering this beauty. Thanks for the inspiration and goosebumps.
Join us on Facebook And In contact with
In stores today you can find New Year's cards for every taste. But the editors website believes that homemade ones are much warmer. After all, when we make something for someone with our own hands, we put our love into it.
Below we have collected ideas for beautiful, original and, most importantly, “quick” New Year’s cards, the creation of which does not require any rare materials - beautiful paper, cardboard, and colorful ribbons and buttons lying around the house.
Volumetric Christmas trees
Volumetric Christmas trees made of white and colored paper are so simple to make that you can make them at the last moment. Read more on the Bog&ide blog.
Making 3D Christmas trees even faster. All you need is a ruler, sharp scissors and cardboard. This blog shows you how to cut them.
Penguin
We really liked this penguin, well thought out. You will need black and white cardstock (or white paper), an orange paper triangle, and 2 miniature snowflakes, which we all know how to cut out. The eyes are, of course, the highlight of the postcard, and you will have to look for them at a hobby store (or tear them off from an unnecessary children's toy, with the consent of the children, of course).
Gifts
This cute and simple card requires 2 sheets of cardstock, a ruler, scissors and glue. And also pieces of wrapping paper that you have left over from gift wrapping, ribbon and ribbon. The manufacturing principle is very simple, but for those who want more details, we recommend taking a look at this blog.
Santa Claus
A friendly Father Frost (or Santa Claus) can be made in just half an hour. The red hat and pink face are strips of paper pasted onto a card or gift bag. The fur of the hat and the beard are obtained like this: you need to take drawing paper and simply tear off strips of the desired shape to get uneven edges. Place on the card over the red and pink stripes. And then draw two squiggles - a mouth and a nose - and two dots - eyes.
Simple drawings
An irresistible idea in its elegance is to draw Christmas balls with patterns with a black gel pen. The main thing here is to draw the correct circles and mark the lines for the patterns. Everything else won't be difficult - stripes and squiggles that you draw when you're bored.
The same principle that underlies the postcard with black and white balloons. Simple silhouettes, painted with simple patterns, this time in color - best done with felt-tip pens. Warm and very cute.
Many, many different Christmas trees
A couple more ideas from the Bog&ide blog. For the first, you will need decorative tape or colored cardboard (with or without glitter - now you can easily buy these at an office supply store or in hobby stores). For the second - elegant straws for drinks and good glue.
This is where patterned paper or cardboard left over from children's crafts or wrapping paper for gifts will come in handy. The Christmas trees are sewn in the center - this is not at all necessary, you can glue them on. But if you really want to, you first need to make holes with a thick needle along a ruler, and then sew with thread in 2 rows - up and down, so that there are no gaps left. Draw a snowball with white gouache.
Laconic and stylish idea- a grove of Christmas trees, one of which is glued to foam double-sided tape (and therefore rises above the rest) and decorated with a star.
This card requires 4 or 3 layers of cardboard (you can do without the red one). You can use paper rather than cardboard as a color layer. In the top, white one, cut out a Christmas tree (a stationery knife will do this well) and glue it with double-sided tape for volume.
A round dance of Christmas trees made from various leftover cardboard, scrapbooking paper, and wrapping paper, tied with a simple ribbon and decorated with a button. Try playing with colors and textures - here you can find an incredible number of options using different color ribbons, paper and even fabric.
Wonderful watercolor so in the spirit of New Year and Christmas! A simple watercolor sketch can be done by anyone, even those who last painted in school. First, you need to outline the patterns with a pencil, color them, and when dry, carefully erase the pencil sketches and complete the patterns with a felt-tip pen.
Winter landscape
For this postcard, it is better to use structured cardboard, but you can get by with regular, smooth cardboard - it will still turn out impressive. Using sharp scissors, cut out the snowy landscape and moon and paste it onto a black or dark blue background.
Another, white-green, option for a winter landscape that will take a little more time. If you find velvety cardboard (remember, back in school they made crafts out of this), it will be great; if not, you can simply color the Christmas trees with a felt-tip pen. Snow - polystyrene foam disassembled into peas. You can also use a hole punch to make circles out of cardboard and glue them to the card.
Hugging snowman
The author of the blog My kid craft made this snowman with her children. The snowman throws his arms up in joy when the card is opened. You can write your wishes inside. Children will be interested in making an applique (and painting their hands and hat), but for those who want everything to be done quickly, the blog has ready-made parts that can be printed on a color printer and simply glued together.
More snowmen
Snowmen peering inquisitively into the starry sky will look better if you can find a bright ribbon for a scarf.
For that postcard on the left, You need unpainted cardboard, white drawing paper and foam tape to glue the snowman with. Drifts are made simply: you need to tear off the drawing paper so that you get a ragged wavy edge. Fill it in with a blue pencil and blend it with anything, even with your finger or a piece of paper. Also tint the edges of the snowman for volume. For the second You will need buttons, a piece of fabric, eyes, glue and colored markers.
You will want to keep this card for a long time. All you need are circles made of cardboard, a nose and twigs made of colored paper. All this must be assembled using double-sided bulk tape. Draw eyes and buttons with black paint, and a snowball with white gouache or watercolor.
Balloons
Balls are one of the main symbols of the New Year and Christmas. These are made from velvety colored paper and ribbon. But balls are such a win-win option that you can allow yourself to fantasize: make balls from patterned paper, wrapping paper, fabric, lace, cut out from a newspaper or a glossy magazine. And you can simply draw the strings.
Another option is to stick paper with a pattern on the inside of the card, and cut out circles on the outside with a sharp stationery knife.
Volumetric balls
For each of these balls you will need 3-4 identical circles of different colors. Fold each one in half and glue the halves to each other, and the two outer halves to the paper. Another option is colored stars or Christmas trees.
Multi-colored balls
Wonderful translucent balls are obtained using a regular eraser on a pencil. It’s worth starting with a pencil to outline the outline of the ball. Then dip the eraser into the paint and leave marks on the paper. Fun and beautiful.
Cards with buttons
Bright buttons will add volume to the cards, and will also evoke subtle associations with childhood.
The main thing is to find buttons of interesting colors, but the rest is up to you - to “hang” them on the Christmas tree, on a branch with cute owls, or on newspaper clouds.


