Decorating a New Year's boot. Original DIY New Year's boot for candy
A small New Year's boot can be filled with candies and hidden under the baby's pillow - let him be happy when he wakes up. The boot can be sewn from bright red felt and decorated with an applique in the shape of a Christmas tree and a bunny. Making a boot will not take much time.
To make a boot we will need:
- - bright red felt;
- - green felt;
- - white felt;
- - blue felt;
- - silver sequins;
- - beads of white, red and black colors;
- - scissors;
- - a regular sewing needle;
- - thin needle for beads;
- - threads of red, green, white and blue colors.

The procedure for making a boot
1. To start working on a New Year's boot, you need to make a paper pattern. To do this, we will redraw the boot pattern and applique details onto paper and cut it out.

2. Draw the contours of the paper boot onto bright red felt and cut out two identical parts.

3. Now you need to cut out the applique parts from felt. We will cut out one part of the Christmas tree from green felt. From white felt we will cut out a bunny and snow under the Christmas tree. From blue felt we will cut out a snowdrift on which the bunny will stand.

4. Additionally, you need to make a lapel for the boot from white felt. To do this, cut out a strip about 11 cm long and about 2.5 cm wide. Smoothly trim one edge of the strip with scissors to create a wavy edge.

5. Take one bright red part of the boot and sew a green Christmas tree to it. It is better to sew on the Christmas tree using regular basting stitches, using green threads for sewing.

6. Now take the white snow piece and sew it under the Christmas tree with white threads. Nearby, to the left of this part, with blue thread we will sew a snowdrift cut out of blue felt.

7. Take the bunny part and sew it so that it stands on a snowdrift.

8. Sew on the bunny’s nose from red beads and eyes from black beads. To sew them on, it is more convenient to use a special thin needle for beads.

9. Put the parts of the boot together and sew them together with an overcast stitch. To sew a boot, you need to take red threads and try to make small, equal-sized stitches.
On top, we sew a white lapel to the boot using white threads. This piece can be sewn on with a simple basting stitch.

10. Decorate the lapel of the boot. To do this, take silver sequins and white beads and sew them along the upper edge of the lapel with white threads using a beading needle.
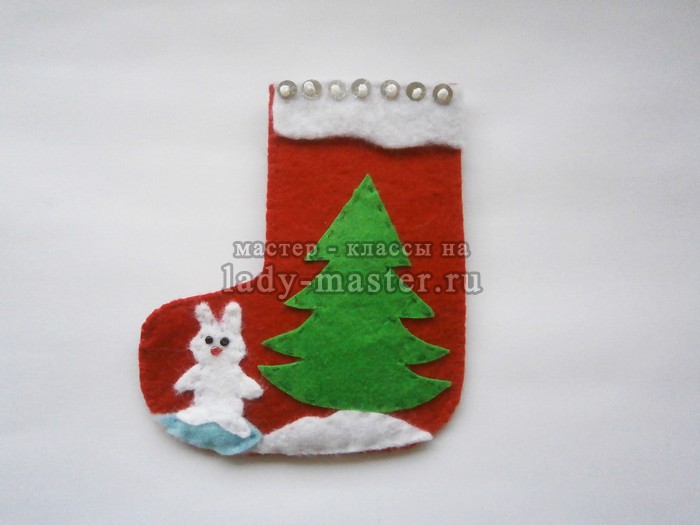
11. The boot itself can also be additionally decorated with white beads. We will sew white beads scattered throughout the boot, as if it were falling snow.

12. If you plan to hang the boot on the Christmas tree or near the fireplace, then you need to sew a loop to it. A green satin ribbon of small width is well suited for making a loop. It is enough to take a piece 18 cm long. It needs to be folded in half and sewn to the inner surface of the boot, trying to sew the tape so that the stitches are not visible from the outside.

13. This is what a boot looks like with a loop sewn on the back side.

The bright boot is ready. All that remains is to put a few delicious candies in it and hide the boot under the child’s pillow. The boot turned out to be small, but that’s even good, because eating a lot of sweets is harmful for children. If desired, you can enlarge the pattern and make a boot bigger size– then the toy will also fit.
You can sew several New Year's boots and hang them on the Christmas tree or give them as gifts to children who will come to visit you during winter holidays. Applications on boots can be different - with snowmen, snowflakes or deer.

You can make a New Year's boot for gifts with your own hands different ways. Get to know some of them and choose the most beautiful one. Socks for gifts are not as popular in Russia as in the West. However, we are increasingly using it not only for its intended purpose, but also simply as decoration.
We have selected three for you simple master class on sewing a Christmas boot. The first is a simple decorative sock. The second one is denser and is suitable for gifts. The third is a boot from plastic bottle(you can put sweets or nice little things in it). Browse all and choose any. In the article you will also find the necessary patterns and stencils.
Patterns
A New Year's boot can be made from felt, fleece, as well as from quilted or any other dense fabric. Whatever you choose, you will need a pattern. Below are sock templates for Santa Claus (print them or just draw them).
 With a small heel
 Classic version, for Victorian Santa and elf
 New Year's sock pattern with dimensions
 Convenient boot template with checkered markings
 Ready-made Santa Claus sock pattern for printing and cutting
Choose the template you need. You will need it for two of the three workshops offered below.
Method number 1: decorative sock
This New Year's boot is not intended for gifts. It can be made single or double and certainly decorated with applique. A felt sock looks best. Fleece is softer, so you can additionally thicken it with cardboard or a double layer of fabric. You can also use velvet, velor, thick cotton fabric.
To decorate a New Year's boot, take felt, fleece, floss or yarn, beads, and ready-made patches.
We advise you to take a look at our section - in it you will find selections different templates with New Year's heroes. They will be useful to you for creating applications. You can simply print them out and cut them out first from paper and then from fabric. Or take it as a basis and just draw it.
Watch this simple video tutorial that clearly shows how to make a decorative Christmas stocking with your own hands.
Use it as a support and come up with your own design.
Here are some ideas for different DIY New Year's boots. Use them for inspiration or just repeat them.
Use acrylic paints and white threads to make embroidery and apply a pattern to the sock.

Place the two patterns together and make a decorative seam along the edge (mark in advance). Decorate the boot with pom-poms.

Cut out several templates decorative elements made of felt or fleece, sew them onto a Christmas stocking with outside. Complete with beads, rhinestones and decorative buttons.

Make a sock pattern using an unwanted sweater or scarf. Decorate with Santa Claus made from a cotton pad, a piece of felt and a hat (use the same fabric for it). Don't forget to add white trim and sew on buttons. You can decorate the sock with embroidery.

These are just a few options, you can choose any of them. It is not necessary to make a double decorative Christmas stocking – a single one will do just fine.
Any of these crafts can decorate a door, Christmas tree, windows, or simply hang on the walls on the eve of the New Year.
Method number 2: sock for gifts
The New Year's boot for gifts needs to be sewn thicker so that it is reliable. Use the patterns suggested above. Take them as a basis, but the sewing technique will be a little more complex than in the first master class.

Choose a suitable thick fabric (you can find interesting decorative options in the creativity departments). Choose a filler. Batting, thin padding polyester or even fleece will do.
We cut out two identical blanks for the New Year's sock according to the template. Also use these stencils to make two parts for the lining (those from which you will sew inner part boot).

The filling can only be sewn to the front part of the sock, because the decor will be located on it.

Sew the loop right away. First, cut out a rectangular piece from the fabric, then fold the ends inward, iron and fold in half.
Fold the front of the sock and the filling together. Sew around 0.5 cm from the edge.
Place the lining piece with the right side facing you. Sew the loop, retreating approximately 2-3 cm from the edge on the heel side.

Then repeat the procedure for the second inner (the loop is sewn to it) and the second outer part of the sock. Place them with the right sides facing you, and then sew along the top (the seam should also be inside).
Take two blanks and straighten them so that the outer part (the part that will be visible when the sock is ready) is on the inside.
Sew the parts around the entire perimeter using a machine. Step back about 1 cm from the edge. Don't forget to leave a hole in the lining so that the sock can be turned inside out.

On the rounded parts of the toe (or around the entire perimeter), make small notches in the form of zigzags or triangles. This is necessary so that the inverted boot does not puff up due to the gathered fabric.

Turn out the New Year's stocking and mend the hole through which you did this. Then tuck the lining into the boot. There you go!

Decorate the resulting New Year's stocking with any stripes, appliqués or three-dimensional figures of Christmas heroes - sew or glue them. Complete the craft with fur, pom-poms, sparkles, rhinestones and other decor.
Method number 3: boot from a plastic bottle
Instead of hanging Santa's boot from the fireplace or on the wall, you can simply place it under the tree. Place a gift or something delicious in it. In addition, this stable sock can be placed on festive table and make it into a vase, napkin holder or “hat” for forfeits.
We invite you to watch this simple video master class, in which the author talks in detail about how to make a New Year's shoe from a bottle with your own hands. Repeat the step-by-step process using the same materials. Everything is shown very clearly, so you definitely can’t go wrong.
Decorate this Christmas boot with rhinestones, braid, bells, and New Year's balls. Add sparkling lights, a garland and streamers - it will turn out very elegant and festive. It would be great to fill this Christmas sock sweet gifts (don't forget candy canes).
We hope you chose one of these master classes and can repeat what you liked. Get a New Year's stocking for each family member. You can mark them with letters or special pictures (look for stencils in our selections). Good luck and creative success!
Decorating your home with textile boots for the New Year - this idea came to us from the West. It mainly contains sweet gifts for children.
Photo master class on how to make a New Year's boot for gifts with your own hands.

Materials and tools:
- material is white fleece (flannel or padding polyester);
- thin satin ribbon Green colour;
- A 4 sheet of paper and a pencil;
- needle, thread and scissors;
- decor: lace and beads;
- fabric for lining;
- blue felt-tip pen;
- beautiful fabric;
- pins;
Note: If you can’t draw a boot, you can print a sketch from the Internet or take a regular sock and trace it, then add 3-4 cm on all sides.
To make a New Year's boot, fabric of any color is suitable, and it will look more interesting if the material has numerous patterns.
1. Take a pencil and draw a boot on paper. Cut it out.

2. Piece beautiful fabric fold with the wrong side up. Place the sketch in the middle of the fabric and pin it with pins. We outline with a blue felt-tip pen. We increase the lower and upper borders of the sketch.

3. Cut it out.

4. Fold the fabric for the lining in half. Place the finished boot pattern on top and pin it together. We trace with a pencil.

5. Cut it out. Unfold the boot. We apply fleece material and pin it together. We cut off the excess.

6. Take a thread and a needle. Sew it on.

7. The next step is to stitch the boot down to the fleece fabric.

8. Then change the thread to white and stitch the fleece material.

9. Turn the boot inside out. We make a hem at the edge of the fleece (we bend the edge inward), pin it together. We sew from the inside.

10. Sew on green lace, white beads and a loop of green satin ribbon.

In addition to sweet gifts, you can add tangerines to your boot, which emphasize the holiday. New Year, and you can also put toys ( soft toy or New Year's, a doll or a car), something for drawing or school supplies(pencil case, brushes for drawing, felt-tip pens or pencils).


It’s very easy to make them with your own hands, and besides, such a boot is a great package for the little one gift, which is not entirely convenient to give just like that. And any little thing placed in it (for example, a chocolate bar) will become bright and memorable a gift, verified!
I will tell you about my experience in implementing an idea Alexandra Alexandrovna Nikulina on simplified sewing of such boots.
So, to begin with, let's decide on pattern. You can draw your own (it’s very simple), you can translate from finished pattern in a magazine or on the Internet (fortunately there are plenty of them). The main thing is that the gift that you are going to pack in this boot fits freely into it.
In use materials And decor give your space fantasy, decorate the front side with decorative stitches, ribbons, sparkles - after all, it’s a holiday!
I do patchwork sewing, so for the front side of my boot I prepared patchwork fabric from squares:If you want to make your boot thicker, you can quilt the front (and back) side of the boot with a small layer padding polyester.
Now let's start with the most important thing: add layers. We put on the table:
- layer linings face up
- on it - the second layer linings face down
- above - patchwork(facial) part of the face up
- fabric for backdrop boot face down.
We trace the contours of the boot according to the template and we sew(except for the top).
Trimming excess, leaving allowances along the seam line.
In places of bends, do not forget to do notches according to the allowances so that after turning the seam does not tighten.Now turn it inside out boot between the patchwork part and the backdrop.
In this case, the seam between the two parts of the lining will be closed, and your boot, even from the inside, will not have open ragged seams! And this one line!
Now all that's left to do is finish it top cut.
Moreover, you can simplify the procedure here: leave a small “tail” of tape, then bend it into a loop and secure (and at the same time decorate) with some bead or button.It's that simple! If you do without patchwork fabric, the work will take it's an hour!
Making boots is fashionable fun and a profitable business.
In 2007, the fashion houses Oscar de la Renta, Dolce & Gabbana, Stella McCartney, Badgley Mischka, Josie Natori and Anthropologie presented their own Christmas socks to the public.
Each boot had a “character”.
For example, Mark Badgley and James Mischka sewed an elegant “feminine” sock from gray silk. It was decorated with a large bow and metal pendants, and “feminine” things were placed inside.
The sock from Anthropologie turned out to be the most “rich”. It is made of felt, cardboard, bamboo. It also included pipe cleaners, wire, buttons, schnapps, automatic guns and even silver spoons...
All of these Christmas socks, as well as socks from other famous designers, were available for purchase on eBay. By the way, the designers filled their socks with gifts. And the proceeds from their sale were used to help the elderly.

Like this New Year's boot you can do it yourself.

|
New Year's boots for giftsTo sew New Year's boot To make your own gifts, you will need suitable fabric, paints for painting on fabric and fringe or braid. I just signed the names with paint. Such New Year's boots, made by hand can be used for gifts for children. I just signed the names with paint. |

Like these ones christmas boots I sewed for my children several years ago.
To sew shoe for gifts we will need:
- red material (I bought red fleece 0.5 m)
- white material for “fur” (I literally bought a 20 cm strip of some kind furry material)
- material of any other color if you embroider names (I had purple fleece)
- a piece of faith
- decorations

Let's retake the pattern - you can enlarge it in any graphic program or draw it by cells. My boots turned out to be 21 cm high.
Sewn shoe for gifts It’s simple: we cut it out on fabric with seam allowances, sew the sides of the boots and sew on “fur” and a string on top so that there is something to hang it on. We decorate to your taste. My kids put notes there with wishes for New Year gifts from Santa Claus.
ATTENTION: if you want, like me, to decorate boots with the names of children, then first you need to sew on the letters, and then sew the boots themselves.
I took the letters from Word, selected a font without unnecessary monograms, and simply enlarged the font to the size I needed. I printed them, cut them out of fabric, under which I placed interlining so that the letters remained even. That's all, the boots are ready!
This is what it looks like enlarged:

Natasha Oleynik (Saechka)
 December is just around the corner - the month of pre-holiday bustle, the month of anticipation of holidays, fairy tales and miracles.
Exactly Christmas and new year holidays Since childhood, we have been absorbed in the aroma of pine needles, sparklers and fireworks, some kind of mystery, magic and miracle. Every time the chimes strike, we make another (or the same) wish, confident that this time it will definitely come true. We prepare gifts for our family and friends, come up with many different delicious dishes - almost for the whole year... As for the bowl of Olivier salad, I’m not sure that everyone still puts it on display New Year's table. But once upon a time, in “stagnant times,” celebrating the New Year without this salad was considered bad manners. Traditions…
Sorry, as always, I deviated from the topic; after all, my topic is handicraft, not culinary.
Let's start making Christmas boots (socks, stockings - whatever you like) for gifts. Although such a boot itself can become a wonderful gift, isn’t it? 
For production we will need:
1.Wool blend fabric blue color for sewing the base of a boot;
(Or another one, to your taste) 
2. Adhesive dublerin to give a more rigid shape to the boot; 
3. Pieces of non-woven material white(voluminous non-woven fabric, padding polyester) for making a snowman and snow; 
4. Pieces of red or orange cloth for making the nose and
snowman headdress; 
5. Dark brown yarn for making a broom;
6. Sequined fabric of blue color for finishing the top of the boot in the form of a starry sky; 
7. Bias tape or braid for edging seams; 
8. Beads for making eyes and mouth for a snowman and for depicting stars 
9. Sewing machine or just a needle and thread.
So, we draw models of boots on paper, choose one of them in order to give a start to life. 
We cut out two parts of the boot from blue fabric and from dublerin, arranging them in a mirror manner.
Mirror - it's like this. 
On the wrong side of the main pattern, we place the dublerin with the adhesive side to the fabric and iron it with an iron through gauze or a cotton napkin.
We begin to decorate one of the sides of the boot.
To do this, fluff the edge of the non-woven material on one side, and on the other, align it with the bottom of the boot.
We lay several decorative lines along the non-woven material, sewing it on. We place the top line at a distance of about 0.8 cm from the fluffy edge, maintaining the illusion of fluffy snow. 
We cut out circles of different diameters from non-woven material to make a snowman.
We sew the parts together, put a cloth bucket on the snowman’s head and sew on a carrot nose. Using black beads we draw embers-eyes and a mouth for the snowman. 
We baste them to the front side of the boot and attach them with a zigzag seam along the edge.
Subsequently, the snowman seemed to me somehow defenselessly lonely, so I decided to “sculpt” his hands and reward him with a broom.
A bucket on the head is “dusted” with snow from fluffy non-woven material.
I made the broom from dark brown yarn: I crocheted the shaft (regular chain), and the “sweeping” part was a pom-pom tassel. When sewing the broom to the boot, do not forget to thread it through the snowman’s “hand”.
Representing the starry sky, we baste the corresponding fabric to the top of the boot, 
turn it over and trim the edges. 
We scatter several “stars” of beads between “heaven and earth” - below the “starry sky”.
We decorate the second (back) part of the boot with “snow” and “starry sky.” Our snowman lives on one side.
We fold the two parts of the boot face outwards and sweep them away. We edge the edges with braid and don’t forget to sew a loop on top. 
Advice: if you are edging the edges with non-bias binding using a special foot for sewing machine, but with braid, then do not be lazy to baste the braid in order to avoid unattached areas later.
For the boot, you can sew textile hearts, snowflakes or stars from leftover fabric. Beautiful handmade gift ready for Christmas and New Year. It will not only create for your gift festive mood, but will also convey a piece of your warmth to your loved ones and friends.
THESE ARE THE IDEAS I HAVE PICKED UP AND HAD TO MAKE IT MYSELF.
The idea of decorating the house with boots for gifts came to us recently.
This festive element of New Year and Christmas decor was invented to
to place a variety of cute gifts for all family members.
We offer you detailed master class how to sew a New Year's boot from fabric with your own hands.
Having made a boot for DIY gifts, you will fill your home with comfort and warmth. This activity will bring pleasure and allow you to get into the New Year's mood.
Materials for production
- felt, fleece, or any other piece of fabric;
- boot stencil;
- threads;
- scissors;
- lace;
- any decorative elements to decorate the boot.
How to sew a boot for gifts
1. First we make a stencil. Then we place it on the fabric and trace the boot, adding 2 cm along the edges for seam allowances. The front piece should be slightly lower in order to sew on the boot cuff later. Afterwards we cut out two blanks and cuffs. We sew a piece of the cuff to the top of the boot.

2. Now we are decorating the front of the boot. For this you can use any decorative elements : beads, ribbons, sequins, etc. If you only use glue to decorate the boot, then the decorative elements can be glued after stitching the product.

3. Next, we are engaged in stitching the boot. To do this, we first need to sew on a lace, by which we can hang our boot. Then we begin to sew two parts of the boot from the wrong side. This can be done using a sewing machine or by hand. If you sew parts of the product by hand, you can use a buttonhole or overcast stitch.
At the end, we simply turn the product inside out - the boot is ready. Please your loved ones and put sweets and small gifts in the boot.


