Volumetric paper flowers: templates and DIY master class. DIY paper flowers: diagrams and templates Crafts paper flowers postcards
Volumetric paper flowers are used to decorate interiors, furniture, ready-made accessories, gift packaging, postcards. Making them is not difficult: the process does not require special skills, it is exciting and enjoyable. Combine business with pleasure: try making flowers in different ways.
Making flowers from paper is a simple process. The material is accessible and inexpensive, it is easy and convenient to work with, so even beginners who have not previously done needlework can master the process. Studying detailed master classes will provide an opportunity to find successful options and receive exclusive jewelry. By the way, popular in 2017-2018.
For production you may need:
- Material. This can be plain white printing paper, colored or corrugated, Whatman paper, tracing paper, old newspapers or magazines. It is convenient to make small elements from soft materials, and large ones from dense ones, which should retain their shape.
- Scissors are used to cut out parts. Choose quality ones that will cut cardboard.
- Glue: universal, silicone, PVA. The choice depends on the type of paper: the denser and thicker it is, the more securely it should be fixed. For convenience, protection from dirt and good bonding, you can use a glue gun.
- Schemes, templates. If the master class with instructions left you with questions, a visual demonstration will answer them. Using the template, you can make ideal blanks, and detailed diagram will help you figure out how and in what sequence to act.
- Materials for frames. If flowers are made from paper with stems and leaves, you will need wire to serve as reinforcement and fixation of the composition.
- Good mood and calmness. Start making if you are calm and determined to succeed. By being nervous, angry and worried, you will not achieve a good result and will not get pleasant emotions from the process.
Volumetric flowers made of corrugated paper
 The flowers look attractive corrugated paper. To make them, stock up on materials and tools. Need to:
- wire;
- scissors;
- corrugated paper (green, red, white, yellow);
- glue;
- ribbon.
 Process :
- Cut a strip of wire to prepare the stem.
- Cut a strip 1.5-2 cm thick from green corrugated paper.
- Coat the wire with glue, wrap it with a green strip along the entire length (fix the edges with glue).
- Cut out a strip of red (or other) paper: do not touch the bottom part, but cut semicircles or ellipses on the top. Wrap the edge of the stem with this blank, having previously coated it with glue.
- Cut out the remaining petals and glue them to the bud one at a time. Fluff the flower.
- Cut out the green leaves and fix them on the stem.
- The first flower is ready, make the rest, making them multi-colored.
- Gather flowers into a bouquet and tie it with a ribbon.
Advice! You can make large flowers in the same way, increasing the size of all the parts several times. It will be original decor interior or photo zone at a holiday.
 There is another way: by combining many flowers, you will get a beautiful garland. You will need multi-colored corrugated paper, fishing line or strong thread, scissors, a needle, glue or a stapler.
Description of actions:
- Cut out rectangles from paper: the same size or differing by 1-2 cm.
- Place the blanks in stacks of five. To obtain solid colors, combine elements of the same tone, and to make bright jewelry combine different shades.
- Fold each stack like an accordion. Fix the centers with a stapler or tie them with thread. Round the edges with scissors to make the flowers look delicate and cute.
- Straighten and fluff the edges of the paper elements.
- String the resulting buds onto a fishing line or thread, piercing them with a needle in the central parts.
Volumetric flowers on the wall
 Large voluminous flowers will become a non-standard wall decor in any room: living room, nursery, bedroom, hallway. Prepare:
- cardboard for the base;
- scissors;
- colored double-sided paper (can be replaced with stickers - small pieces of paper glued together into a block for notes);
- glue.
 Master Class:
- Cut out a round base blank from cardboard. Diameter – 13-14 centimeters.
- Prepare paper squares. It is more convenient to use ready-made stickers, since you do not need to prepare the parts. If there are none, cut out squares of approximately 7.4x7.5 cm from double-sided colored paper. Quantity for a circle with a diameter of 13-14 centimeters: 24 pieces for the first layer, 22 for the second, 17 for the third, 14 for the 4th and 15 for the core.
- Form small balls from all the squares (much like for seeds). A sharp cone should form at the bottom, and a circle with one triangular petal at the top. Connect the edges with glue.
- Take the base, coat the edges with glue and fix the balls with the back sides (the parts with protruding triangular petals).
- Glue the second, third and fourth rows in the same way.
- When making the core, glue the central bags to the neighboring ones so that the center turns out voluminous and neat.
- Beautiful volumetric flower ready. You can attach it to the wall with double-sided tape or using a nail and a thread loop glued to the base.
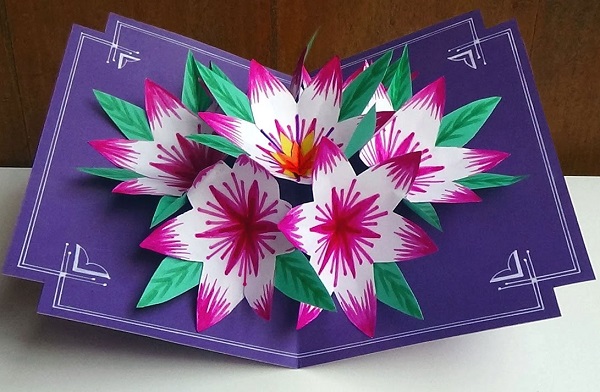
Postcard with voluminous flowers inside
To please a loved one or friend with a card with a bouquet of paper flowers inside, try making such a gift yourself. Make beautiful three-dimensional chrysanthemums. You will need:
- colored paper lilac, pink, yellow, white, green (lime) colors;
- a sheet of cardboard for the base;
- thread;
- scissors;
- glue.
Master Class:
- For one flower you will need five paper circles: two big size, two medium and one small. Fold the first circle in half three times, cut out two oblong petals from the edge (deepen the cutout slightly towards the center).
- Unfold the circle and fold the petals in half to give the composition volume.
- Place two medium ones on the large circle, then the small one. Connect the parts with thread or glue. The center can be decorated with a thread tassel or left as is.
- Make several chrysanthemum buds.
- Prepare the card base by folding a piece of cardboard in half.
- Glue the resulting flowers, for example, one in the center on the fold of the cardboard and several on both sides.
- Cut out strips - flower stems. Fix them under the buds.
- Cut out the leaves, fold them in half and secure them near the stems.
- The DIY card is ready, and the flowers seen inside will definitely delight the recipient!


There is another option for those who love roses. You need to prepare:
- double-sided colored paper (red, pink or white);
- felt-tip pen or pencil;
- scissors;
- cardboard;
- glue.
 Manufacturing instructions:
- Draw a spiral on paper and cut out the blank along the line.
- Twist or bend the edges of the long turn of the spiral - this is the center of the future flower.
- Wind the remaining turns of the spiral around the central part, periodically fixing them with glue to secure the composition.
- The edges of the petals can be bent a little, then the flowers will look more realistic and voluminous.
- Make a few more flowers.
- Fold a piece of cardboard in half to form the base of the card.
- Glue the buds inside the card.
If the recipient prefers delicate flowers calla lilies, make this paper card for him. You need:
- double-sided colored paper (corrugated paper is suitable);
- modeling dough or polymer clay;
- universal glue (glue gun);
- scissors.
 Description:
- Make a stamen - mold it from dough or clay. But you can crumple the paper and roll it into a tube.
- Cut out a heart from paper.
- Place the stamen between the rounded parts of the heart and secure.
- Wrap the stamen into the petal, leaving most of the part out. Glue the connected sides of the heart together, carefully turning the edges out.
- Make several buds, glue the flowers into a card and give them as a gift.
Templates and volumetric color schemes
You can make flowers from paper using templates or diagrams. After studying the diagram, you will understand the sequence of steps and make the product identical to that described by the author. For beginners, it is better to use simple and understandable options.
The template will simplify the process as much as possible. You just need to open and download the image, transfer it to a Word document or other file and print the image on paper. But it will not be possible to make large flowers using templates, since the size of the design is limited by the sheet format. 


Volume flowers video
Handmade flowers will become original decoration interior or an exclusive gift for any occasion. Consider all the methods proposed in the article, choose the one you like, study the instructions and start making.
Do you need to complement the interior of your home or please your loved ones? Flowers made of paper, which for a long time will be able to decorate your hearth and will never fade.
This decorative element can decorate both a banquet table and a living room; it will also be a pleasant addition to a gift.

Let's look at popular examples of making paper flowers and look at photos of paper flowers.

Coffee filter flowers
To do this you will need:
- Colored aluminum wire.
- Paints.
- New coffee filters.
- Pliers.

If you don't have coffee filters on hand, corrugated paper in the shape of a circle will come to your aid.
- To create one copy, you need to take approximately 5-10 filter sheets, depending on how voluminous the paper flower you want to make.
- Collect all the leaves and fold them in half several times.
- The edges of the filter can be trimmed wavy - this will add similarity to real colors.
- Then, we divide the filters into two halves, shortening those that will be on the top by 2-3 cm, so the bud will be more realistic.
- Place all the cut out sheets of paper on the table so that the smaller ones are on top. We pierce the centers of all filters with wire. We stretch it halfway, bend it and pierce the filters again at a distance of 5 mm.
- We secure the wire by twisting it.
- Each “petal” is twisted and compressed. We perform these maneuvers with each sheet.
- To prevent the bud from falling apart, we wrap the base with the remaining wire.
- We hide the wire behind adhesive green tape.
Painting the filters is not difficult, as they are perfectly saturated with paint. To paint flowers, simply pour any food coloring and soak the bud in it. Your product is ready.

Paper rose
Would need:
- Bamboo sticks.
- A thread.
- Corrugated paper (red, pink or yellow).
- Adhesive green tape.

The difficulty of this design is to beautifully and neatly wrap the edges of the corrugated paper, while straightening the folds, making them even.

We twist the strip so that the tiers are tightly against each other. Then we string the bud onto a bamboo stick and secure it with thread, wrapping it around it.

If desired, wrap the bamboo stick with adhesive tape. We make several paper roses to assemble a lush bouquet.
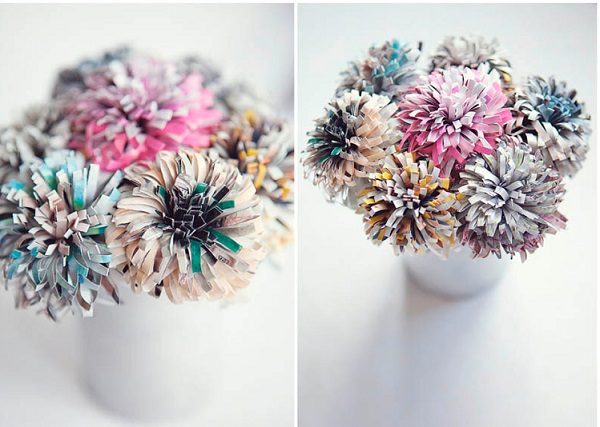
Asters from old magazines
To do this you need:
- Bamboo sticks for decorative items (can be green).
- Glue stick.
- Unnecessary magazines.
- Small scissors.
- Green adhesive tape.

Cut out the brightest and most colorful pages from the magazine. Then we bend them in half, and the halves towards the center. We begin cutting the fringe where the folds begin, leaving 10 mm to the base.

Then we wrap the resulting colored strip around a bamboo stick and secure the base with adhesive tape. We make the bud voluminous by spreading out the fringe. Wrap the stick completely with adhesive tape. We repeat the manipulations with each flower.
Corrugated hyacinths
To make this type of flower from corrugated paper, you will need:
- Bamboo sticks or skewers.
- Glue stick, hot glue.
- Corrugated paper.
- Food toothpicks.
- Scissors.

We cut several colored strips of paper. We make a border on each strip.

We twist the resulting border onto a toothpick and make a kind of serpentine.

We make buds and wrap them on sticks and secure them with glue. We wrap the “stem” with green adhesive tape, if possible, cut out the leaves and attach them.
Note!

Calla with your own hands
You will need:
- Double-sided colored paper.
- Stamen (made from polymer clay).
- Wire.
- Hot glue.

Cut out a heart from paper and put a homemade stamen in it. Glue the edges of the heart over the stamen.

We wrap the edges to make the calla lily more realistic.

Flowers of this style are suitable for decorating a gift or postcard, and a bouquet of such flowers will delight every girl with its beauty.

Paper peonies
For a lush peony you will need:
- Corrugated paper of different colors.
- Scissors.
- Sticks.
- Paper clips.

Stages of work:
Note!

- Cutting sheets of paper different colors. We make an “accordion” out of them. We do this with each color.
- We make sure that each previous strip is 5-6mm shorter than the next.
- We make the corners of each “accordion” triangular.
- Find the middle of the strip and fold them together.
- With help aluminum wire We connect all the “accordions” in the middle.
- We bend the edges to form petals.
- We attach the buds to the sticks.

Paper poppy
You will need:
- Thin corrugated paper.
- Bamboo sticks.
- A thread.
- Green duct tape.

Cut approximately 10 teardrop-shaped petals. We stretch the folds so that each petal looks like a mushroom.

We wrap a small amount of paper on bamboo sticks - the core. We attach the main petals on top of the core. We wrap the resulting bud with thread. We mask the sticks with adhesive tape.

Photos of flowers made from paper with your own hands


Note!


Pleasant and very a heartfelt gift For a themed celebration, cards made from bright, unusual colored paper, which were created manually, can be used.
This option is the most in a simple way to make a person happy, to express your warmest feelings. Often a card complements the main gift.

You can learn how to make a postcard with your own hands from paper on the Internet, because there are a huge number of master classes and templates for various postcards that describe the process of creating such crafts. The cards turn out bright and beautiful, unique and inimitable.
Paper Product Base
In numerous photos homemade cards from the paper it is clear that the main thing in the product is not only congratulatory speech and decoration, but also the basis. Either thick scrap paper or a thin sheet of cardboard is suitable for it.

As for color preference, you should choose a neutral light color color palette so that against its background all other elements are bright and stand out.
A cardboard sheet with embossing and textured patterns looks very original as a base.

To do beautiful postcard more solemn and unusual, it is worth rounding the rectangular ends, or using curly scissors to give the edges a carved outline.
Card with colorful balls
To create a cute and romantic card that can be presented for a celebration on any occasion, you should take thin beige cardboard and fold it in half, rounding the corners. For decoration outside For the product, you need to prepare multi-colored paper balls of different shapes: oval and round.

If the card is intended to be given to a girl, then the color of the balloons can be chosen predominantly pink, if for a boy it is blue, neutral shades are suitable for congratulating an adult.

You will need about 15 blanks for future balls. They will be placed both on the front side and inside the product.

Since the shape and size of the elements are different, it is better to prepare cardboard templates in advance and cut them out. After the templates are prepared, you can select the appropriate scrap sheets and cut out the balls.

When the ball blanks are cut out, a piece of paper is glued to each of them. reverse side a piece of thick thread. Now you can start decorating the front side of the card. To do this, start gluing balls on top, then subsequent lower layers until the desired result is achieved.

To create voluminous non-standard paper postcards, you can glue the elements onto double-sided tape.

We attach a small piece of tape to the back of the ball, and then to the front base. The result will be a magnificent ornament.

When the balls are glued, you should tie all the threads, tie beautiful ribbon and secure at the bottom of the balls. Then the edges need to be trimmed.

Several elements are also glued inside the product, leaving space for writing congratulatory words.

Homemade New Year cards
To congratulate the New Year holidays, as a rule, they choose more thematic decorations in the form of Christmas trees, garlands, snowflakes and other paraphernalia. An excellent gift would be a hand-made postcard with a voluminous pine beauty using origami technique.
Note!
To make origami blanks, it is better to choose thin paper sheets so that they can be easily crumpled. You should also give preference to materials with interesting pattern, then the tree will turn out colorful.

To create a Christmas tree you need to prepare 5 square blanks from the selected paper. The dimensions of the sides of the squares are as follows: 10; 9; 7.5; 6.5; and 5.5 centimeters, respectively. All squares are added according to the same principle.

First, the square is folded diagonally, then it returns to its original shape and folds diagonally on the other side. The result will be a workpiece with two diagonal fold lines.


Now the first origami blank is ready. There should be 5 of them in total. The Christmas tree is assembled from the top smallest element.

Note!
Quilling cards
A greeting card made using the quilling technique will be simple to make, but very attractive and original.
To create an owl that will be placed on the front side of the product, you need to twist several tight spirals from paper of the color you like.

For the owl's body, a spiral is selected, which will consist of three different shades in the form of orange, brown and beige shades. The width of the paper strip to create the body is 5 mm. Each subsequent strip should be glued to the previous one, and the tip should be glued to the spiral itself.

For the eyes and wings of the owl you need to take thinner paper strips. Each bird wing consists of three twisted spirals that are glued together. The paws are also represented by three spirals.

When all the elements are twisted, they can be glued to the base, decorating the composition with leaves and tree branches, which are also cut out of paper.

A card with flowers made using the quilling technique looks very beautiful.
Note!

Photos of DIY paper postcards


Elizaveta Sklyarova
Beautiful and original postcard 3-D will be a great gift for the upcoming holiday on March 8th. like this postcard It will be useful to do with children over 6 years old. Of course, children will need the help of an adult, but they will be able to do all the preparation of the parts on their own. The manufacturing process is like this postcards develops fine motor skills hands, spatial thinking, logic, and also teaches children perseverance and accuracy.
Do three-dimensional 3-D postcard incredibly interesting, because in the process of making it, real miracles happen to paper.
Required materials:
- colored printer paper
Glue stick, PVA or double-sided tape
Scissors
- felt-tip pens or markers
Bird pattern
Openwork napkin
Printed congratulations for mom

Move work:
1. On sheets of paper of any kind colors measure out 10*10 squares. You need 7 such squares.


2. Fold our squares into triangles three times.

3. Cut out the petals.


4. Expand the petals and get flowers.

5. One segment cut off the flower.

6. Let's start coloring our colors(I have a black marker)

7. Leave one petal unpainted, glue it with tape or apply glue and glue it to the adjacent petal, creating volume.

8. Fold flowers in half and begin to collect the bouquet. To the first flower We glue the blanks on the right and left sides, leaving the central petal free.

9. Place one blank on the three central petals.

10. Again we apply two petals on the left and right sides.

11. Glue the last piece onto the three central petals.

Important: glue only the edges of the petals!
12. I decided to make leaves.


13. Let's start the design postcards.

Fold a sheet of thick paper in half, glue the leaves and attach the bouquet to postcard as shown in the photo.


14. We design the title page at our discretion. I glued an openwork napkin, a cardboard bird on top, a wing and a congratulation to mom in the right corner.


At first glance it seems that postcard very difficult to do, but it's not. It’s worth trying and everything becomes clear. My seven year old son squealed with delight as he helped me glue and saw the magical results. Good luck to everyone!
Publications on the topic:
Teacher of the second group early age: Neklyudova Darina Sergeevna Purpose of the master class: Formation of teachers’ skills to create a product.
Here he enters the clearing Straight to the ocean-sea; Lying across it is Chudo-Yudo the Whale Fish. Which fairy tale did you learn these lines from? That’s right, from the fairy tale.
Master Class " Volumetric snowflake» Approaching New Year! This means that it’s time to think about decoration, which few people can do without.
Master class "Volume snowflake". After the autumn slush, dampness and rain, winter has come - the most fabulous time of all seasons. AND.
Soon, very soon, the long-awaited and beloved holiday, New Year! Time New Year's holidays, beautiful time, good fairy tale, which.
Volumetric snowflake made of paper. New Year is a time of magic and fairy tales, when each of us hopes for a small miracle. Therefore, preparation for...
Making an accent in your home, decorating a souvenir package, or complementing a gift with a unique bouquet - this is now available to everyone. It only takes a little effort to get the desired result.
How to do beautiful flowers from paper? – about this below the article. In it you will find several detailed master classes.
Also, you might be interested learn how to make flowers from shells - with your own hands.
How to make a simple and beautiful paper flower with your own hands?
Lately flower arrangements made of paper have become an alternative: both in the design of halls and souvenirs.
Try making these simple but beautiful flowers yourself. detailed instructions and the diagram is below.
To work you will need:
- colored paper;
- scissors;
- diagrams and templates for cutting out parts;
- pencil or pen;
- glue.
Manufacturing process:
- From paper you need to cut out the parts for the future flower using templates (for each product you will need: 3 parts in the form of a drop, 1 - four-leaf, 1 - three-leaf, 2 - five-leaf, 3 green parts - leaves).
- A pencil (pen, or you can use a brush) will help give the necessary shape to each detail for the future product.
- All blanks are glued together. First, you need to glue the larger fragments, and then the small ones. Repeat everything according to the diagram below.
There is one more interesting option simple but lush paper flowers.
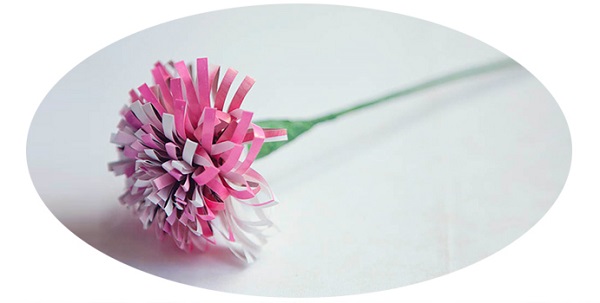
They are made using the quilling type.
What you need for work:
- Illustrated magazines.
- Adhesive tape (green).
- Glue.
- Scissors.
- Barbecue skewers.

Step-by-step instruction:


Here's how to make a bouquet of paper flowers very simply and effectively.
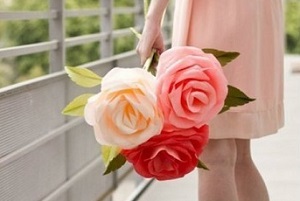
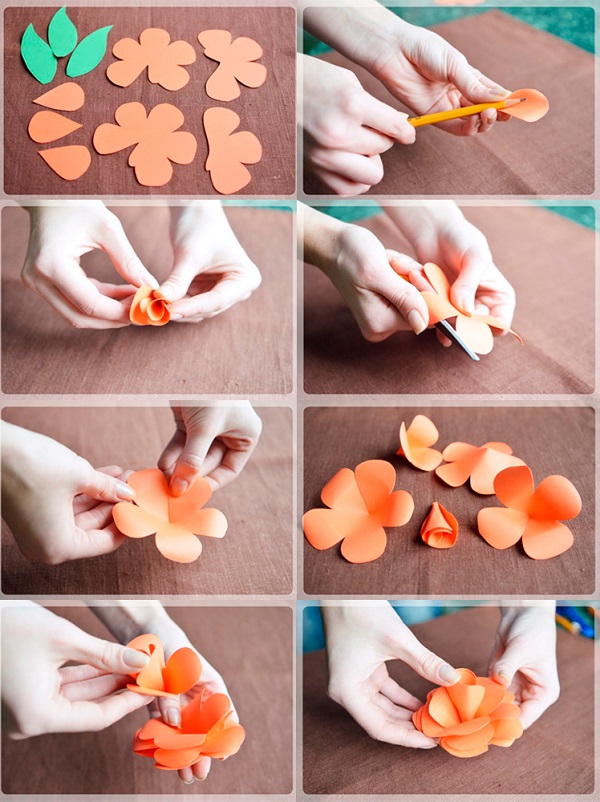
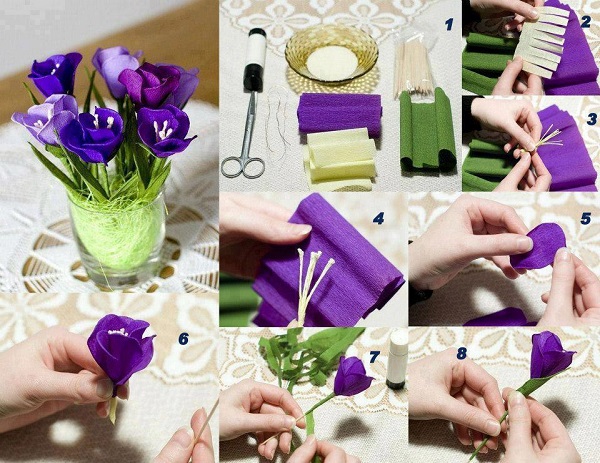
Large paper flowers - master class
Huge buds allow you to create a unique interior for celebrations. Thanks to them, you can accent or highlight a place for a photo shoot.
Large flowers can be grouped into arches, various compositions on the ceiling or wall. Making such a decoration will be quite simple.
Materials for work:
- patterns (diagrams) of parts;
- scissors;
- adhesive tape;
- colored paper (both sides);
- stick or skewer (thicker).
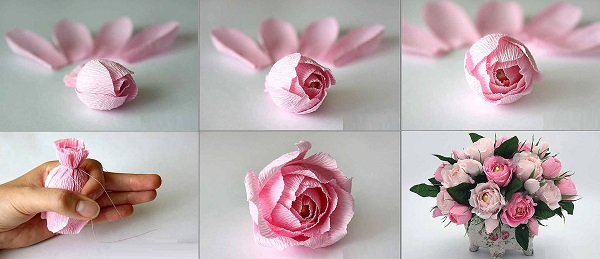
How to make a paper rose?

These roses can be made as a souvenir or decoration for a photo shoot.
DIY crepe paper flowers - diagrams
To make beautiful buds, you can choose one of the instructions presented below. Small or huge flowers can be made in a few hours.
Wonderful lush peonies or a pink bouquet will be a wonderful addition to your interior or souvenir.
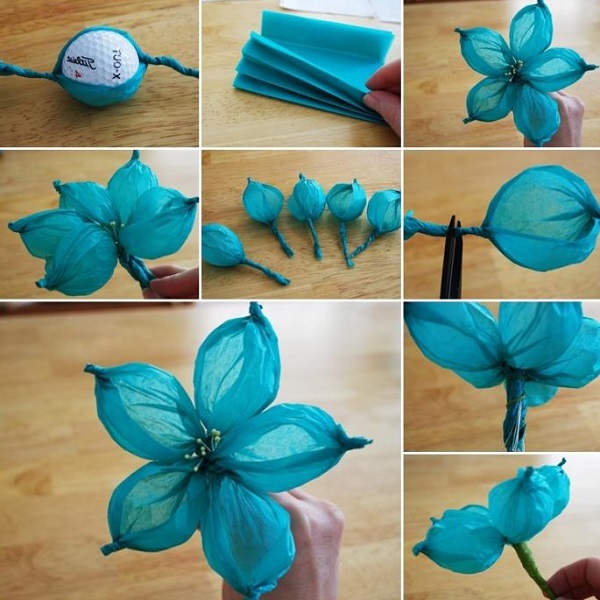
These are such wonderful flowers blue color you can make it out of crepe paper with your own hands if you follow step by step diagram on the picture.
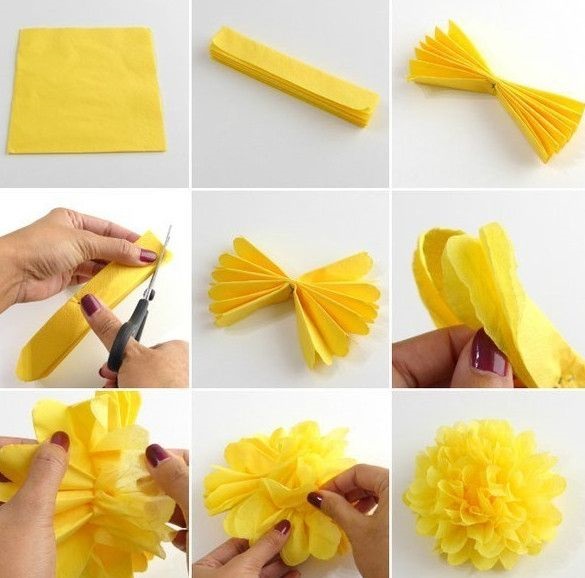
Volumetric flowers made of corrugated paper - step by step photo
You can use crumpled paper to create beautiful bouquets, such as a composition of crocuses.
To work you will need:
- corrugated paper;
- glue;
- toothpicks;
- scissors;
- brush.
Composition making process:
- The paper must be placed in such a way that the relief is on the short side.
- Now you should cut the paper into rectangles measuring 8*4 centimeters.
- The blanks need to be crumpled in the form of an accordion.
- Now you need to cut out 6 identical petals from these folds, then you need to slightly twist their ends with a toothpick.
- Now it's up to the stamens. They are made from the same rectangles as the petals. The blanks are cut with fringe, leaving a narrow strip (see the diagram above).
- The fringe (each of its elements) needs to be twisted into a flagellum, and then the future stamen should be rolled into a tube. To do this, wrap the toothpick in a paper blank.
- The bottom of each of the stamens is smeared with glue, after which the flower petals begin to be fixed one by one.
- The completion of each flower is to wrap the stem in green paper and then attach the leaves to it.
How to make paper flowers for a postcard?
Decorating souvenirs makes every giver think about how to decorate the packaging in an interesting and original way.
A simple ribbon bow is a thing of the past, replaced by paper flower arrangements.

Even handmade flowers from cardboard will allow even a little person to create unique gifts for friends or family.
What is required for labor?
- colored paper (several colors: pink, red and green, you can choose other colors);
- a postcard purchased or made independently;
- glue;
- scissors.

How to make small decorative flowers?
- Round blanks are cut out of thin cardboard or paper. The edges of the circle are made jagged. The more such elements, the more magnificent the bud. You can make flowers of different sizes.
- Each blank is folded into 4 or more folds - it depends on what shape you want to give the bud.
- Each part is fixed with glue on the postcard.
- The stem and leaves will complete the paper plant.
Like these ones interesting master classes With step by step instructions for your attention were selected and presented in this article. Imagine, create - everything will work out!


