How to weave baubles. How to learn to weave baubles from threads? Lesson for Beginners
Elizaveta Rumyantseva
Nothing is impossible for diligence and art.
Content
A bauble or bracelet is a decoration made from various materials: leather, threads, beads and simple cords. Some consider them decorative, others prefer to call them a symbol of friendship. How to weave baubles if you have never done it? You just need to decide on the type and materials used and follow our recommendations step by step. We'll sort it all out possible options so that you don't have any questions.
We braid in the form of a braid
Try a four rope braid first:
- In this case, two central threads are taken: the left one is superimposed on the right side, and the right one on the left. As a result, the two outermost threads appear in the center.
- Continue weaving to the desired length.
A bauble is woven in a similar way from an even number of ropes. When using an odd number, the outer ones are alternately crossed in the center, as in the case of three. With a little practice, the braid forms especially quickly.
There are also more complex methods, when the outer threads are intertwined around one central one.

Oblique weaving

Once you understand the basic principles of knot formation, you will quickly understand all the techniques. First of all, it applies oblique weaving. To do this, the rows are performed either from left to right or from right to left. The symbols on the diagrams indicate which node should be in a given location. The beads are strung on a fishing line in accordance with the color indicated in the diagram.

If you wish, you can make a pattern in the form of arrows or a zigzag. We will talk about them below.
Two-color
In most cases, such decorations are woven using ribbons or cords. The ribbons should not be wide, but you can experiment if you wish. A bauble made of leather cords in two contrasting colors looks impressive.
There is nothing complicated about this technique. Watch the video tutorial and follow the instructions of the wizard. After a couple of knots you will understand the principle, and the work will go much faster.
Multicolored
Try to weave not only two-color bracelets, but also multi-colored ones - you just need to change the pattern.
- To do this, mark dots on paper and paint them with a certain color.
- Measure your wrist - this will be the length of the product.
- The width depends on your imagination.
If you use ribbon, use 2-3-4 colors. But especially spectacular bracelets are made from beads. Take absolutely any pattern as a basis, and each decoration will be unique.
Try a simple scheme first. Use . You need to start with a strip of beads strung on a fishing line. Next, work according to the scheme.

Once the length is sufficient, make the clasp. Use a hook or special locks. If desired, weave a long bracelet and wear it without unfastening it. Do not forget to solder the ends of the fishing line so that the braided fabric does not unravel.
With names
Jewelry with names is especially attractive. They are presented as a gift or a symbol of friendship. You will need several colors to create a design, but even with two colors of material you will get a beautiful memorial bracelet.
In addition to beads, prepare a lighter or matches, fishing line, scissors, and pliers (if you have a clasp). Start weaving by classic scheme given above. Use a stencil to create letters. To make it convenient, draw a pattern on paper and knit according to it.

Bracelets can be wide, and then they will fit not only your name, but also other words and signs that are important to you.
Personalized products are not necessarily woven from beads. Check out the video tutorial, which explains in detail how to create letters from threads.
Main nodes

For ease of knitting, remember the basic knots. To do this, use our master class.
You will need:
- spool of thread or skein of yarn
- clip or pin
- pillow
- tailor's meter
- Prepare pieces 40-50 centimeters long. Connect them and tie them in a knot. Insert a pin into it.
- Next, you need to fix the pin on the pillow with a needle. Arrange the threads alternately or in the sequence you need, according to the diagram.
- We braid the working one with a knot, creating a loop. You need to put the same working one into it and tighten it.
- Repeat the process and you will have a double knot. Next you need to swap the threads. The loops should be identical and tight.
- As a result, the first thread became the second. We use it as a knot, and the third as a working one. We continue until the first becomes the last.
- Once you have a ring of the desired length, finish the piece with a regular braid and secure the two ends with knots.
- You can cut off the excess ends.
With rhinestones and stones

This master class will help you create a bauble with rhinestones. For beginners, we recommend a simple option.
- Take a needle, nylon threads and rhinestones.
- Start from the lock and stitch it in the middle or along the edges, stringing rhinestones, balls or beads on the front side.
The spike is secured in a similar way if it has screws.
- Using an awl, the element is tightly pierced and secured.
Advice: please note that the threads should not be broken through, but pulled apart with an awl so that the product does not unravel.
If skill allows, add rhinestones.
- As you work, simply weave the elements into the fabric, and knit using any chosen method that you have already mastered.
- Make sure that the position of the rhinestones is the same, and then the bracelet will turn out perfectly symmetrical.
With chain

If you already have a bauble or even a bookmark, using this technique you will update it by adding a chain. Agree, this decor looks good in the photo.
For work, take floss, a needle, and scissors.
- We take the threads and insert them into the needle. First, you need to tie a knot in the baubles.
- We begin to tightly sew our chain over the edge.
- Please note that the stitches should be the same length as the distance between the chain links.
- We continue working until the end of the bracelet.
- All that remains is to trim off the excess and enjoy the new decoration.
From satin ribbons
With this master class you will learn how to weave baubles from ribbons. Follow these steps sequentially:
- Take two ribbons and tie them together.
- Lay out one end in the form of a turn or loop.
- We also fold the next end into a loop and thread it into the previous turn.
- Tighten the loop of the first tape.
- We make the next turn and insert the previous one into it, also tightening it.
- Continue until the desired length is reached.

Use ribbons to make it more attractive different colors, and then you will have a nice strap.
From floss threads
Products made from floss are very diverse. It will not be easy for beginners to understand the technique, but after trying a couple of knots on simple threads, you will master this technique. You just need to follow the weaving pattern.

Except for floss, where cotton and nylon are used. It is more slippery and a little easier to weave for beginners. But the knots require a stronger tie, because they unravel if careless.
- Pick up required colors. To create unique decorations you will need a set of floss.
- Secure the required number of threads using a clamp and paper clip.
- Follow the video tutorial instructions.
Macrame style
The knots used in macrame will help you create a special pattern. Already from the photographs you can see that these are openwork products that simply cannot be created using floss or ribbons.
They are woven from nylon threads. You will need 5 of them. Using a ruler, measure 2 pieces of 80 centimeters each, 2 pieces of 55 centimeters each and one piece no more than 25 centimeters long. You will also need a ring.
- Fasten the segments middle length on the ring. To do this, fold them in half and insert them into the ring, creating a loop. You need to thread the ends into it and tighten it. Such fastening will be reliable and motionless.
- Next, take a piece 80 centimeters long and fold it in half.
- We put it under the two central ones.
- We will weave using long ends.
First, practice on simple knots according to the following scheme:

With an image
For experienced craftswomen We recommend trying the technique with a pattern. She will hardly be disappointed by anything described above: these could be knots made of threads or patterns made of beads. The picture needs to be converted into a diagram with a picture, phrase or logo.

- Create the desired length of the product.
- Next, use the clasp of your choice. For narrow baubles, hooks are suitable; for wide ones, you will need to purchase a clasp.
- Sometimes it is necessary to make additional holes in it, which need to be drilled using a thin drill.
- If this is too difficult a process, sew on a button and make a loop at the other end.
With nuts
When creating jewelry, they use even more unusual objects: nuts.
- Look again at the description of the braid technique.
- When creating weaves, simply thread the thread through the hole in the nut and continue working.
- Decide for yourself where the nuts will be located: on both sides of the bracelet or only on one.

How to make a friendship necklace
Baubles are a symbol of friendship. Why not create a necklace in the same way? You can use any of the given techniques. Make a necklace from threads, floss, beads, with nuts and chains - it all depends on your desire!
What do baubles “talk” about?
Baubles are not only a symbol of friendship and affection. They cannot be sold, but only given as gifts. It is generally accepted that they fulfill a wish: you need to make it when weaving the third knot, and it will definitely come true.
It is believed that the presence of two identical baubles in people indicates their sympathy for each other. Those who wear white bracelets strive for freedom, and those who wear red bracelets strive for love. While tying them on your hand, make a wish, after a while it will come true.
If the bauble is untied or torn, perhaps your friendship with the person who gave it will soon come to an end.
Found an error in the text? Select it, press Ctrl + Enter and we will fix everything!Discuss
How to weave baubles for beginners
Baubles take their roots back to the times of the Slavs. By the way, in those days they were considered amulets and drove away evil spirits. Today, of course, they are used in the form of decoration. Moreover, both among the female and male population. Most often people get carried away with this at a young age, but it is still important to know the secrets of the correct execution of the product. This will be discussed in our material.
In principle, baubles are very quick and easy to make, and the material does not require much expense. More precisely, you can make it from any available ones - from threads, ribbons or beads. With the latter, of course, you need more time, attention and enormous patience.
Most often girls make baubles. Boys somehow have slightly different hobbies, and they lack perseverance. But wearing such beauty is equally popular among everyone. Now you can buy baubles at a stall or store. But you must admit that it looks much prettier with your own hands. And if you give a bauble dear person, then for him it becomes simply priceless.
First, it’s worth highlighting what types of weaving there are:
- oblique
- direct
- indefinite
Of course, for beginners it is better to first choose a simpler pattern and make it from floss threads. And you don't need to take it a large number of colors. Now it’s worth understanding the method of attaching threads.
- The easiest way is to use a clip that is attached to a thick notebook or book. After all, the threads must hold tightly so that they do not get lost in the process.
- You can use a large pin. The threads are tied directly to a pin, which is attached, for example, to the back of a chair or armchair.
- Each student has a tablet (board with a clip). And you don't need to invent anything. But to hold the threads more firmly, you can put a ruler.
- And it’s very simple and quick - using tape.
Main nodule
It can be called the basis for weaving baubles. Let's just say that if you understand its principle (which is not difficult), then, combined with imagination, you can create masterpieces.
- We take two threads, for example, red and yellow. Different colors to make it easier to understand
- And now the yellow thread goes along the top of the first one. When making a loop, we stretch our thread (yellow) between the first and second threads
- And this is how the knot is tied. It is important to ensure that they are the same size
Half knot
This knot looks like a spiral, which looks very interesting:
- In this situation, we take four threads. Two threads will be one color (red), two will be another (blue).
- And so important detail– the middle strands are stretched and secured. You can use a clamp, or even tape.
- Now we work directly with blue threads. We lay the left one over our main strands, creating a loop, and let it go under the right thread.
- Next, very carefully. We put the right thread under the main thread so that the left one remains in place. That is, it turned out to be a knot. But there is no need to tighten it.
- And then, we pass the right thread between the main and left threads so that it turns out on top.
- All! Now all that remains is to tighten this slightly intricate knot.

Flat knot
It also requires attention, since it is often used in this type of weaving. After all, it turns out to be very beautiful.
- You also need a thread, for example, yellow and a thread, for example, blue colors. And also, two main threads. That is, a total of four laces are obtained. For convenience, we will call them by numbers. Yellow is one, and blue will be the fourth.
- The principle of weaving is similar to the half knot, but the task is a little more complicated, let's say.
- So, we also pass the first thread on top of the main strands and run it under the blue thread.
- We put the fourth thread under them and bring it out on top of the yellow lace.
- Now pay attention! Do not tighten the knot. Again we put our first thread on top of the main strands and bring it under the blue thread.
- And we also bend the fourth fiber, put it in from below and bring it out from above the yellow thread.
- That is, let’s say, it’s like we tied a half knot twice.
The easiest and fastest way:
If you really want a bauble, but have no desire to weave, then you can resort to a little trick.
- We take 4-6 colors. More is possible, but the lace should not be too thick. But a thin one will not look so impressive.
- By the way, the length of the thread should not be less than 60 cm and more than 70 cm.
- We tie all the threads with a regular knot (“through the hand”). If someone doesn’t know or has forgotten, we’ll remind you. Hold one edge of the thread with your thumb and wrap it around your middle and index fingers. Then we thread the second end under the wound thread and thus form a knot.
- We attach it in any way. And we begin to twist. It just needs to be tight and strong, very strong. And so on until the very end of the lace. Then, with one hand we hold the end, and with the finger of the other hand we hold the middle of the lace. Bend it in half, pull it well and remove the finger.
- The threads themselves will begin to twist and thus in a fast way, it will turn out to be a bauble.
- Now all that remains is to fasten the ends of the bracelet.
In principle, this is the basic information that will help a novice master. Of course, there are other ways to weave, but in the beginning, you need to start with the basics.
How to weave baubles according to patterns?
The schemes were invented to make it easier to make some intricate pattern. After all, even if a drawing appears in your head, it is very difficult to bring it to life. As a rule, before any diagram there should be an explanation for it. But many still have questions about which direction the weaving is directed. After all, there are no detailed descriptions of the nodes.
It is worth noting that there are four nodes that are mainly used in circuits. We will call it that in order.
- Node No. 1 or the left one in the diagram is depicted as a cross with a circle. And the arrow in it is directed from left to right, down. Using the left thread, perform the main knot, which is described in the previous paragraph. It just runs twice.
- Node No. 2 or the right one has the same image, only the arrow is directed from right to left, also down. Accordingly, the thread with right side we make the main node. Also twice.
- Node No. 3 is shown with a curved arrow pointing to the right. We make the main knot with a thread on the right side, only the second time the thread is laid not on top of the main fiber, but from below.
- Knot No. 4 is also drawn with a curved arrow, only its direction is in left side. Exactly the same as in the previous case, but we work with the left thread.

As you can see, if you delve deeply, there will be no problems reading the diagram. And with an “experienced” hand it will be possible to complete any drawing of varying complexity. The main thing is to do everything carefully and strictly follow the instructions. You can change the color scheme as you wish, but then you need to be very careful not to confuse anything.
How to weave baubles from floss threads?
Most often, of course, baubles are made from floss. But this is not a limitation at all. They can be woven with different knitting threads, for example acrylic or six, you can use iris or cotton thread.
This is interesting! The apogee of the popularity of baubles occurred precisely during the times of the hippies. After all, they considered themselves “children of flowers,” and also had a great love for everything colored.
An important requirement is that the thread should not be too thick. After all, then you won’t get the expected beauty. No, sometimes they are made from thick laces or thick threads, but only according to a simple pattern and with a minimum number of colors.
- The big plus of floss threads specifically is that the color range is simply stunning. Knitting threads, unfortunately, have a less rich palette.
- In principle, weaving with threads is as easy as shelling pears. The main thing is to choose the necessary scheme that will suit you and your strengths. Therefore, at first there is no need to grab onto a super complex and intricate drawing. We have already described how to read the diagrams.

- By the way, when choosing colors, you should take into account the symbolism of both each color and their combinations. For example, red and green color speaks of love for nature. But a rainbow of seven colors speaks of joy, love, friendship and flowers.
- You can also decorate such a bracelet with various rhinestones, beads or chains. If desired, you can attach beautiful feathers to the bauble. The choice of all kinds of jewelry is simply huge, so they will help you make a bracelet in any style.
How to weave baubles from beads?
This type of weaving baubles is a little more complicated. And the main thing is to have great patience and great perseverance. But believe me, the result will be worth it. True, you shouldn’t grab onto a complex scheme either. To begin with, you should practice on a simpler version.
It’s worth noting right away that you will need:
- Beads - any: you can big, you can small and absolutely any color. The main condition is quality. The beads must be the same size and it is important that they have holes. Because a low-quality product contains defective beads without holes or only one.
- Fishing line, nylon thread or special thread for beads.

- Needle. But this is optional. If you weave with fishing line, you can do without it. And with a simple scheme, it will be enough to lubricate the tip of the thread with colorless varnish.
- Scissors and matches for finishing edges.
- Clasps. But it’s also not necessary, since they are often made with the same beads.
- Weaving machine. You can make it yourself from cardboard box. Make cuts along the edges at equal distances and pull the thread tightly. By the way, some schemes do not require a machine.
Option #1
This is the fastest and easiest option for bead weaving. More precisely, from beads. Because it will look much nicer if you take medium-sized beads.
- We attach three pieces of fishing line to the fastener
- Then we put beads (of any color) on each segment. The length should be slightly longer than the arm circumference
- And then we just braid the braid, and also attach the ends to the clasp
- That's all! Maximum five minutes and the bracelet is ready
Option #2.
Another fairly simple method that anyone can handle is the “canvas”. No machine required.
- We put the required number of beads on the fishing line
- Then each bead should be attached to the previous row separately
- To do this, you need to put a new bead on the fishing line, then go through the bead of the first row and return to the starting point. And again start with a new bead, which will already be attached to its bead from the previous row.
- This technique is very well used to make a drawing or inscription.

There are still a sufficient number of bead weaving patterns, but we will not dwell on them, since there are many videos on this subject on the Internet with detailed description. You just need to look at the type of weaving that interests you and try to make a bracelet yourself.
How to weave baubles from ribbons?
It is also a very popular decoration that is quite easy to make. The main thing is to understand the essence of weaving. And then it will be like clockwork. Naturally, let's consider the simplest method, which uses only two colors. For example, there will be white and black (their length is at least 1 meter).
- You need to bend the pieces of tape by about 10-15 centimeters. And put them on top of each other crosswise.
- Next, take the black tape (it will be on top) and wrap it around the white strip and return to the starting position. The result should be a small loop.

- Next we thread the white ribbon through this loop.
- And carefully tighten this knot with black tape. It is important not to tighten it too tightly, as it will ruin the whole look.
- And then we thread a long piece of black ribbon into the white loop (this should also form an eyelet). Tighten it again and thread the loop through. And so you need to do until you get the desired length.
- At the end, fasten the ribbons with a knot, and you can attach a clasp for convenience.
Round bracelet
This option is a little more complicated than the previous one, but it also turns out nicer. We will also take a dark tape and a light one for ease of perception.
- Fold them crosswise and secure with a pin. For example, a dark ribbon will be on top.
- Then we bend the light ribbon like the letter “P”, only rounded (or in the form of an arch, as they also call it) to the left.
- We wrap the dark ribbon in the same way, but downwards. The result should be four points of contact between the tapes.

- Then we do the same with the other ends of the ribbons, but in the other direction. That is, the light ribbon goes to the right, and the dark ribbon goes up. It is important to ensure that the lines are perpendicular to each other.
- The knot you have made needs to be tightened well (should resemble a square).
- Such manipulations with ribbons must be done until the end until the required length is obtained.
- Pieces of ribbon can be used as ties. The result should be a bracelet, like a strand of ribbons.
How to weave baubles with names?
Ribbons with various inscriptions or names are very popular. And such a gift will clearly be appreciated by the dear person for whom it was intended.
- It is worth noting that you can weave from threads or beads, and color scheme you can choose absolutely any one. But it will look much better if you choose two contrasting colors. So that the inscription is clearly visible.
- You need to spell out your name in squares or use ready-made letter stencils.
- And already, following the pattern, weave a bracelet, and also do not forget to change the color in time.
- You should also calculate how long the name will take so that the edges of the bracelet are the same.
- If the bracelet is made of threads, then you need to use simple circuits weaving, the knots of which have already been discussed above.

- If - from beads, then the most successful method will be the “canvas”. You can also use the “cross” technique, but the inscriptions on it do not look so impressive.
How to weave baubles with straight weave?
This is the most common way of weaving baubles, and most importantly - fast and varied. After all, you can use absolutely any scheme and use completely different colors.
First you need to select the threads.
- Main or leading thread. I think everyone understands that thanks to it the bracelet is made, and the color depends on it. It is not cut from the ball and, as a rule, at least 5 meters are needed.
- The main thread is the thread on which the knots are attached. Therefore, the color of the bracelet is practically not affected; more precisely, only the outer threads remain visible.
- Additional or auxiliary threads. They help create the necessary drawing.

To make a bauble with straight weaving, you first need to choose a pattern and color scheme.
- You can attach the threads in any convenient way
- There is also a little trick - in order for the rows to be even, they need to be pressed with a ruler
- We begin to work with the left thread, which moves to the right
- But we do the next row in the opposite direction
- And, if the drawing requires it, then do not forget to alternate colors or introduce new ones
- And so we do the necessary color until the very end. Just don’t forget to make two knots
- If you are going to create a drawing, then you should definitely calculate how many rows there will be before and after
How to weave oblique baubles?
This method of weaving baubles is considered the simplest and is perfect for beginners. The fact is that the rows do not go strictly in one line, but seem to have a slight offset (about half the length of the knot).
- To begin with, it is worth noting that the threads in this method are not woven during the work. The entire bracelet is made with the same threads that started
- Schemes most often provide for a paired number of fibers

- Since the types of knots and reading the diagrams have already been explained above, all that remains is to add that for oblique weaving there is only one rule. This is following the instructions.
As you can see, if you wish, you can create a bauble using absolutely different weaving and threads. And the variety of patterns is simply huge, which includes various designs and colors to suit every taste. Therefore, you can make any bracelet. And most importantly, it will be an exclusive bauble. Develop your imagination, and we hope our tips will become an excellent practical guide for you.
Video: “Straight weave baubles with letters”
Baubles made from floss are also called friendship bracelets; they are given to friends and girlfriends. After you give a few baubles to your girlfriends, those who want such a gift will line up.
In order to weave baubles from floss, you will need floss threads of different colors, scissors, a ruler and adhesive tape, with its help the threads are attached, for example, to a table. Since weaving a bauble is a long process, you should make yourself comfortable in a well-lit place.
Well, let's start analyzing the methods of weaving baubles. There will be a lot of them, and we will try to describe everything as detailed and illustrated as possible.
1. How to braid a braid
The simplest weaving used in baubles is a braid. Yes, the most ordinary braid. It is woven with three threads. Often the ends of baubles are braided with a pigtail. In this case, there are of course more than three threads, but then all the threads are simply divided into three groups and the braid is woven. And at the end of the braid, a regular knot is tied so that the braid does not unravel. But there are also more interesting and beautiful options how to braid threads, if there are more than three, into a pigtail. Let's look at them.
Pattern for braiding a four-strand braid. Using the same principle you can weave from any even number of threads(six, eight, ten, twelve, fourteen and so on). At each step, we take two central threads, move the left one to the right edge, and the right one to the left, and so we weave.
 Scheme for weaving a braid of five threads (aiguillette cord). Again, using this weaving pattern you can weave from any odd number of threads(seven, nine, eleven, thirteen, fifteen, etc.). The essence of this scheme is that we take the left thread and move it to the center, then move the right one to the center and repeat the required number of times.
 The second way to weave a braid with five strands.
 The third way to weave a braid with five strands.
 Six-strand braiding pattern.
 Another way to weave a six-strand braid.
2. How to weave baubles with oblique weaving

 This is a very popular weaving of baubles. There are a huge number of patterns for weaving baubles with oblique weaving. On our website there is an article on 50 patterns for weaving baubles and a separate category for baubles patterns, where patterns are added every day (usually two per day) and represent the pattern itself, as well as photographs of baubles woven according to this pattern. Usually the photos are different, that is, the scheme is the same, but the colors are different. Go to the Baubles Schemes page and choose what you like, and follow the updates. And now you can create a bias weaving pattern yourself using our new generator.
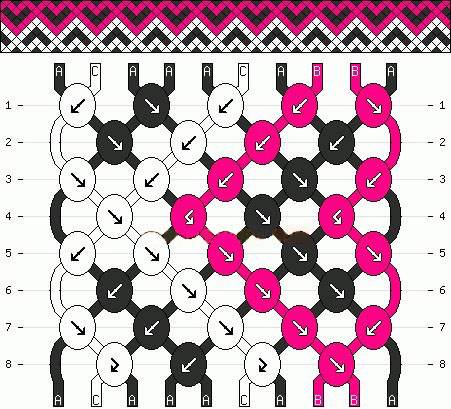
In oblique weaving of baubles, 4 different knots are used, they are designated differently and are woven differently. Such baubles should be woven in rows from left to right, or from right to left, and not in any other way, and not as the arrows show. In this case, the arrows only show which knot needs to be tied. You can learn how to weave baubles with oblique weaving using our master class: .

3. How to weave baubles with straight weave with two colors (including baubles with names)
 There are already articles on this topic on our website that tell how baubles are woven using straight weave. This is a master class on how to weave baubles with names and a Generator of patterns for baubles with names. On the generator page you can create your own individual bauble design with any name or text.

4. How to weave baubles with straight weave with a large number of colors
 Straight weave baubles with two colors are woven differently than baubles with many colors. In this article we will not describe this technique; it deserves special attention. We analyzed this weaving in the master class. You can create your own bauble pattern thanks to our Straight Weave Bauble Pattern Generator.

5. How to weave baubles with sharp arrows (braid)

 To weave this bauble, take floss threads a little more than a meter long. 6 colors, 2 pieces of each color. Lay out the threads symmetrically, connect them into a bundle and tie them in a knot at a distance of 7 centimeters from the edge. Thread a pin through the knot and attach it to a pillow, or glue the beginning of the bauble to the table with tape. Divide the threads in half.
Start on the left side with the outer color, ours is red. Using this thread, make a figure of four over the second thread, then pass the first thread under it and thread it through the hole as shown in the photo. 
 Tighten the knot by pulling the first thread upward to the right. Repeat this knot again, you will get a double knot, this is what the whole bauble will be woven with. Thus, our first thread moved from the left side one position to the right and became the second. Using exactly the same knot, we tie the second thread around the third and so on until the second thread reaches the center. This is one half of the bauble.
Now take the thread from the other side, ours is also red. We will make knots from right to left. To do this, we do everything symmetrically: we bend the red thread over the orange one in the form of a mirrored four. Then we also thread it inside and tighten it to the left up. The main thing is not to forget that this knot must be made twice on each thread. 
 We continue to knit knots with this thread from left to right until it reaches the middle. Tie a knot with two middle threads of the same color in order to tie the halves together. So we have finished the first line of our bauble. The remaining rows are knitted in exactly the same way with two outer threads of the same color.
 When you finish the bauble (you can tell by simply trying it on your hand, only take into account a little free space in order to tie the bauble), tie a regular knot using all the threads, and then braid it.
This bauble can also be made asymmetrical; to do this, first lay out the threads without symmetry. If you don't stop in the middle, you will end up with a classic oblique braided bauble. Don't forget that the knots need to be tied twice. And don't skip the middle when you knit.

6. How to make a bauble with rhinestones

There are many ways to weave baubles, and we will also look at how to make any bauble more unique and shiny.
 We make a bauble with rhinestones. To do this, we will need a ready-made bauble (we will take a woven bauble with arrows), a chain with rhinestones, a floss thread, a needle and scissors.
 Thread the needle and tie a knot at the end. Pass the needle through the bauble from the bottom up at the very beginning of the bauble. Or, to better hide the knot, you can thread the thread through the knot at the very beginning of the bauble. Place a chain with rhinestones in the center of the bauble.
Make a stitch between the first two rhinestones. Then pass the needle from bottom to top again, this time trying to get it in the middle between the second and third stone. 
 Continue this way until the end of the bauble. After the last stitch, tie a knot with reverse side. Or again, thread it through the knot at the end of the bauble. Then trim the edge of the thread.
Our bauble with rhinestones is ready.
7. How to make a bauble with thorns

 To create a bauble with spikes we will need: any bauble, 5 chrome spikes with fasteners, a screwdriver and scissors.
 Make marks with a marker to ensure even placement of the spikes. Use a ruler, or calculate by thread. Pierce in the marked places with scissors so that the screw can come through.
 Place the screw through the hole and screw it into the tenon using a screwdriver.
Repeat with the remaining spikes in the same way. That's all! Our thorned bauble is ready.
8. How to make a bauble with a chain

 In order to make a bauble with a chain, we will need: any ready-made bauble, a short chain with large links, a floss thread, a needle and scissors.
 Thread the floss thread through the needle. Then untie one knot at the end of the bauble and tie it together with the end of our thread. On the reverse side, thread the needle first from the very edge of the bauble.
Place the chain near the bauble and thread the needle through the first link. Pass the needle through the back of the baubles again, so that the needle is near the second link of our chain. 
 Continue this way until the end of the bauble. The chain will need to be adjusted to the length of the bauble. To do this, straighten the link that extends beyond the length of the bauble and remove the rest of the chain. Make two stitches on the last link. After this, untie the bauble knot and tie it together with our thread.
Trim the remaining thread. Your updated shiny bauble is ready. Does she really look brighter now?

9. How to weave baubles with nuts

Using ordinary hex nuts you can weave a very original bauble. It somewhat resembles a spine. This bauble will look great on a guy’s hand. And nuts can be bought at any hardware store in different colors and sizes.
 For this bauble we will need a spool of cotton rope, hex nuts (the quantity depends on you) and scissors.
 Take three ropes, tie them into a knot, leaving ends 5-10 centimeters long free. After the knot, start braiding with a regular 3-5 centimeter braid.
Next, before making a strand with the left thread, put a nut on it, press the nut tightly to the pigtail and make a strand with the left thread. If your thread or rope is not very thick, then you can make a ring inside the nut (by wrapping the nut with thread), and then weave further. This way, the not very thick rope will not wear out very quickly. 
Hold the left nut with your finger. Before making a strand now with the right thread, put a nut on it and make a strand. Hold the nut with your finger in the same way so that it is pressed tightly against the pigtail. 
 Then there will be a new thread on the left, thread the nut and knit the bauble in the same way. We try to knit tightly so that the nuts do not dangle or become loose after a couple of days of wear.
 We repeat the steps and weave a bauble. We calculate the required length according to our wrist, taking into account the free space before and after the nuts.
 After we have finished braiding the nuts, we again make 3-5 centimeters of a regular braid, tie a knot and leave another 5-10 centimeters of the free end of the ropes.
We wrap the bauble 2-3 times around the wrist and tie it. Our bauble with nuts is ready!

10. How to weave baubles and tied chains

 Shiny chains tied with multi-colored floss threads look impressive, right? And they are made very simply. Let's learn how to weave them. We will need: a chain with large links, floss threads of different colors, two hair clips and scissors.
 Let's cut 2 sets of 15 threads each. The length of one thread should be 4 times the length of our bracelet. Tie both sets of threads into one knot, leaving 5 centimeters free. Put a pin on each set of threads; they will help you easily thread the threads into the links of the chain and weave a bauble.
 Place the threads to the left of the chain. Pull the first set of threads through the first link of the chain using a bobby pin, as shown in the photo.
 Place the second set of threads on top of the first. Thread the second set of threads through the same chain link from the bottom up.
 We move on to the second link, again put the first color on top of the second and thread it into the second link from the bottom up. We repeat in the same way with the second color. We have a chain with fairly large links, so in each link we make a braid with each set of threads. If you have a bracelet with smaller links, you can weave one pass into each link.
 Repeat the steps until you reach the end of the chain, then tie a knot and trim the ends. So our bauble is ready. You can tie the chain on both sides, it will also turn out interesting. To do this, simply turn the chain over to the other side and weave according to the same instructions.

11. How to weave a friendship necklace
Let's learn how to weave a wonderful necklace. It looks interesting. It can also be given as a gift, just like a friendship bracelet. And they are quite easy to weave.

 Well, we will need: cotton rope, floss threads, nuts and washers, spools of thread and scissors.
In order to make a necklace of two colors, we take two skeins of floss and wind them on spools to make it easy to weave. Then we take a rope of the required length and tie it together with the threads in one large knot. We fasten the end with tape to the table, or with a pin to the sofa. Let's start weaving in red, which means we hold the purple color in our left hand so that it is taut along with the rope. We take the red color in our right hand, make a loop in the shape of a four with a thread over the rope, then thread the spool into the resulting loop from the bottom up (see photo) and tighten the knot by pulling the spool up to the right. We repeat this knot many times until you decide to change the color.

Changing the color is very easy. To do this, simply transfer the red spool to your left hand and pull it, and with the purple thread we begin to knit knots, as described above.

You can change the colors as you wish. You can add washers or nuts in the middle of the friendship necklace and then tie the knots again. When you are finished knitting, untie the first knot and tie both ends of the necklace into one knot. In addition, the necklace will look much more interesting if there are more colors. You can weave a large number of thread colors in the same way, just hold all the currently unused thread spools in your left hand. It turns out such beauty!

12. How to weave a bauble wrapped chain with rhinestones

 For this bauble we will need: 110-140 centimeters of leather cord one and a half millimeters thick, 30-40 centimeters of a chain of balls or crystals, 150-180 centimeters of thread, a brass nut and scissors. The length varies depending on your wrist size. It is designed to be wrapped twice around the wrist and tied.
 Fold the leather cord in half to create a loop. The size of the loop must be selected in such a way that the nut, which will act as a fastener, fits tightly into it. Run the thread along a leather cord a couple of centimeters long. Then we begin to wrap the rest of the thread around the cord in the opposite direction from the loop. Pull the thread tightly so that the end does not jump out and unravel.
 Place a chain with balls between the two halves of the leather cord. Wrap the thread tightly between each individual ball.
 Continue wrapping the chain until the bauble reaches the required length.
 When you reach the required length, tie a knot with three threads (thread and two halves of leather cord).
 Then thread the nut and tie another knot. Trim off any excess ends.
 The bauble with wrapped rhinestones is ready. Please note that the size is designed for two rings around the wrist. If you want to make one turn, or vice versa more, calculate in relation to these dimensions.

13. How to weave macrame baubles
Square knots, which are used in macrame, also look very impressive in baubles. Only we will take brighter materials. Instead of thread, we will use nylon cord of different colors. Add shiny metal and stones and get shiny macrame baubles.

a href=”http://3rebenka.ru/articles/544-kak-plesti-fenechk...ss-10-foto-1-video.html”  So, we will need: four meters of nylon cord half a millimeter thick, metal jewelry or stones, a needle and scissors.
 Cut the nylon cord like this: 2 pieces of 75 centimeters, 2 pieces of 50 centimeters and 1 piece of 25 centimeters. Fold one half-meter piece of nylon cord in half, thread the resulting loop into the ring, and thread the end of the thread into this loop and tighten. Repeat with the second half-meter end on the other side. This way we will fix the ring. These threads will remain motionless for us.
Take one piece of nylon cord 75 centimeters long, bend it in half and place the center under the cord tied to the ring. Turn the right part of the cord to the left, place the left part of the cord above the right and thread it into the loop formed on the right from the bottom up as shown in the photo. 
 Pull the knot tightly and push it up until it stops.
 Next, we turn the left part of the cord to the right, lift the right part above it, and then thread it into the loop on the left in the same way from bottom to top and tighten the knot. It turns out to be a mirror image of the previous node.
 We repeat the knots left and right until the required length of the bauble is reached. Please note that the fastener will take up about one and a half centimeters.
When you're done, take the left side of the cord first and thread it along the center part 4-5 knots from the back of the bauble. 
 Repeat the same steps with the right half of the cord.
 When you thread the cords, cut off the excess part, and the small pieces that remain sticking out can be additionally melted and sealed using a lighter for better fixation. We weave in the same way on the other side of the ring with a second piece of cord 75 centimeters long.
 Next we will make it so that the bauble can be moved apart and tightened. It will turn out solid and without knots. Take the piece of cord that we cut off as extra and temporarily tie the cords of the ends of the bauble together.
 Next, take the last piece of nylon cord 25 centimeters long, fold it in half, and start knitting the same left and right knots as we knitted earlier on the bracelet itself.
Make knots about one and a half centimeters long. Thread the ends of the cord that we knitted back and seal them with a lighter. Remove the temporary knots that tied the two ends of the bauble. 
 Thus, with the help of the central cords we can now adjust the size of the bauble. Select the desired length and tie knots at the ends, and then trim off the excess.
All. The adjustable macrame bauble is ready! As a decoration in the center, you can take whatever your imagination comes up with.

14. How to weave beaded baubles

 Let's make another unusual bauble - threads plus beads. For this bauble we need 1.2 meters of thread, beads, a button, and scissors.
 Cut the thread into two pieces, one 70 cm, the other 50 cm. Fold the long thread in half. Then attach one end of the short thread to the ends of the long thread and make a bend at half of the long thread. Look at the photo what it looks like. You get a loop and three ends of thread 35 centimeters long and one short end.
 We tie a knot, leaving a loop of such a size that the selected button fits tightly. Then cut off the fourth short tip.
 We begin to weave a regular braid with three threads. After three centimeters of the braid, we thread the beads onto the left thread.
Press the beads onto the braid and cross the center thread with the left thread. Now put the beads on the right thread and cross the center thread with the right thread. 
 Hold the beads with your finger as you weave to make the bauble tight. Continue braiding the braid, alternately threading the beads from the left to the right.
 When the size of the bauble is sufficient for your hand, we again braid a bead-free braid of the same length as at the beginning. Tie a knot at the end.
 After the knot, put a button on the threads and tie a double knot.
 Cut off the excess part. So our bauble with beads is ready.
You can take threads and beads of any colors, try, experiment, you will like it!

15. How to weave a bauble with hooks
Let's look at another option on how to weave baubles. This will be a bauble with hooks. It is not difficult to make, in addition, it has one interesting advantage, which I will talk about at the end of the master class.

 Well, let's get started. For this bauble we will need:
- a cord 2 mm thick, about 60 cm long, instead you can use flexible wire, twine, or something similar;
- copper hook;
- ruler;
- pliers;
- lighter.
 Before you begin, seal the ends of the cord with a lighter so that it does not unravel when worn. Take a pair of pliers and bend the hook on one side until it stops so that the cord cannot come out. Bend it on the other side too, but so that the cord can pass through.
 Now we will make an adjustable knot. Thread one end of a 6-inch cord through the fully curled side of the hook. Bend 8 centimeters of the cord back towards the hook, 5 centimeters of which turn towards you. We will tie a knot with this end.
 Wrap it around all the threads, making two circles towards the left loop. Thread the end through the left loop.
 Hold it with your left hand and with your right press the skeins to the left until the knot is tied tightly. You can check that you have tied the knot correctly by holding the hook in your right hand and pulling the cord with your left. The knot should move close to the hook.
 At the other end of the cord you need to make the same knot. There is no need to thread it through the hook. In this case, the turns of the end of the cord must be wound in the direction to the right.
 Pass the end of the cord into the right loop and tighten the knot, moving the turns to the right as well.
Trim the ends of the cord and resolder them with a lighter if necessary. Now our bracelet is ready. It needs to be wrapped around your hand 2-3 times and adjusted with the second sliding knot.

And now interesting point. Instead of a hook, you can use anything. You just need a hook on one side, and on the other you can drill a hole if necessary. This is how you can make this bauble for a guy. Especially if he is a fisherman, it will be very relevant. A designer version of a fish hook is used here.

If you show your imagination, you can use any item that can highlight and convey the owner’s hobbies. For musicians, for example, you can take a keychain in the form of a note, on one side you can fasten the cord to its tail, and on the other, drill a hole in its base. It will also look stylish and interesting. Show your imagination and surprise your friends!
Handicrafts, . You can follow responses to this entry via RSS.
You can leave a response, or trackback from your own site.
A bauble is a bracelet made by hand from beads, threads, wool or leather. Historically, the art of weaving such bracelets originated in the North American Indian tribes, where they were decorated with feathers, beads and embroidery. Baubles gained enormous popularity in the 60s of the 20th century with the development and spread of such a subculture as hippies. Then these items began to include not only thread bracelets, but also headbands, decorative bags for documents and small items.
Initially, the bauble is a symbol of friendship and sincere sympathy. They were given as recognition of eternal devotion, as a symbol of involvement in something, and even as wedding bracelets.
Moreover, even combinations of colors and patterns had their own meaning, which was easily interpreted by those who knew the designations. Therefore, the colors of the future product were selected carefully and taking into account the personal qualities of the person for whom the bauble was prepared as a gift. Bracelets were made for friends, family and loved ones, and making them for yourself was considered bad manners.
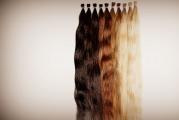
In principle, you can weave baubles from any convenient material at hand, however, being one of the special types of macrame, they are more often made from wool threads, iris or floss.
Baubles from threads can be woven in two ways - straight and oblique weaving. The first is considered the simplest, but often it is with this that most questions arise. About how to weave beautiful patterns oblique weaving can be learned from special patterns, which will be discussed a little later.
The second, direct weaving, requires a lot of concentration and dexterity, however, using the same patterns, with this type you can weave a beautiful personalized bracelet, a picture bauble or your own original print. Cross stitch patterns or those drawn on your own on a piece of notebook work well as patterns.
Direct weaving uses two types of knots - forward and reverse. Moreover, the warp thread and the pattern threads always go crosswise (toward each other).
Before you start weaving your bauble, you need to roughly determine the length of the future product, choose the colors you like best and arrange them in in the necessary order. It should be remembered that knitting knots significantly shortens the leading thread, which means that it is necessary to take threads 60–80 centimeters long.
Learning how to weave baubles is not difficult, the main thing is desire and interest, as well as positive emotions invested in your creation.
How to secure threads for weaving baubles?
When weaving, the threads twitch, fall apart and crawl away, which greatly complicates the work. Therefore, weaving a bauble begins with securing it.

You can attach the future bauble to anything and everything - even on a hard table surface, even on a soft pillow. It all depends on what position and under what circumstances you do it.
The simplest and most convenient way is to secure it with tape. To do this, the threads are laid out in the required order and secured with a piece of tape or tape.
All you need to do is make sure that the thread does not come out from under it and sometimes, for convenience, as you weave, attach the “overgrown” tail to the surface. Thus, you can weave both at the table and by attaching the future product to any other hard surface - a board or a book.
The next method assumes the presence of a regular safety pin. Each thread, including a tail for tying, is tied in the required order, and the pin itself is attached to the fabric of a pillow, tablecloth, carpet or clothing. However, there is a significant drawback - the beginning of the bauble is not always smooth; sometimes you have to straighten it yourself.
You can immediately make a loop fastener on the bauble - the required number of threads is folded in half, the leading thread is tied to the beginning of the loop, then the warp threads are braided at once as many times as required for the required size of the future loop.
As soon as you think it’s enough, you can start weaving. The method is convenient for starting direct weaving, which has already been discussed earlier.
You can also use office clips, clothespins, fasteners from hardware stores, paper clips or clipboards.
In general, there are a great many ways to start a bauble. It all depends on imagination and the means at hand.
Often baubles are woven on the road, in cars, or while traveling. All the methods listed above are good for securing threads in any conditions.
Learn about weaving baubles from threads from the proposed video.
Knots for weaving baubles from threads
In order to start weaving beautiful thread baubles, you need to remember the four main knots and their designations in the diagrams.
There are only two simple (loop) knots - the right and left loop knots.

To make the first one, it is necessary that the working thread is to the right of the knot thread. Rows consisting of such nodes go from right to left.
The working thread for the left loop knot should be in the opposite position. The rows go from left to right.
These knots are most often tied in pairs.
The following types of nodes exist:
- straight (left-left);
- reverse (right-right);
- left tatting (left-right;
- right tatting (right-left).
The execution of these knots can be learned by carefully studying the weaving patterns.
At first, it seems difficult to delve into all the nuances of such a simple matter as fennel weaving, but soon after you start working, your fingers will automatically begin to tighten the knots and shift the threads in the right directions.
Patterns for weaving baubles from threads
Like patterns for knitting or embroidery, all these knots in their various combinations can be found in special patterns. For those who are just starting to weave and are not sure that they will be able to create their own unique masterpiece the first time, there are special patterns for weaving baubles from threads, in which everything that was described in the paragraph above is described in detail and clearly.

It’s always easy to find them on the Internet or in books on needlework - from simple ones with a few threads to more complex and voluminous ones with 20-30 or even 40 threads.
Some of the simplest baubles are woven without patterns at all. However, in order to weave an original, beautiful bracelet, it is still worth learning how to disassemble the patterns. Reading them is not so difficult - you just have to remember the special symbols four types nodes and determine what kind of circuit it is - with a full or incomplete cycle.
A cycle is defined by the arrangement of threads. If the diagram shows correct location threads and color sequence on both sides of the product, then the cycle is complete.
If the threads from the end and the beginning do not match, then the cycle is incomplete.
Schemes also come with an even and odd number of threads in the bundles. This means that there will be more of one color than another.
At first, it’s quite difficult to figure out what’s what, but constant work according to the schemes develops the movements to the point of automatism.
How to decorate thread baubles?
The bauble itself is an original and beautiful decoration that suits almost everyone and everything (with very few exceptions). However, you can still add something to it, making an ordinary string bracelet unique.

Craft stores now sell a variety of fun, cute and beautiful jewelry, which you can always add to your bauble.
For example, a thin bauble can be complemented by sewing a small chain or a strip of rhinestones onto it. And by choosing cute beads, sequins and seed beads, the bracelet can be made in any style - from classic to punk.
Bracelets made from natural threads (such as wool or cotton) can be complemented with wooden beads or other “natural” materials.
You can decorate your thread product in Indian style by sewing several bird feathers and beads to the bracelet. Those who know how to embroider can embroider a name or ornament on top of a wicker product, making the bauble personalized.
Such jewelry, complemented by beautiful details, can be an excellent gift for a holiday or memorable event. Besides, beautiful baubles Suitable for both adults and children, boys and girls.
In contact with
Every girl wants to have exclusive jewelry. Beaded baubles are beautiful youth accessory. He is known to many people around the world. Initially, the bauble as an ornament flourished in popularity during the period of hippies and perestroika, when new fashion trends burst into people’s everyday lives.
A mixture of beading and weaving allows you to make bracelets and beads of various styles, both more discreet and elegant


So are children’s ones - with various bunnies, flags, inscriptions, hearts.


We will learn how to weave a beaded bauble easily and simply, and master classes and patterns will help us.
What materials will you need
To work, you need to purchase certain tools and materials: it will be difficult for you to do without them. But a video or step-by-step tutorial will tell you how to weave beaded baubles for beginners.
The work requires:

Fastenings can be very different

The designs for beaded baubles are varied. If you are just starting your journey into the world of needlework, choose simpler items and weaving techniques. You can start weaving on specialized machines. If you don’t have one, you can make a homemade one. To do this, you will need a hardcover book or cardboard box.


Homemade machine out of the box
Simple weaving methods and patterns for beginners
On the Internet there are many patterns for weaving various animals, emoticons, mosaics, letters, flowers and other shapes. Step-by-step master class lessons will help you master weaving baubles from beads.
Photos of all the baubles from the section
Weaving technique "Cross" and its varieties
Let's learn how to weave beautiful beaded baubles using this technique. It is very common and simple. The Cross technique is suitable for beginners.

If you weave in a single row, the product turns out narrow. But if you wish, you can make more massive and wider products. For this:
- weave several baubles of the same length and width, connect them together;
- increase the amount of material. For example, take not 4 beads, but 6 or 8. But keep in mind that you will have to take a longer thread;
- weave beads, stones, glass beads into the bracelet;
- weave in turning rows
 Weaving option diagram
  Options for using beads
 Weaving baubles “Cross stitch”
The algorithm for making a bracelet is as follows:
- We take two threads. We attach a needle to each one.
- We string 4 beads onto the right needle and push them to the middle of the thread.
- We pass the needle and left thread through the last (fourth) bead. Make it crosswise. In this case, your two needles have swapped places. To avoid confusion, you can lightly tint the edges with nail polish in contrasting colors.
- Place 1 bead on the left needle and two on the right needle.
- Pass the left needle crosswise through the last (seventh) bead.
- Weave the bracelet to the length you need.

Video lessons
Bauble with a cross
Wide bauble with a cross
Schemes of drawings for baubles


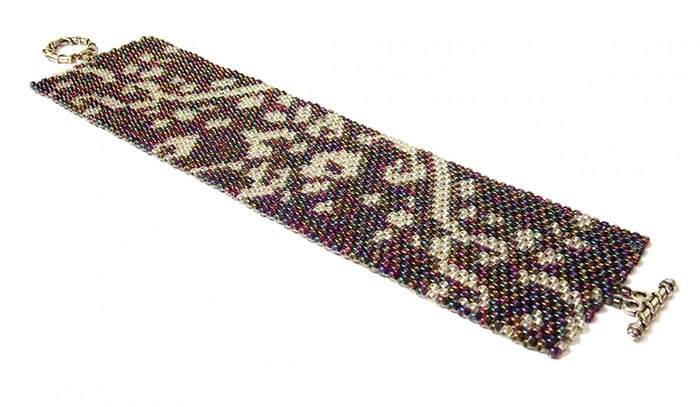
Weaving technique "Canvas".
Hand weaving or tapestry weaving.

This technique allows you to obtain a uniform canvas. It can be either plain or with various patterns, inscriptions and names. Even a beginner who sees beads and a pattern for the first time will get beautiful beaded baubles. Weaving patterns of this type are carried out according to the following algorithm:
- Measure the thread to the required length.
- String 10 beads on the thread one by one.
- Pass the needle through the third one from the edge.
- Next, place a bead on the thread, and insert the needle into the fifth bead from the edge. At the end of the row the thread is pulled together.


Personalized beaded baubles
If you want to make a personalized product, first find its diagram. If you don’t have one, draw it yourself on a sheet of paper in a box. Each cell is one bead. Mark where the colored beads - letters - will be located.

Patterns for weaving personalized beaded baubles involve working using the “Canvas” technique. This way you can achieve the optimal width of the product, weave not only the name, but also various decorative elements– beads, stones.

Video lesson
Personalized bracelets can also be woven on a loom; more on this later in the article.
Weaving technique "Flower"
A bracelet made using this technique is suitable for girls or young girls. And if you skillfully use materials, then even business woman. After all, tender openwork decoration in milky golden shades can refresh a spring look or an evening dress.

The technique is:
- On the thread, place the number of beads corresponding to the flower petals (6-10), in our case - 8.
- Close them in one circle and go inside again so that the thread comes out in the outermost bead (8th).
- Place a bead of a different color on the thread; this will be our leaf or the beginning of another flower. Place the needle at the beginning of the bracelet (at the 4th bead).
- Collect 8 beads, close them into a ring after 5-6 of the previous flower. Go around the circle to come out with the needle opposite the 5th bead.
- Take beads of a different color and repeat the algorithm as necessary.


Video lessons:
Openwork bauble with a floral pattern
This product can be given as a gift to a friend or you can safely wear it with various outfits. Depending on the color of the materials, the decoration can be matched to business suit, jeans, dress.
Openwork baubles are made using large beads and stones. This combination with ordinary beads allows you to achieve an unexpected effect.

They can be woven on one or two threads. Let's consider the last option.
For work you will need large white, blue and lilac beads and small matte beads of blue or pale blue color.
- On two fishing lines, collect 6-10 beads.
- Thread a large white bead through both fishing lines (this will be the petal of our flower).
- Now put lilac and blue beads on the left and right fishing line.
- Now thread both lines through the white bead. Unfold the lines back and turn out the petals. String 2 lilac beads on both fishing lines, pass them through the white one. The first link is ready, use the same algorithm to make the next flowers.
- Place a lock on the fishing line.
 Options for openwork beaded baubles
 Master class on weaving baubles "Pigtail"
Jewelry in this style can be made from single-color or multi-colored beads. The simplest braided bauble is woven in this way:
- Take 3 pieces of fishing line and secure them in a lock.
- For each fishing line, collect a chain of beads (25-35 pieces).
- Braid the braids from the fishing line and secure the second part of the lock.


If desired, you can use this technique to make beads, belts and chic massive bracelets. To do this, take beads different sizes, glass beads and more threads.

Weaving technique "Mosaic"

The mosaic technique is similar to the “Canvas” technique that we described above, but it is somewhat more complicated.
- Collect 9 beads (or any number, the main thing is that it should be odd).
- Thread the line through the fifth bead.
- Place a bead on the fishing line and thread the end through the sixth from the end.
- Add another bead and thread the line through the very first one. Tighten the thread.
- In the third row, string a bead onto the fishing line and insert the fishing line into the first protruding bead.
- By analogy, weave the following rows.


Video lesson
This technique requires skill, but with time everything will work out!
Weaving baubles on a machine
If you are a professional beader or weaver, you will need a loom. When there is a large flow of products, it is convenient to make bracelets and linens on it.

You can work on the machine using any technique. You secure the thread or fishing line. This device is very convenient for weaving wide bracelets or belts.


Video lesson
Advice from experts will help you in making beaded baubles:
- Choose the color scheme of your future bracelet depending on your clothing style or taste preferences. Do not forget about the compatibility of shades.
- If you are a beginner, then take as a basis for your first bauble simple techniques- braid, canvas.
- If necessary, look online on how to make your own beading machine.
We wish you good luck in your endeavors! Once you master one weaving technique, you will certainly want to get acquainted with another, more complex one. We will always help you in this matter!